
*DATE is written in American Format MM/DD/YYYY
Intro
Programming 3, will be using Visual Blueprinting on Unreal Engine
WEEK 1 - 1/22/2024
To start off with, we went over the Unreal engine, and the key uses some functions and variables.
Because we will be using visual scripting, he went over a nice rundown of things we need to know while using the event graph, like inheritance, which is when you give code obj the same functionality behavior from the re-existence class & Instances, where you take copy original obj and change with new behavior to be different. The event begins & Tick is what will be used to start the function in the game instantly, The Event begins play starts immediately when the game starts and triggers functionality that meets the requirements met that the code wants, like "if the game starts the code was like wait 5 sec and text pop up" that will happen or "if you walk on collision box you die". At the same time, Tick is running code every per frame.
When naming variables, I went over making simple, not what to do, and using certain naming conventions the one that the prof encourage uses the camel case convention. Even simple use of underscore instead of space( which I am aware) and name-specific var behind the name.
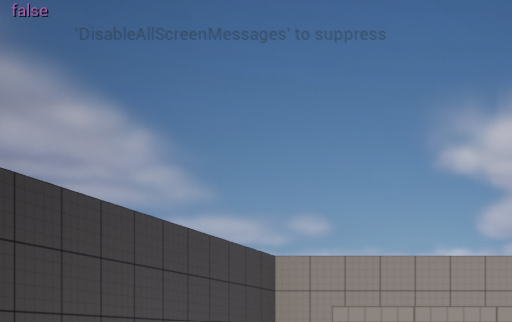
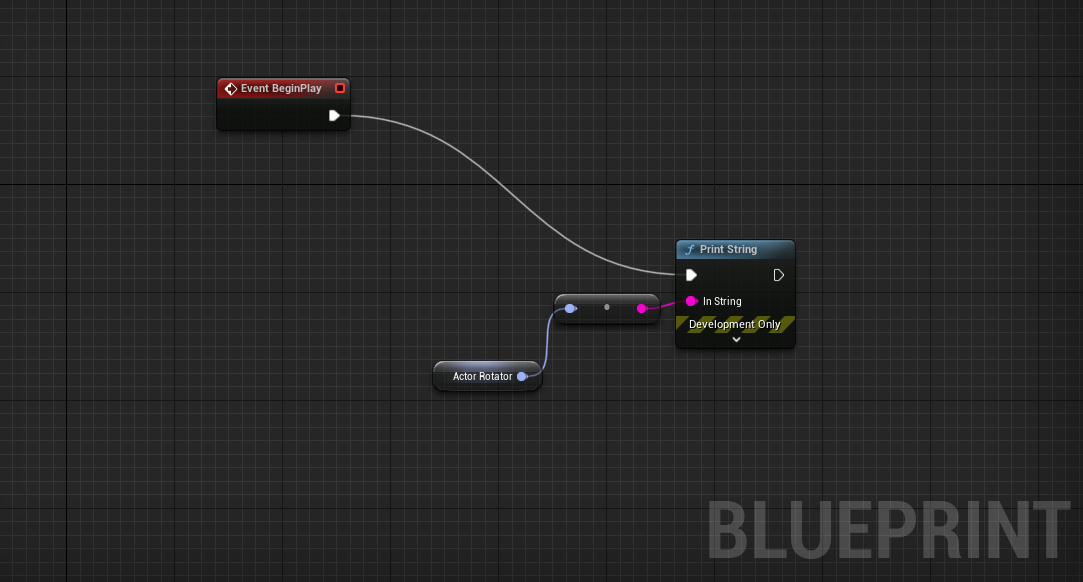
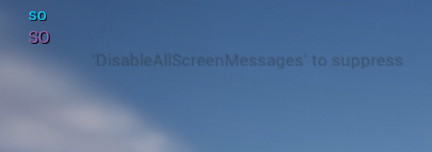
We had a quick run down on how some different node functions work delay, visibility, branch etc, and used print string and different ways to use it combined show evidence task works. Mention different variables and what it does like boolean true and false(yes and no) , int are whole numbers( you can store numbers attach any node to hold value), vector which store numbers for position, rotation etc( it is used for Ai, movement etc).
Public & private:
Public - access from everywhere
Private - opposite child class, restriction
When you set up the float to make a health bar system and you want to see variables on open world hierarchy temp, you can go to your BP and press instance Editable and it will show up as editable var in your open world.
reference = pointer
WEEK 1 - 1/23/24
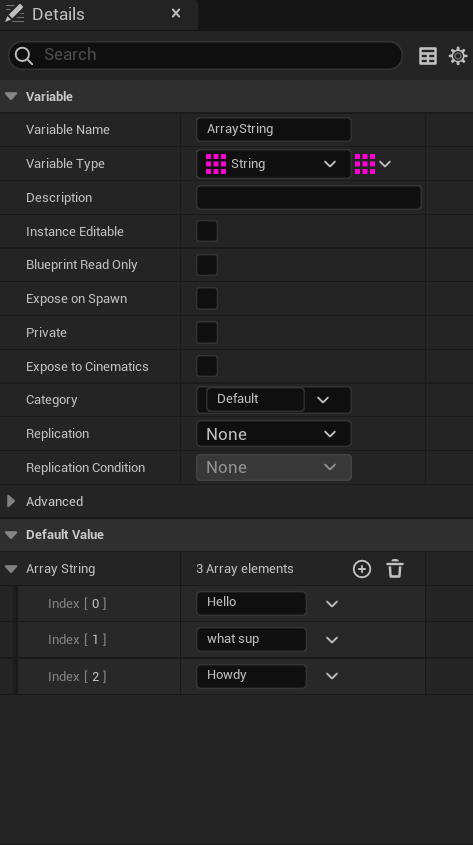
HMWK: Working with Variable
Integers:
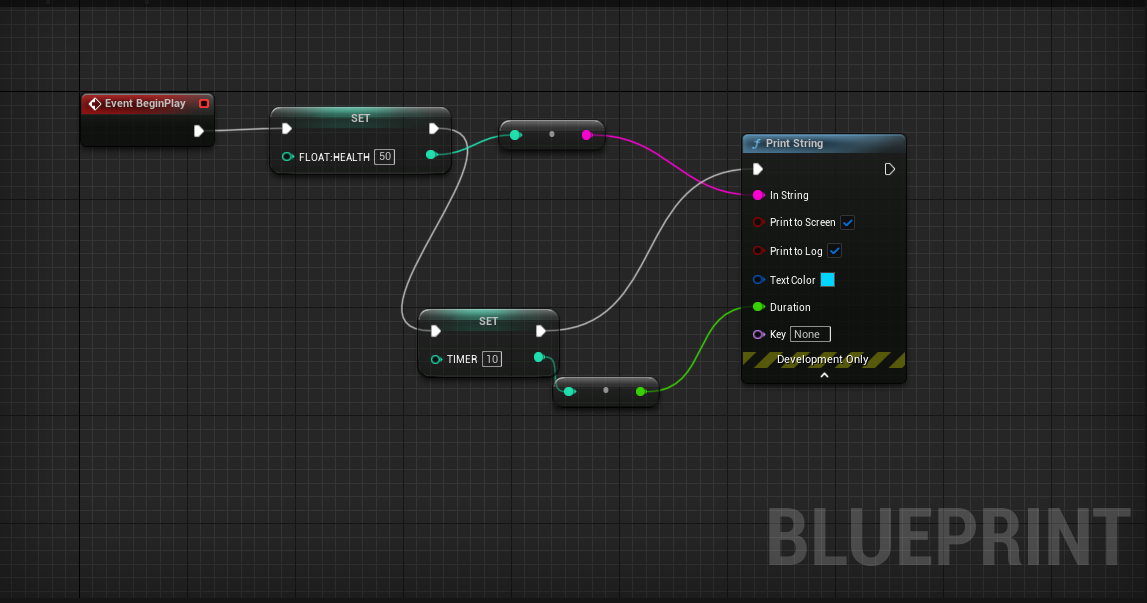
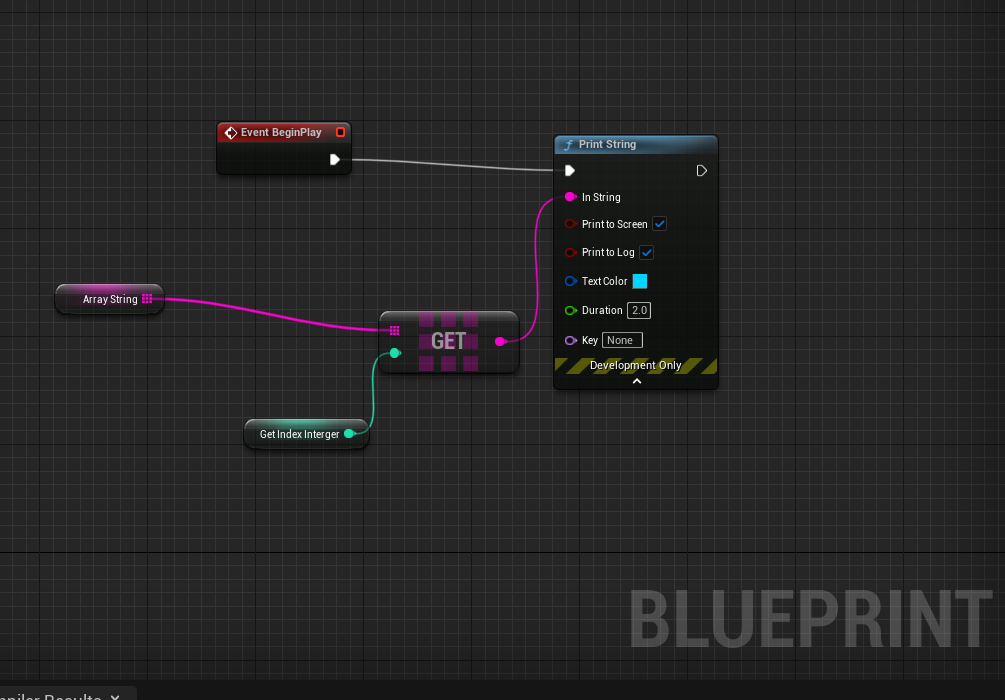
This function prints out the Integer num "50" combining print string with integer variable. It then gives its exact duration timer of 10, linking the integer to the duration. So when 50 shows up on the screen and when the timer hits 0 '50' string will disappear from the screen.
An example of this is you can use it if the character has some sought poison etc and his health is depleting if the timer hits 0 in the background character dies.
Floats:
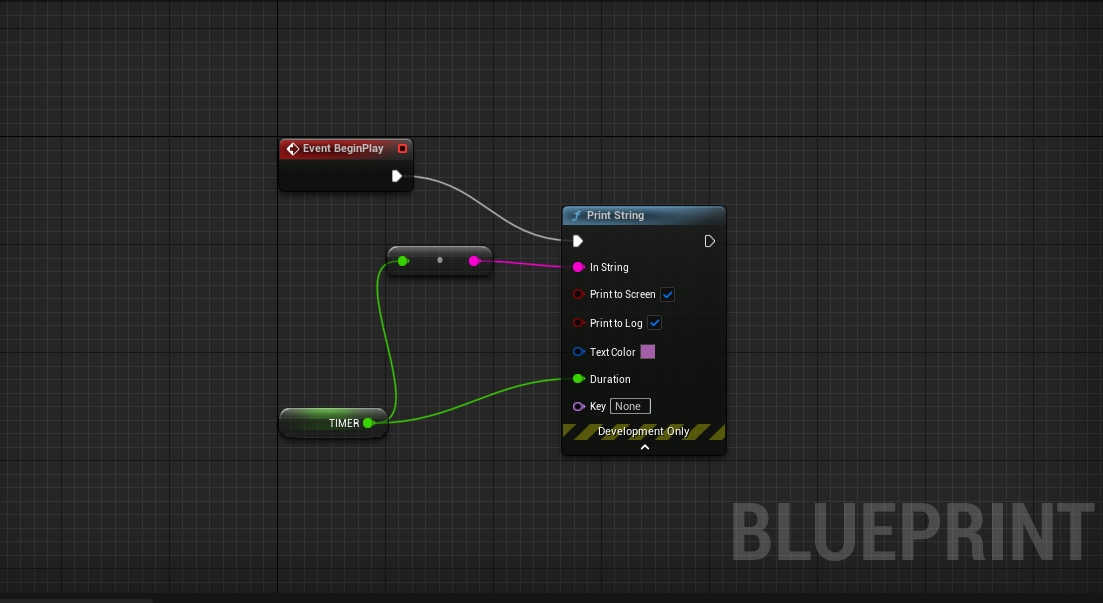
This set of functions makes a timer. You use the timer "Float" and link the Print string to the in string and duration, What it does firstly, allows the print string to print a whole number and secondly makes duration as the timer function, print only stays for long and one more thing by using float variable for the "timer" you can edit the duration amount in details. You can use the instance editable to edit in the open world.
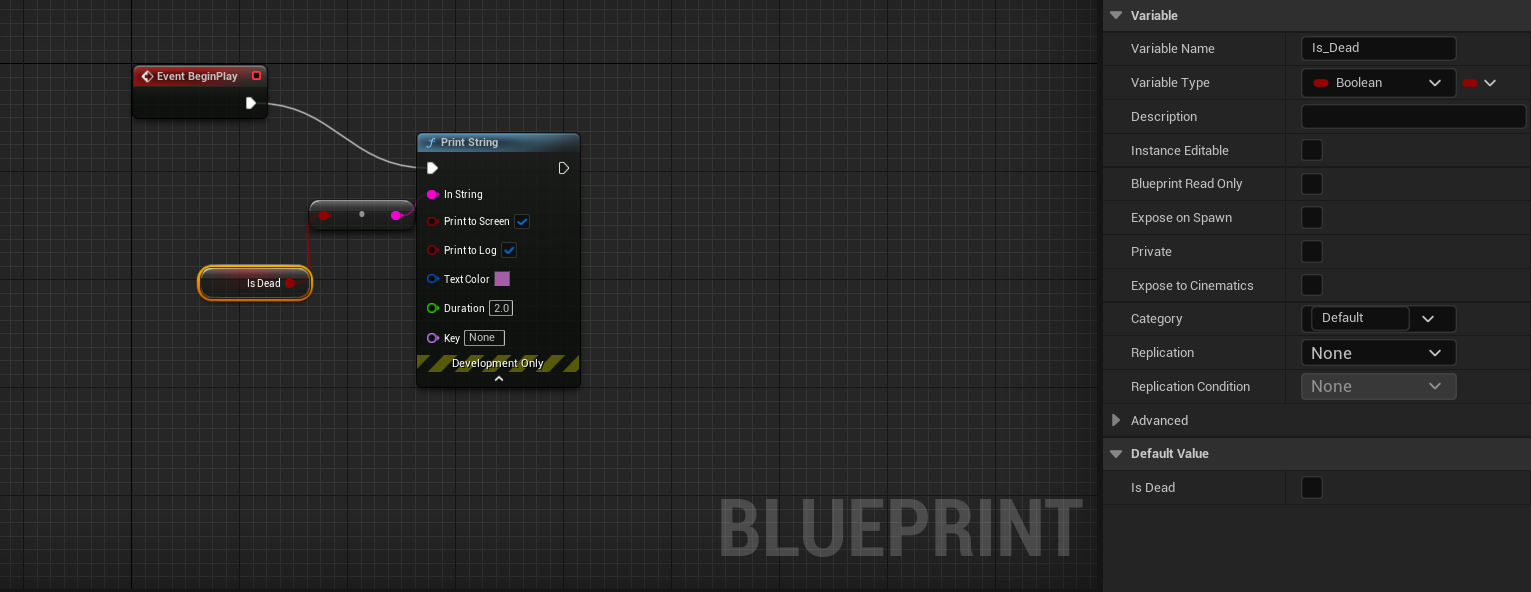
Booleans(True & False):
This boolean function style connects the red boolean named "Is dead." to the print string; it will print true or false depending on what details I set up on the variable.
There are two examples of how this can be used.
The first example will be using a branch system. On the first branch, if it's True check if dead if false> he is alive on the second branch on check if dead hit 0 true dead on false > revive alive. This can be used for survival, MMO, shooter.
Second example, if you walk on acid if true> 10 before you die, if false your are alive.
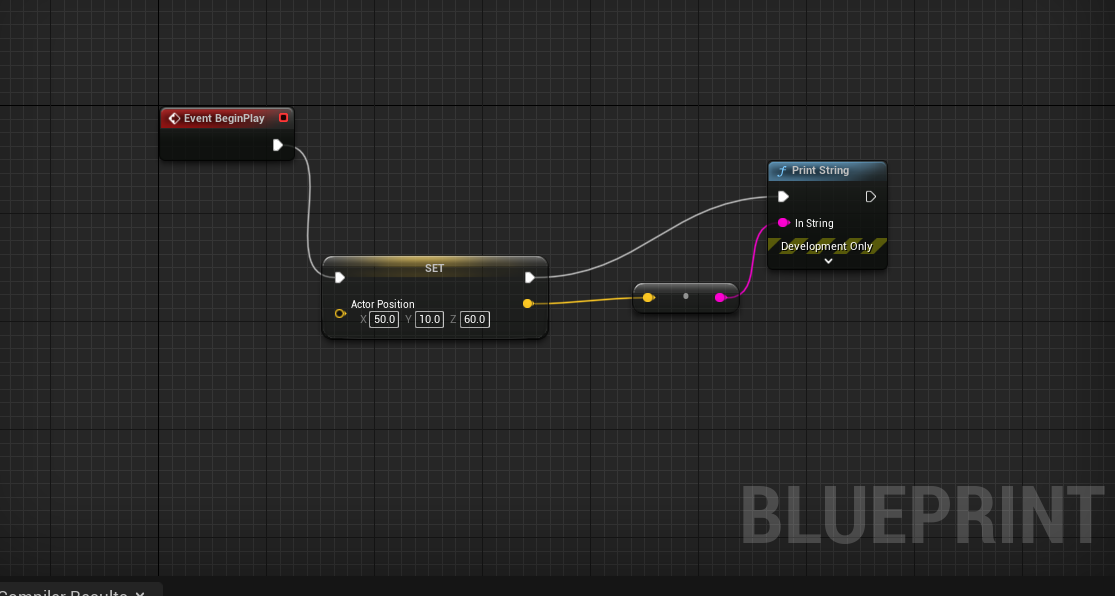
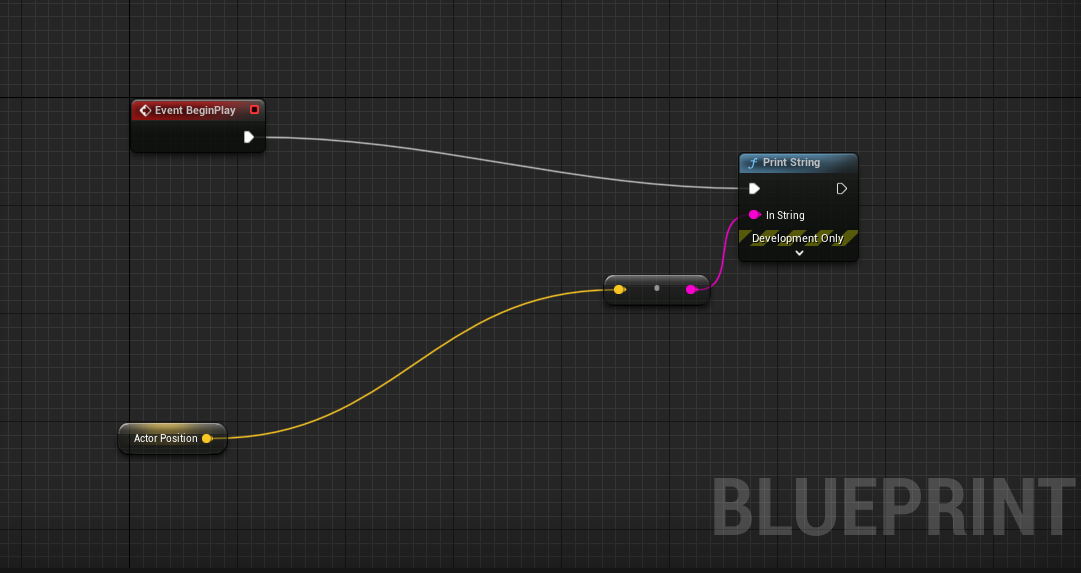
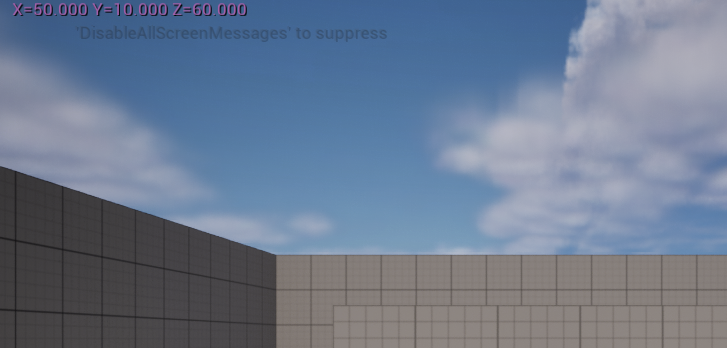
Vectors:
It prints out the coordinate using the vector variable by setting it and linking it on the print string.There two setting it up using both get and set variables shown.
Vectors can be used for AI movement, player movement for return value vector. teleport.

Rotators:
While it is printing the rotation coordinates, this is for rotating 360 degrees in different directions.
This can be used for camera rotation for players, rotating objects like a coin to collect,
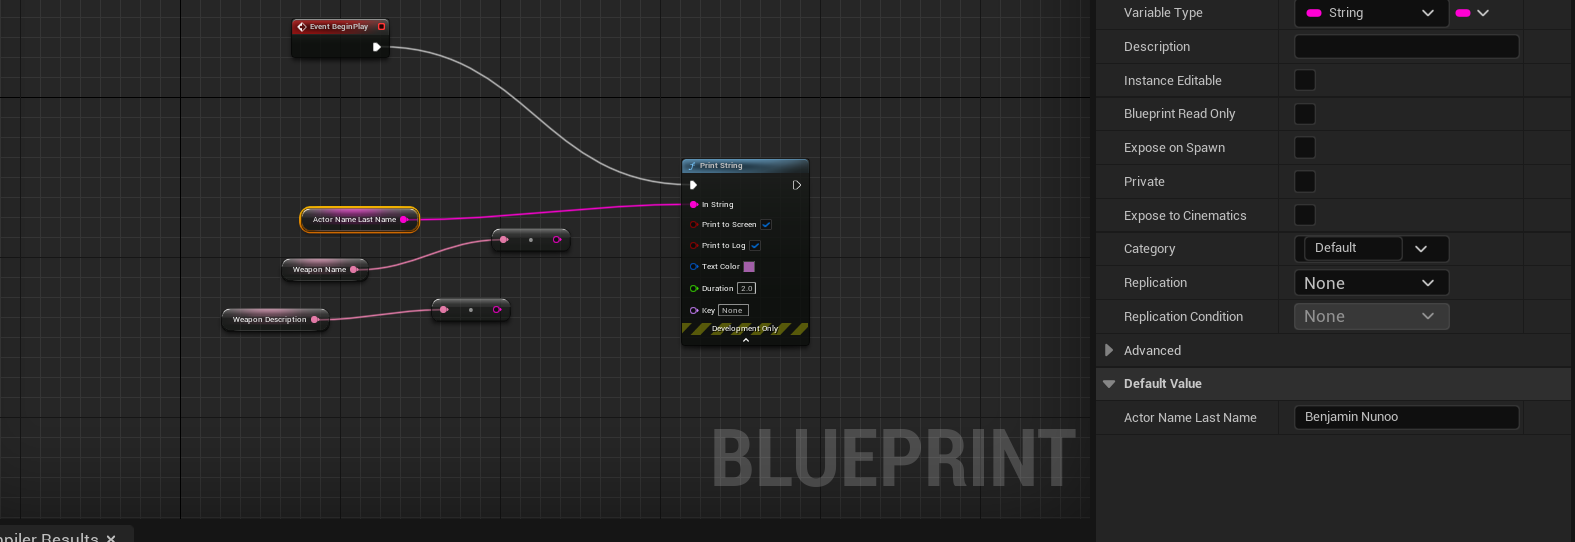
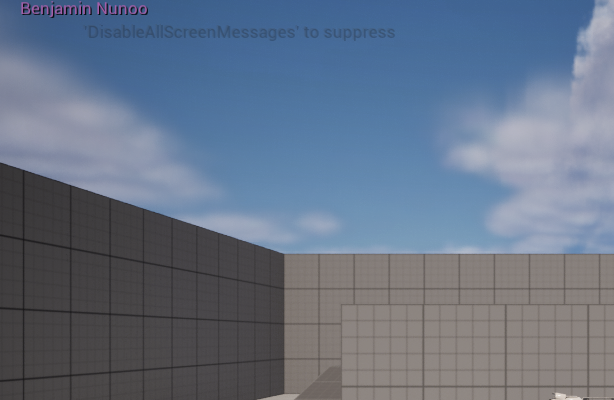
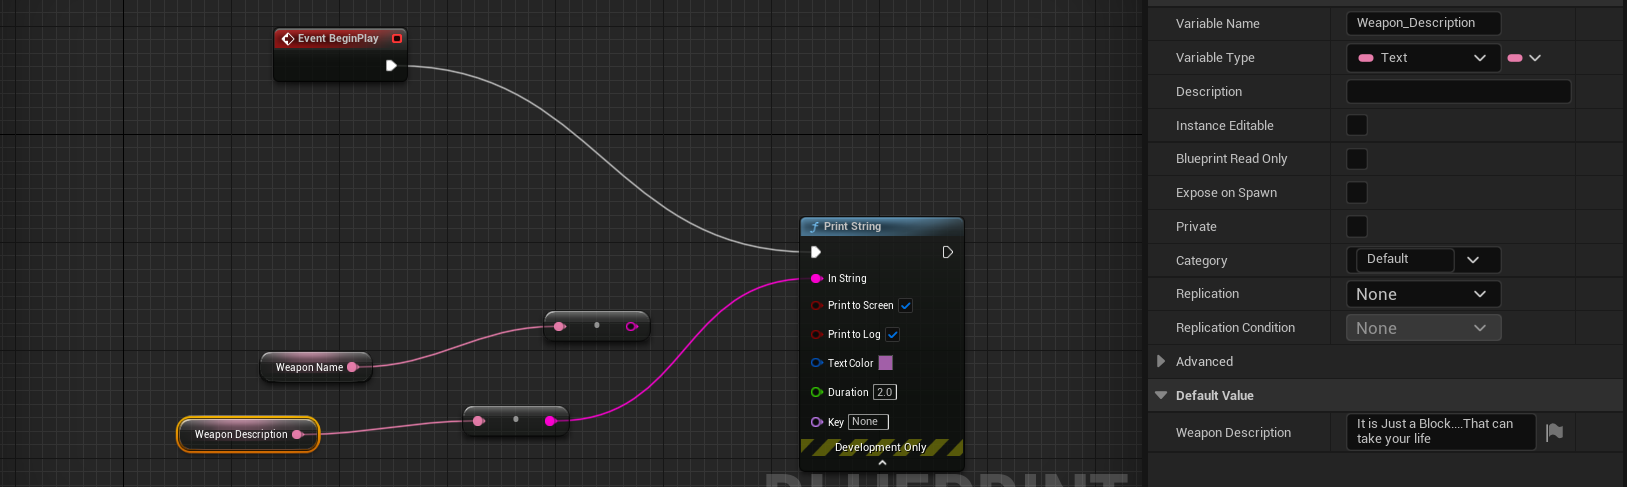
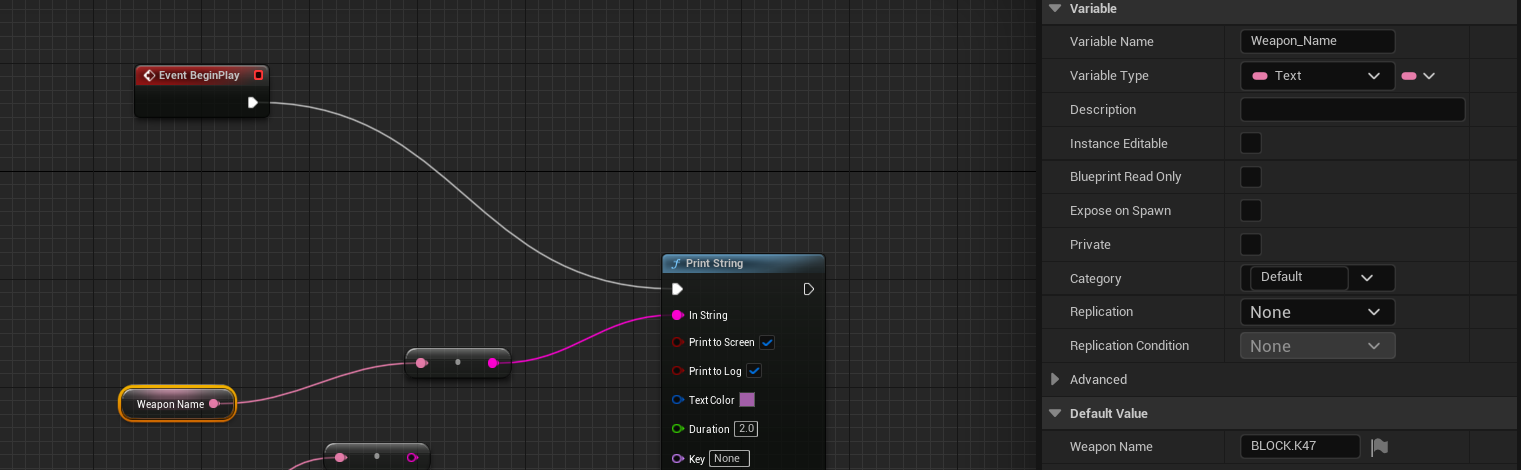
Name, String, and Text
The way this function works is that it simply prints texts using the text using the Text variable and string variable. We used two text variables, one for the weapon name and the other for the Weapon description. And for the String it was used for First & Last Name. This can be used for testing text .

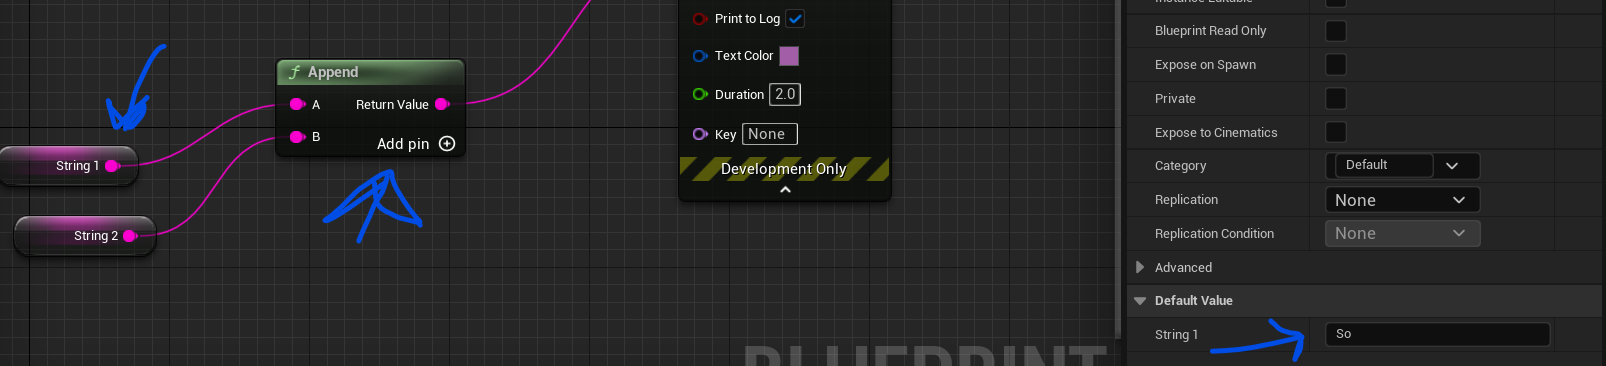

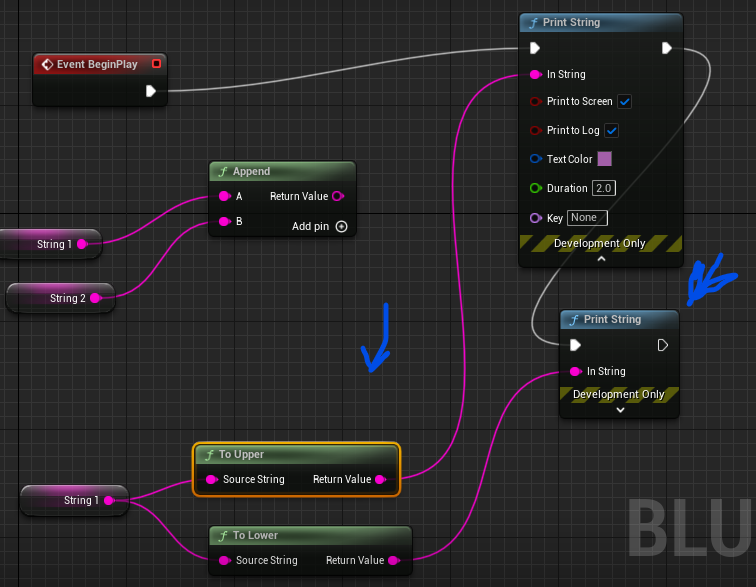


String Functions:
To start off with The [First] function combines two strings into one by using the Append function.
On the [Second] function separate the 1 string by placing them upper and lower, added another print string for it to work.
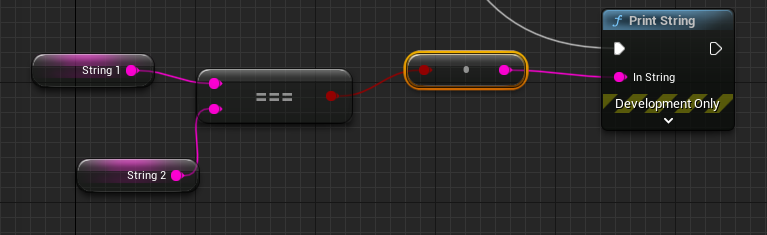
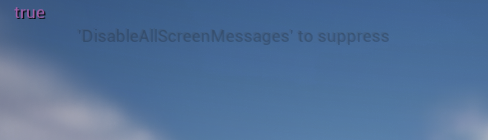
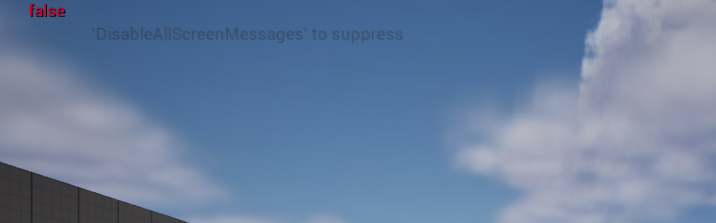
[Third] function, These strings are linked to a boolean, and how this function works is if both strings have the same word meaning equal to each other it will print true; if it is a different word it will say false.
[Fourth] function , substitution to change from false to true.
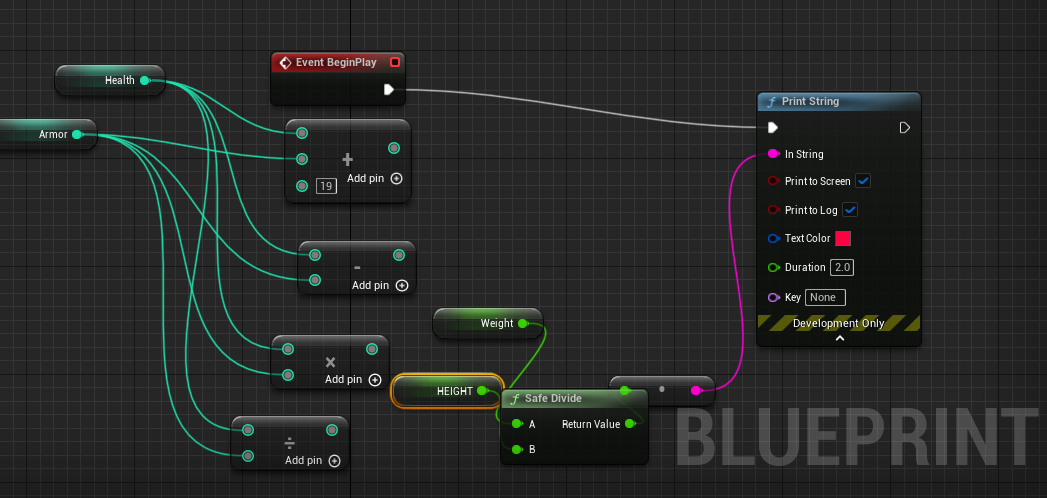
Mathematical Operator
These interger operator changes the value of the health & armor from + to /.
These can use health system.
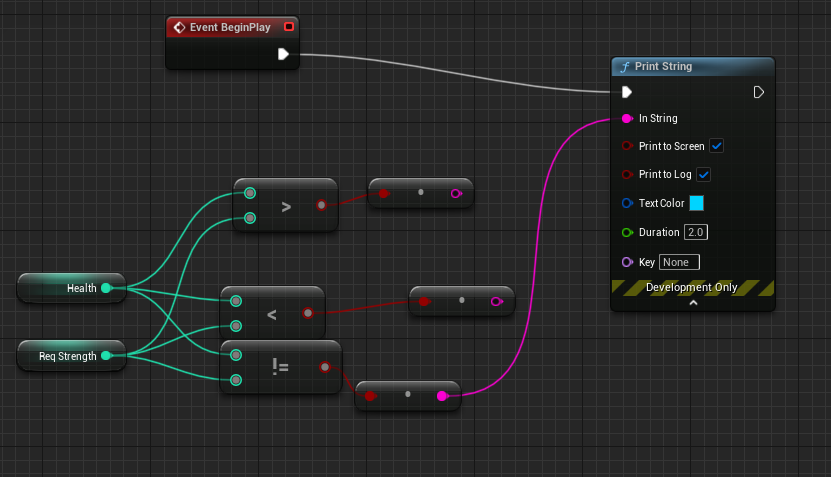
Conditional Operator:
It is kind of like If else statement. it ends with boolean . Like if its greater it's true , less than false and not either or neither.
You can use in .... If it less than you get warning sign and warning music but if greater a specific number its stop warning.
Get and Set Variables
By using set variable you set property fields and by using Get it read its. there times where doesn't matter which one you use because there both use same value .
Flow Controls:
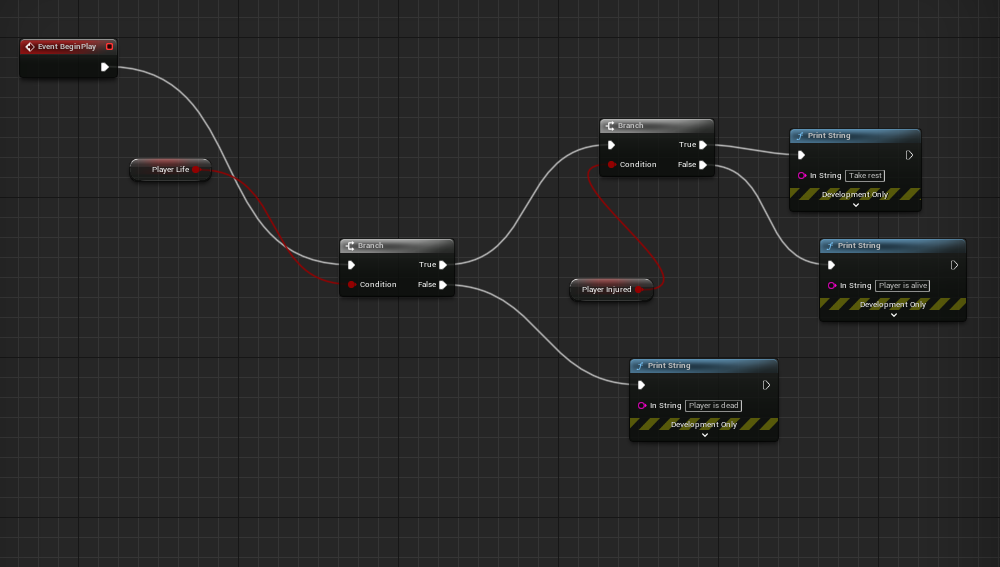
Branch:
The branches are used for true and false. It can be used for many things, from dialog progression to when your character is injured and uses a health pack. Yes, it is healed; if not, it dies and TCG abilities.
The way this work is :
Player is :
True(player life) and True(Player Injured) = Take a rest
True(Player Life) and False( Player Injured) = Player Alive
False(playerLife) and True(Player Injured) = Player is dead
Squence:
This is used run alot functions through one event begin. Thisreal helpful if you wan used event begin so badly.
For Loop:
It repeat functions to a extent. In this one it is looping hello and bye.
For loop can be used from combat, Any other functions that you don't want to repeat and enemy traps.
While loop:
The way this work , while loop is looping one task if not is done. While loop is bool making this whole question true and false. And this function If loop 1 and loop 2 is not equal to while looping(condition : False) It will loop allowing it to end.
So basically While loop is used loop task until that task reach is specific goal. Like if I had shoot a monster with 5 on his head 3 times , the monsters will not stop spawning I shoot monster with 5 on his head 3 times .
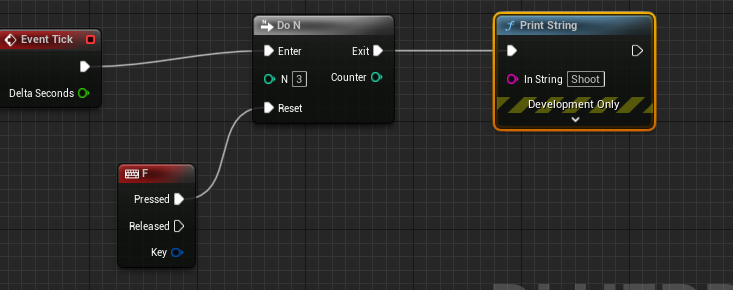
Do N
On this example by pressing the F key Do N will print Shoot x3 at the same time in one go. So basically Do N allows you activate function specific amount time and then stop until you restart it.
One example is using a special move 3 times and after it will stop working until I (restart it by) get power up replenish or timer restart etc.
Do Once
Is similar to DO N but it will only function once and stop until you want restart. I have used it before.
This can be useful when you want function to only work simule once not alltime and if there issue and it constantly runs when it should only be once.
FlipFlop
This function basically switches from one to another with a press of a button. You can use it for switches or leval etc.
WEEK 2 - 1/29/2024
Arrays & Macro
Today, I reviewed Arrays and Macros—arrays store data of the same type in one collection in a specific location. An array can also have different data types like int, float, bool, etc. All arrays start at the 0th index.
The First task is to try out different arrays and types and discuss what it does and can be used.

Array :
Get Array - This allows you to get any set of arrays use( on this ex print) by typing specific index int sec. We are using the "Get array 'copy'".
This could be used , in rock , paper and scissor( which we did in sem 1) , were attach the array index to word/letter Rock, paper and scissor. So when input one of them specific move.
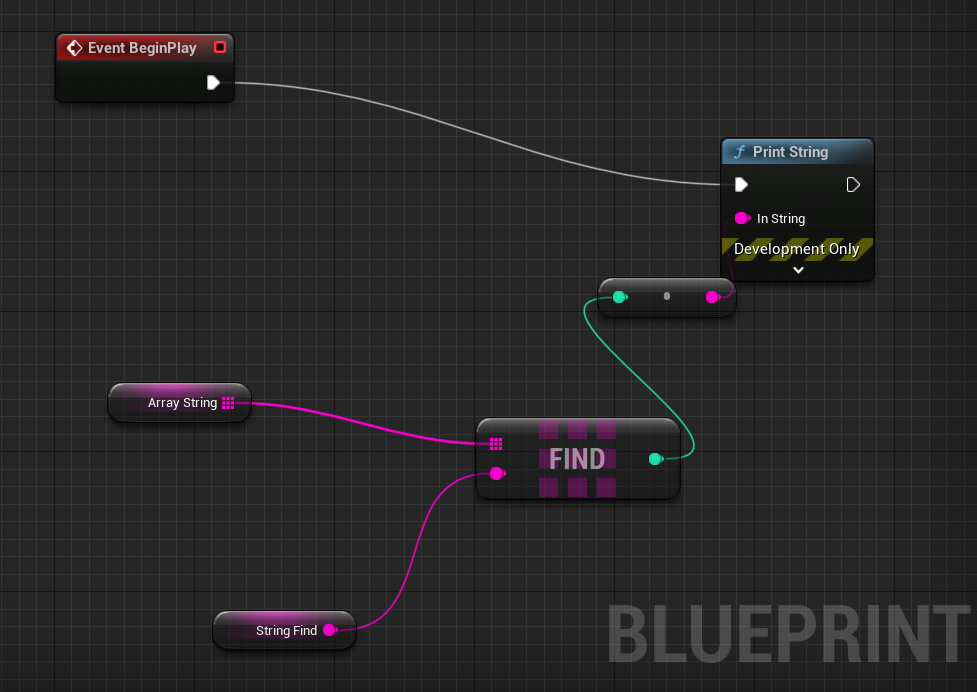


Find Item in Array - What "find array" does is to look for index in specific location. In this example if the match found it will print out the actually index number if not it will print out -1 for error.
Examples of this could be used are password manager, hacking guessing games and Inventory retrieving.
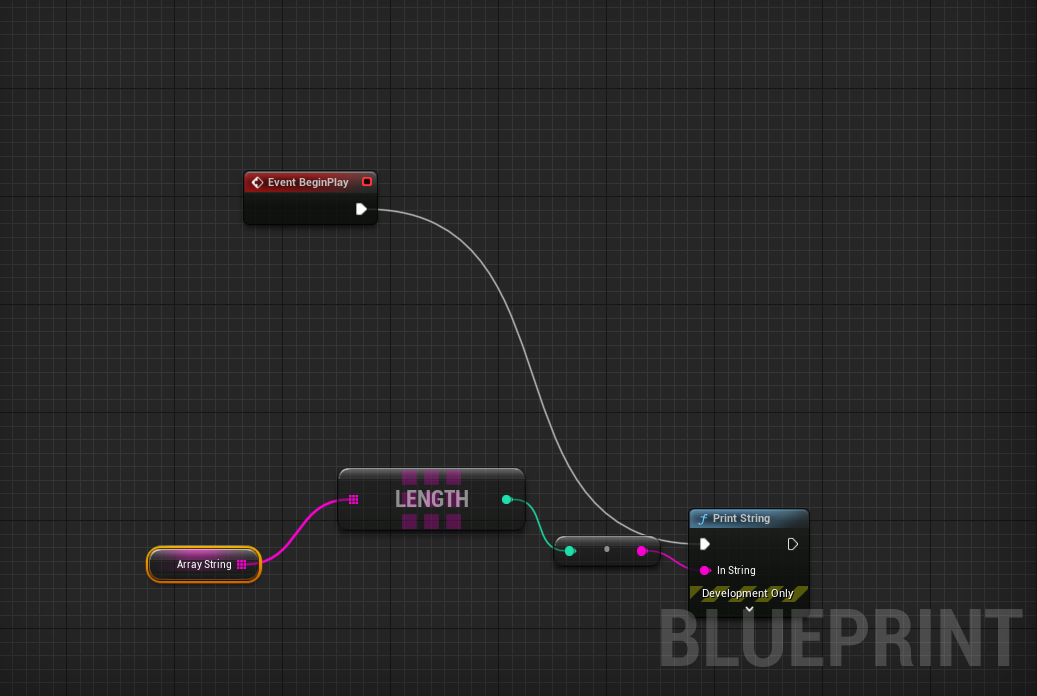

Find length in Array - This shows the total amount index that is available. Example of usage this could be used in other arrays. You could also for total items for inventory.
Array Last Index - This just shows the last index arrays.
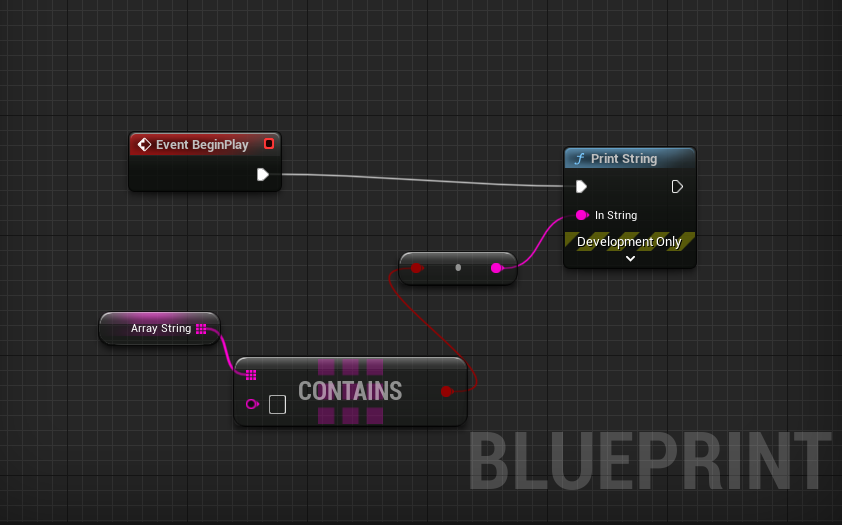
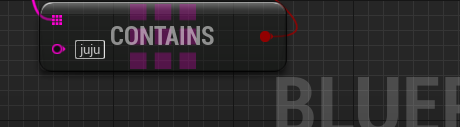


Array container - This uses bool for true or false, and by looking up the item( ex. String). If the array contains it, it will be True; if not, it will be False. This can be used for match card games.
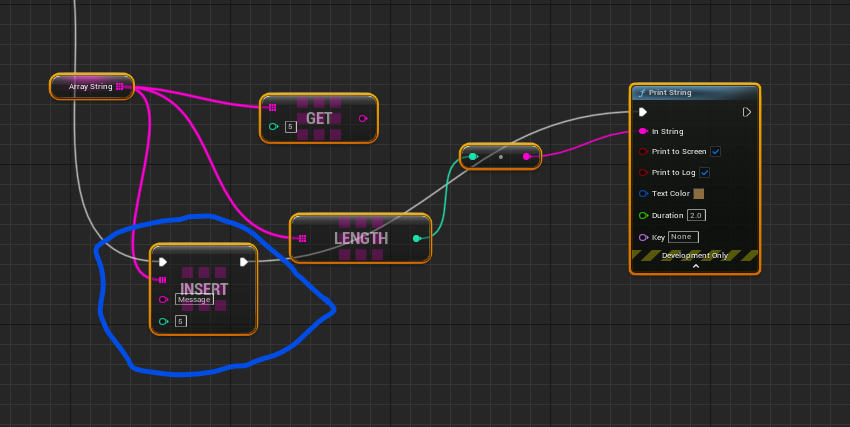
Insert Item in Array - It will insert another array and update the index count. This can be used to add another item in your inventory, add another abilities another title your character hold.
Remove Item array - This just remove the array and index value.
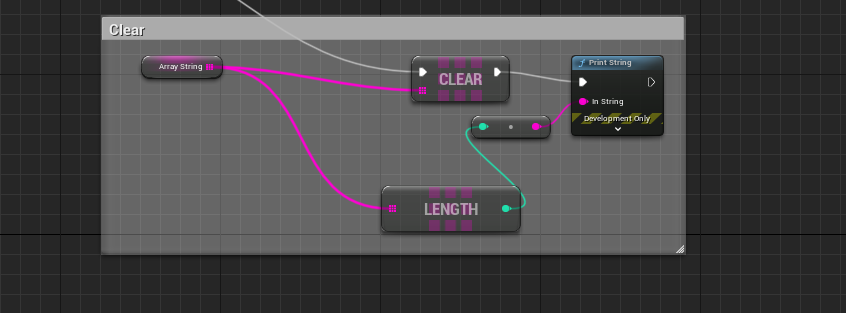
Clear the array - Clear everything example clear storages, standby abilities etc.
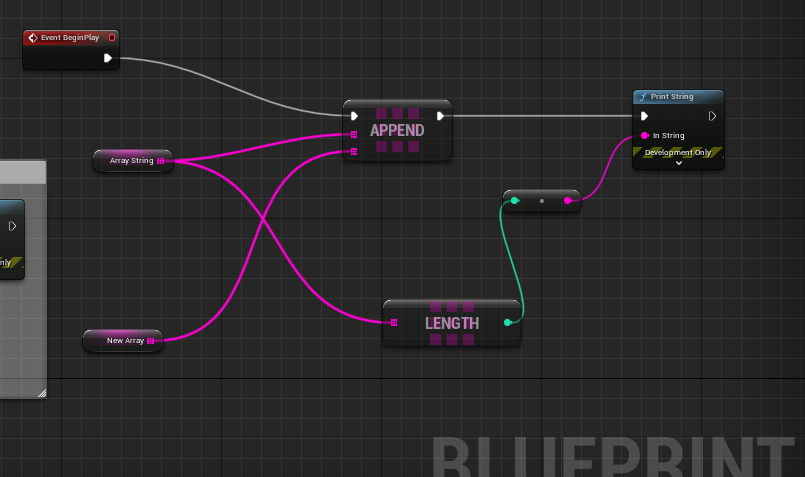
Append array - This will add an extra array index ton existing array basically overwriting.
Collapsed Node - Taking a function of nodes and collapsed into one.
Functions( pure and Impure) -
Macros - (similar to the collapsed Node)Macros Take a whole node function and represent it into one collection named Macro. You can set up input and output and may of them. Macros are what you will call preprocessor.
WEEK 3 - 2/5/2024
Game structure
What is a Game production pipeline? It is a long, lengthy journey, a simple/complex concept, developing it into a finished product. Pre-production -->Production
Concept(spider diagram) ---> GDD ---> Prototype(Alpha builds)-----> Testing -->Finishd Product ---Promotion(which vary midway of build cycle).
For example,https://astrofantasysec.github.io/StealthProj.html.
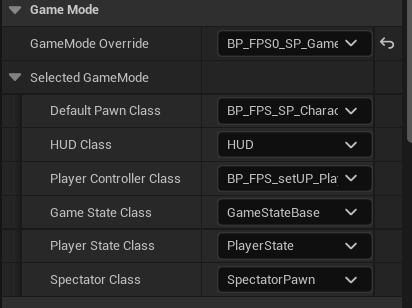
The Game Controller combines input and player/computer behavior into one management for pawn and player components. Game mode is the rules of the game and how the settings should run, like the HUD and player.

Mini_Proj1(1) pt1 - HMWK *
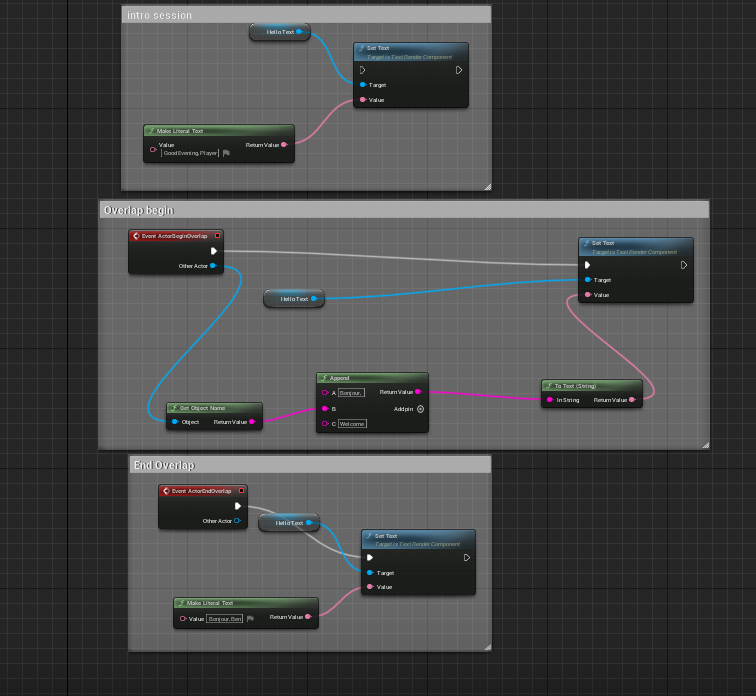
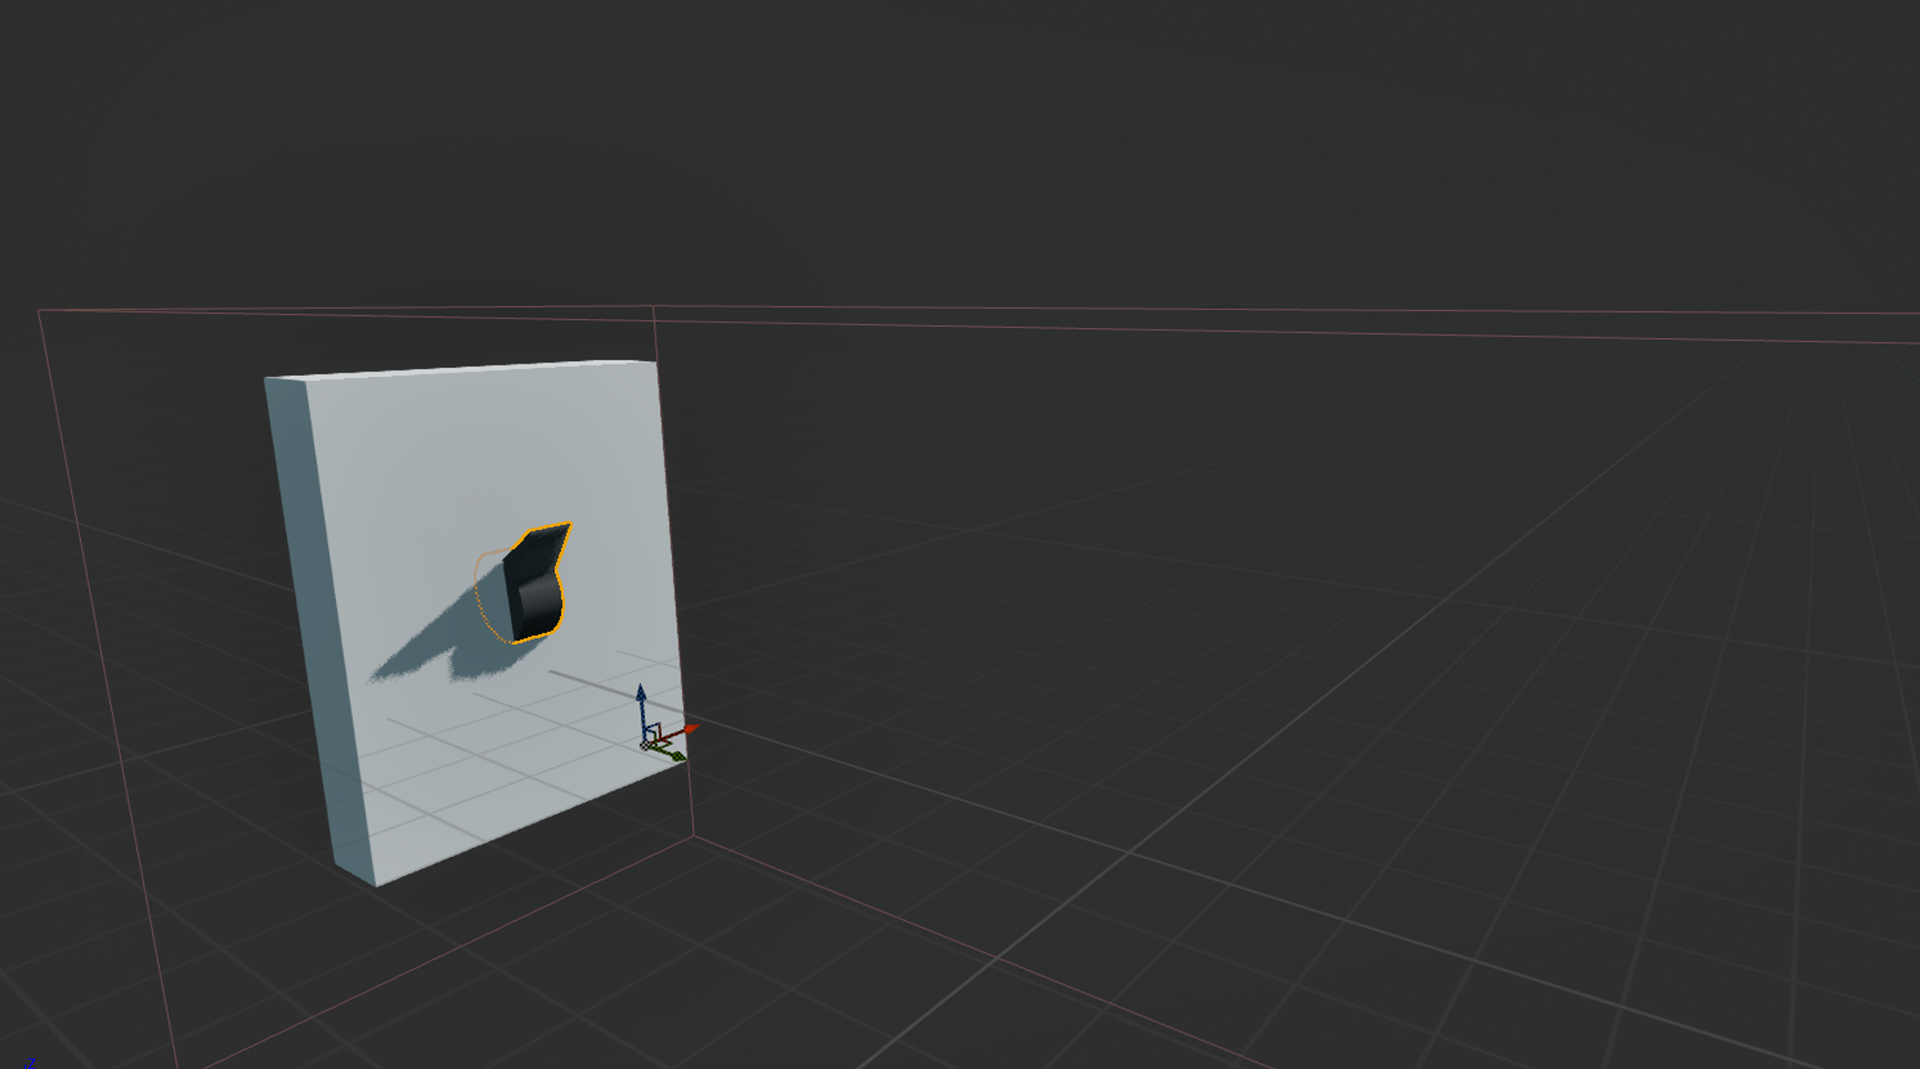
For Mini Project Part 1, It is about a mini interactive build where you walk up to an object. And it changes the text, that I placed on top of my object to a different one. And when we walk away it revert back. We use 'Event actor begin overlap' allow the function to start when I overlap with collision and 'Event actor end overlap' ends the text appears and reverts back. We use 'Set text', which changes the text value and Make Literal text to create actually text. Append for different line of words and object name and obj name will show on text.
For my version I used a Cone as my object and made it red as my material. And Used custom text which is shown in the video and images.
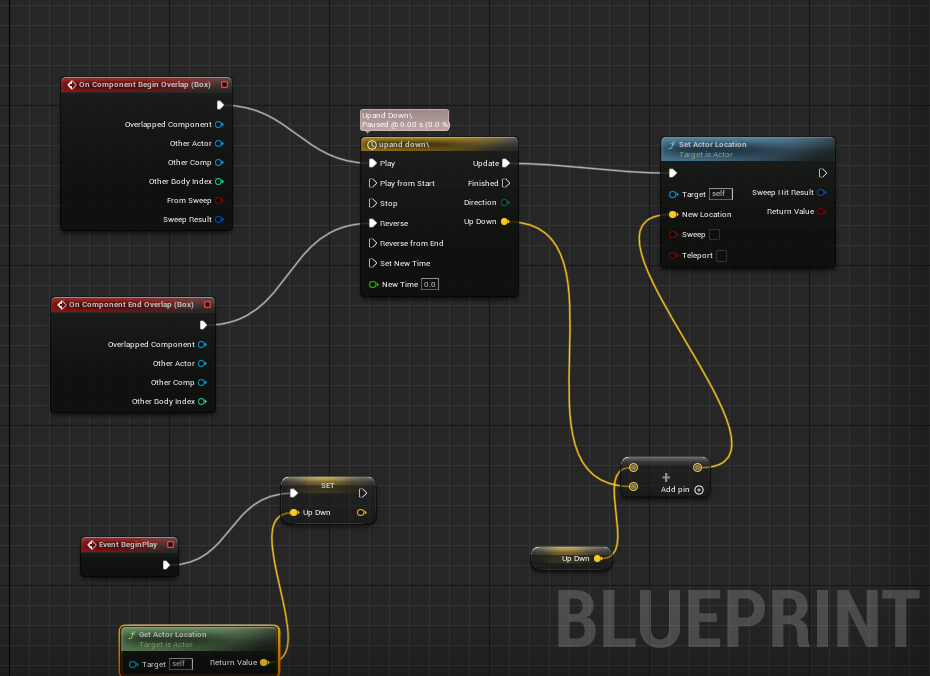
Mini_Proj1(2) part 2*
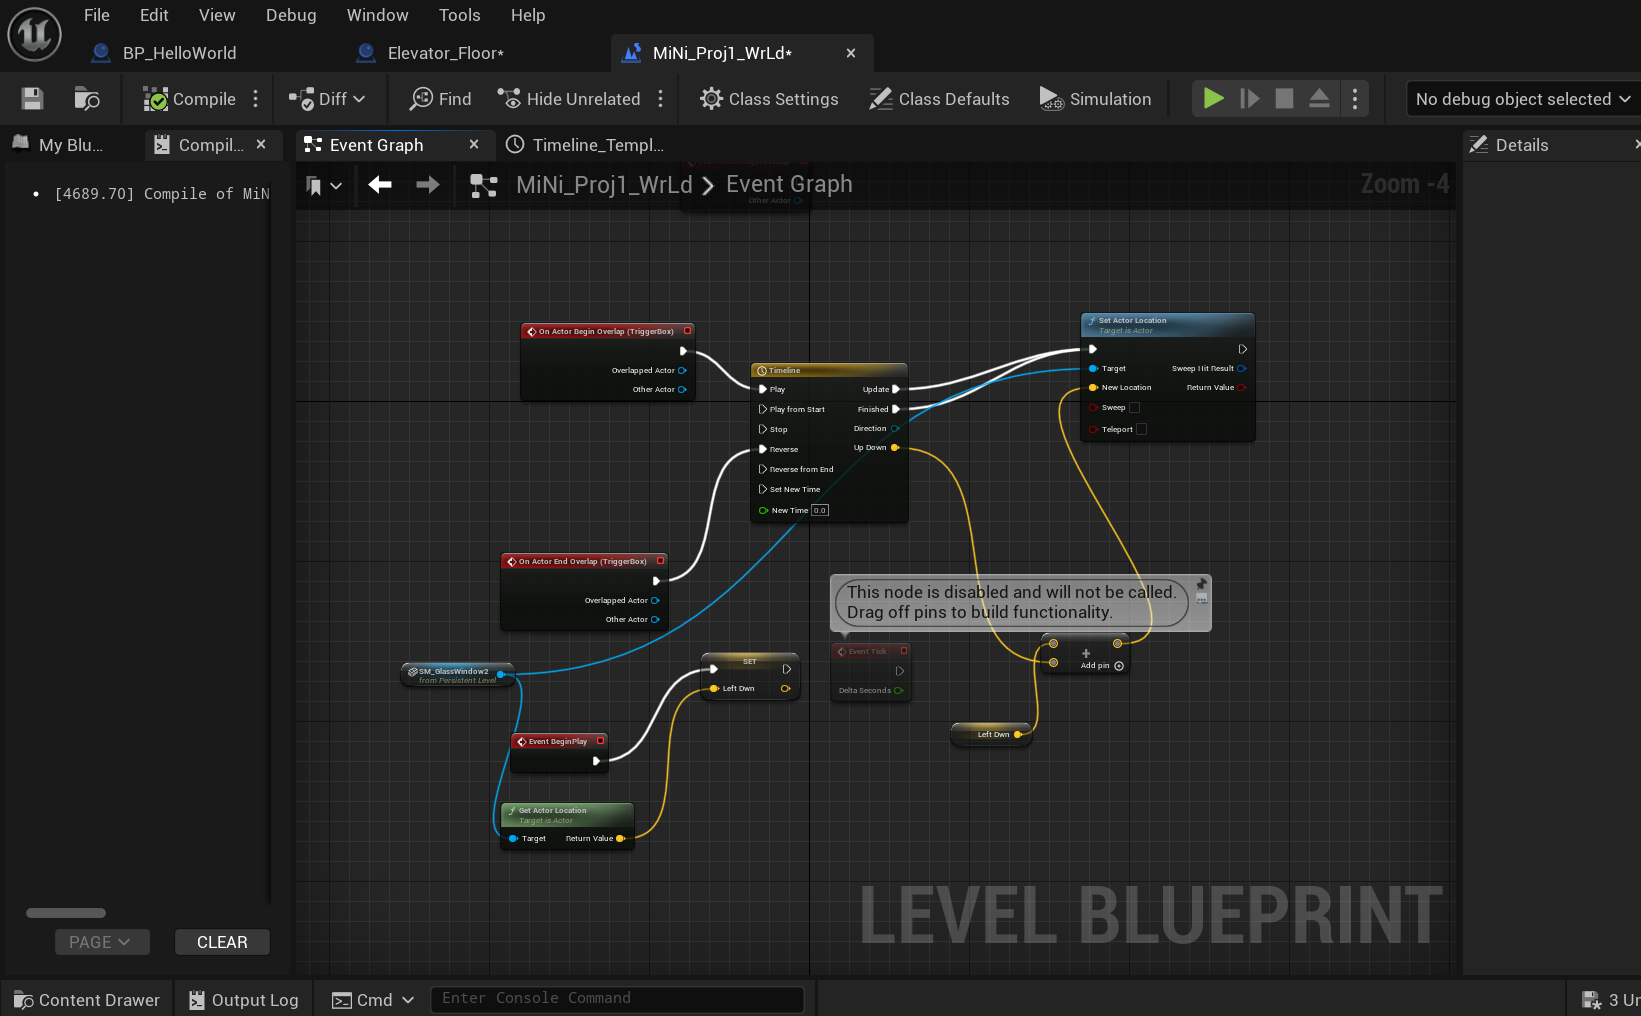
For part 2 I made elevator, I have done this couple of time on Unreal in the past .I simply use the timeline and set time duration and and use value of how high you want the platform to go.
Combined final:*
I combined both elevator and text change interactive and even added sliding doors as I'm at it.

WEEK 4 - (FEB)2/12/2024
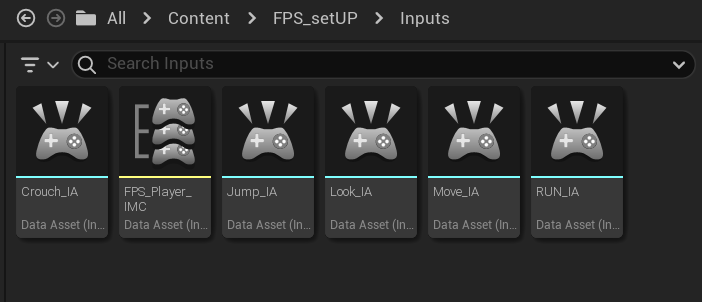
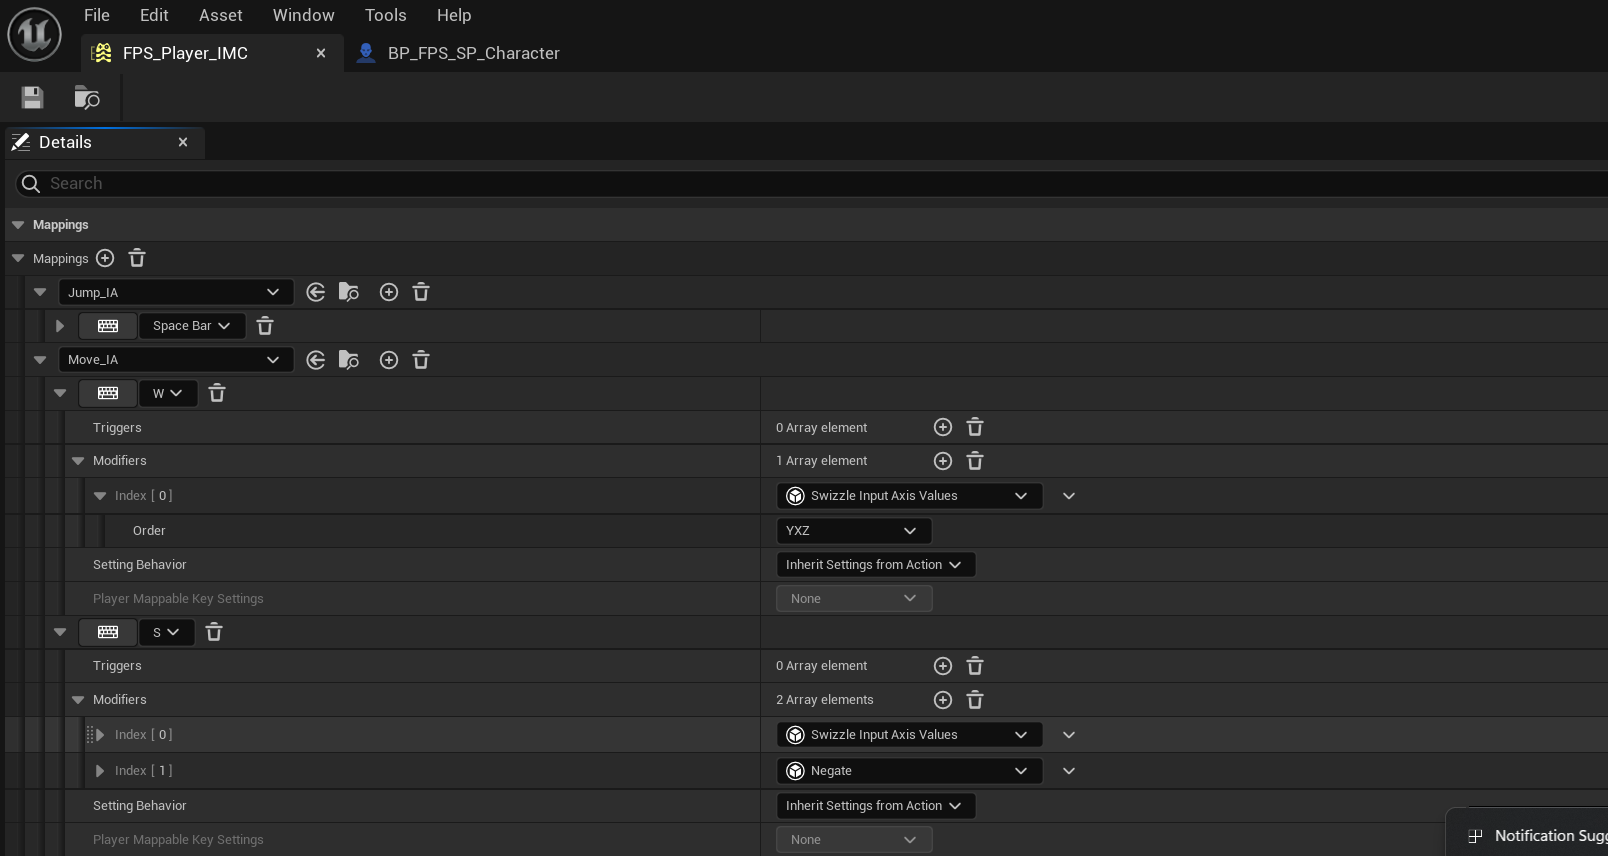
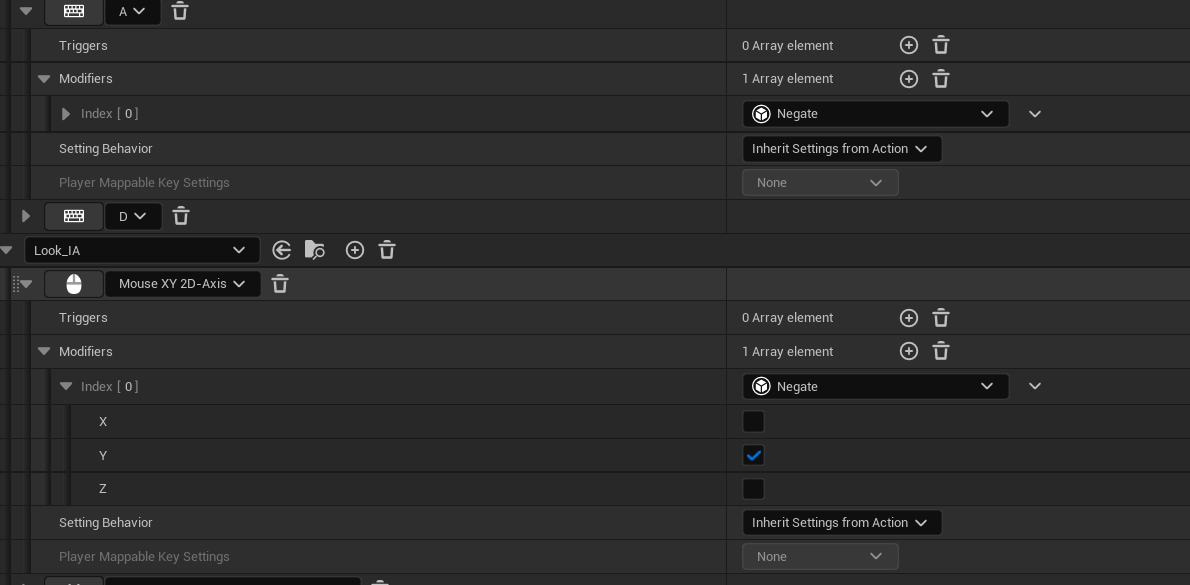
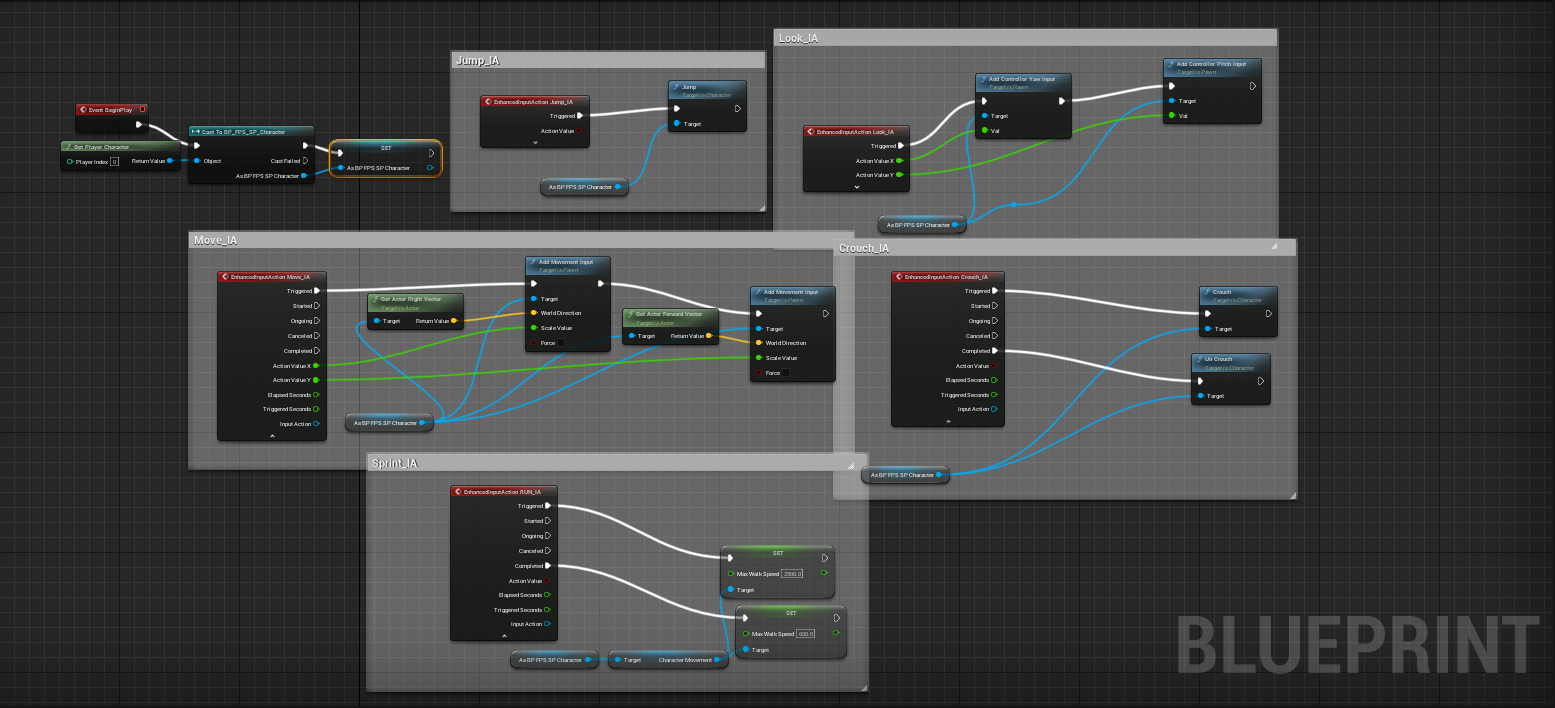
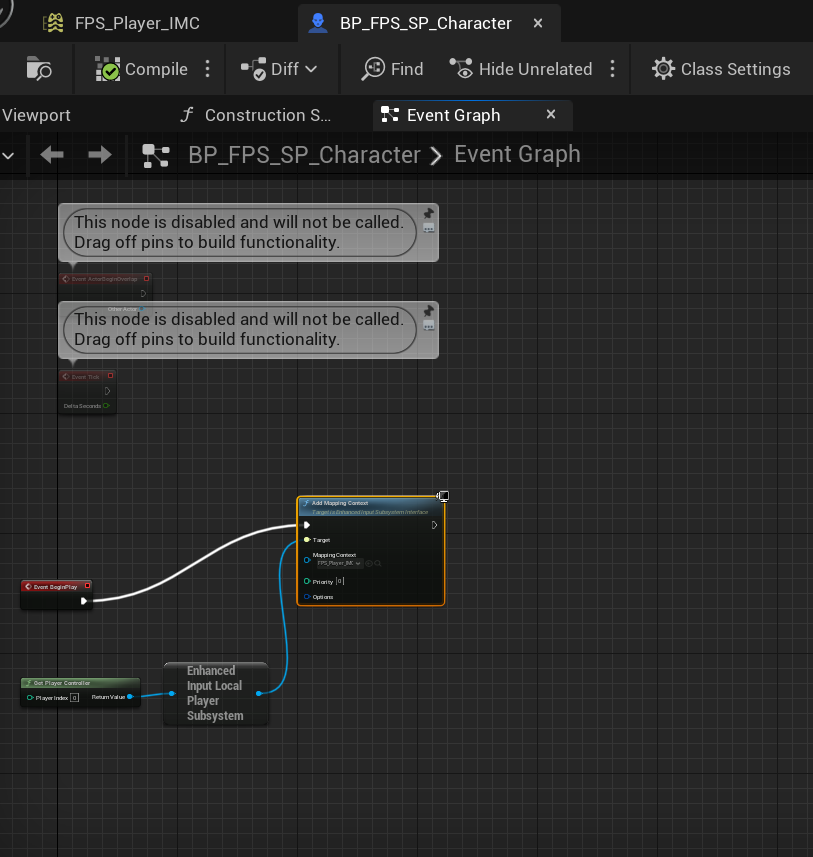
Today's Lesson we went over building enhanced input on ureal using BP. I have done this before in C++, I've seen the BP version, but I don't remember so we went over it again which I am ok with. We used an empty project and started from scratch. We created folders and organized the files into BP and Input. The level map will be an outer folder.
In Blueprint, create a character, game mode, and player controller, and name them accordingly(BP_FPS__). I have done IMC, IA in C++ but this time going over it. We also included Crouch and sprint.
It method is similar and easier to understand.

WEEK 4 - 2/15/2024
HWK
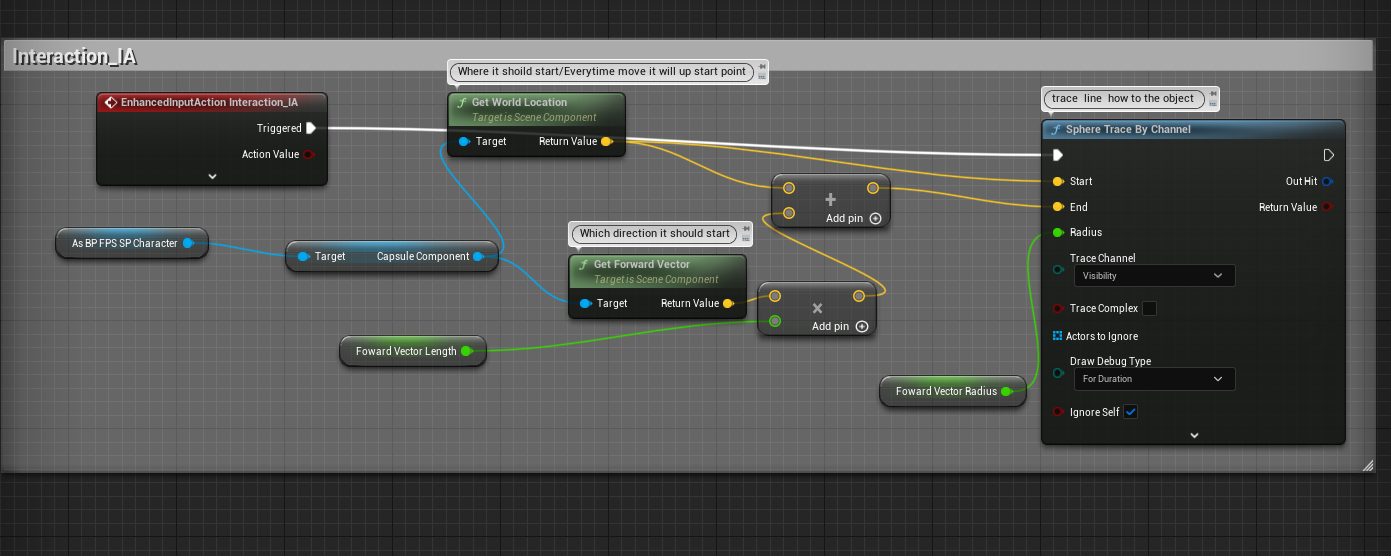
I continued the FirstPersonsetup, which we did in class at home. The first, I will be working on is the interaction. I have done interaction before, especially for inventory BP from last semester's 1 PROJ. But this interaction method looks excellent and simple to understand.
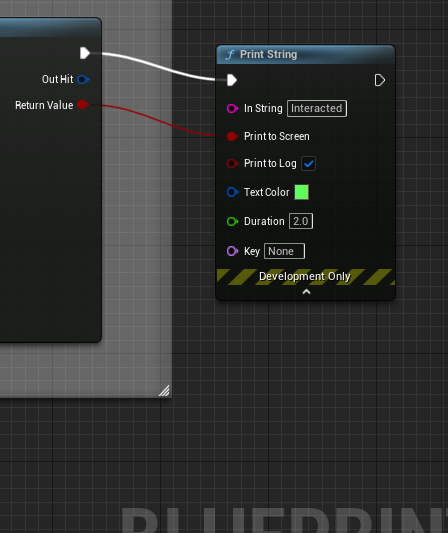
I personally added a print string and give it return value , so it will show green and print when hit object.
It can be used for interactive door and hello block that we did last time . Even the elevator that I did just replace the event begin with interaction_IA event.


WEEK 4 - 2/16/2024
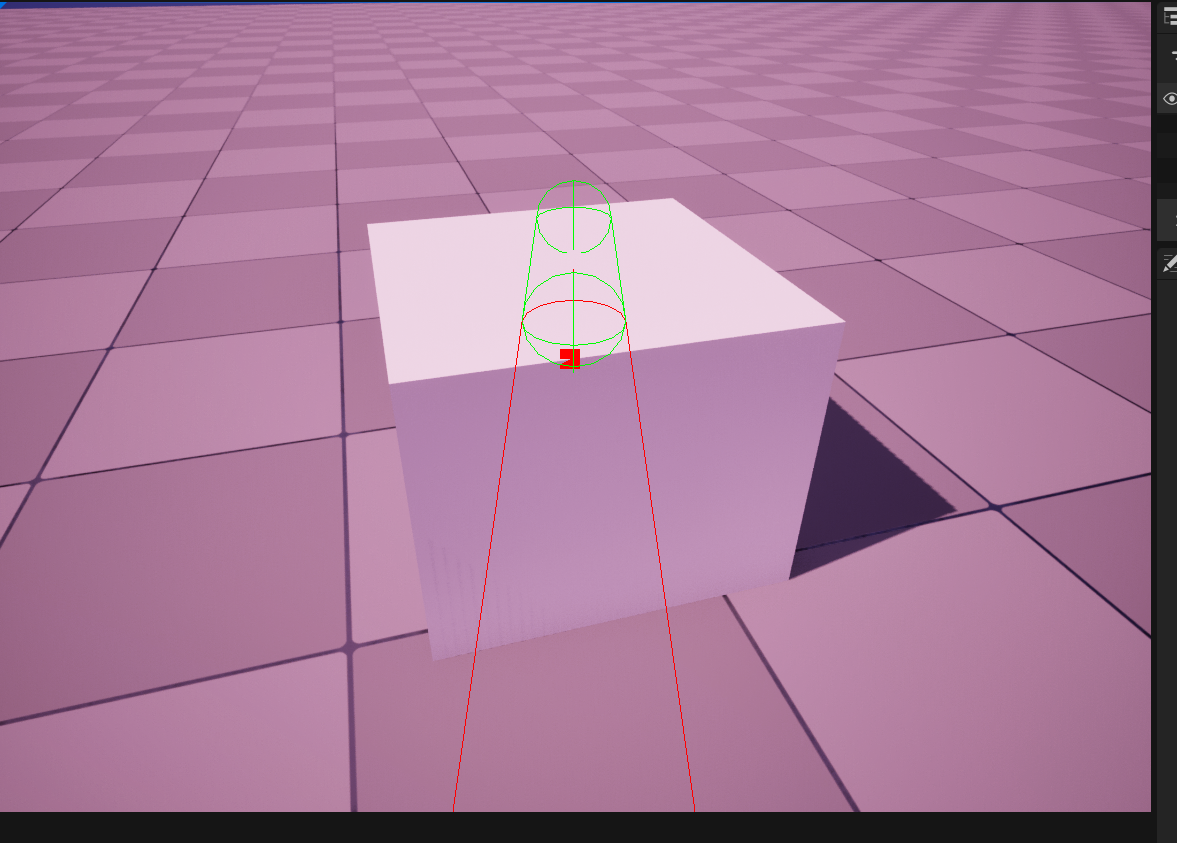
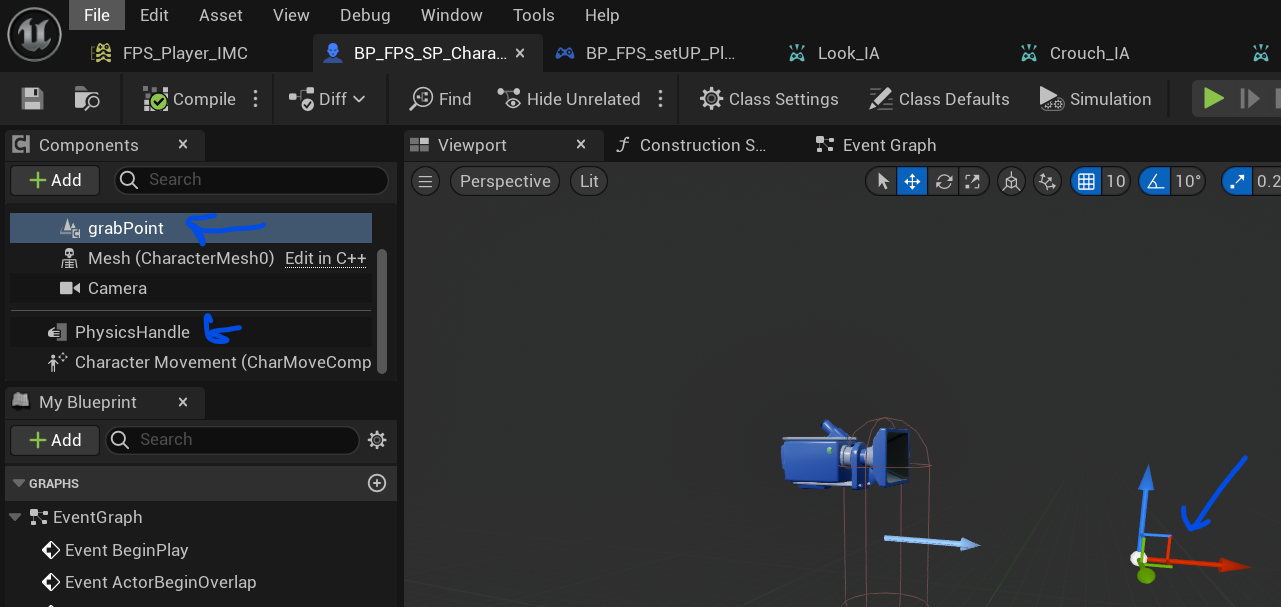
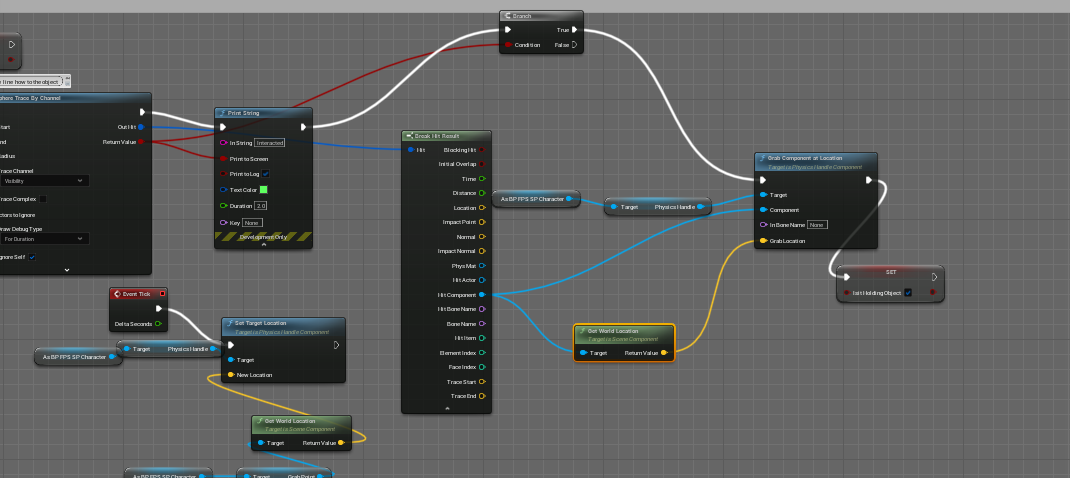
Grab and drop
Today I learned and tried how to grab and drop objects. We continued adding things on our Interaction BP to make it happen.
This can be used for games like a puzzle/ puzzle game, open world like fallout, world customize gam( like sims).
WEEK 5 - 2/19/2024
Today we talk about us creating a simple mini-project by the end of this week. Using the knowledge that we have learn from the last couple of lessons and work sent out by prof.
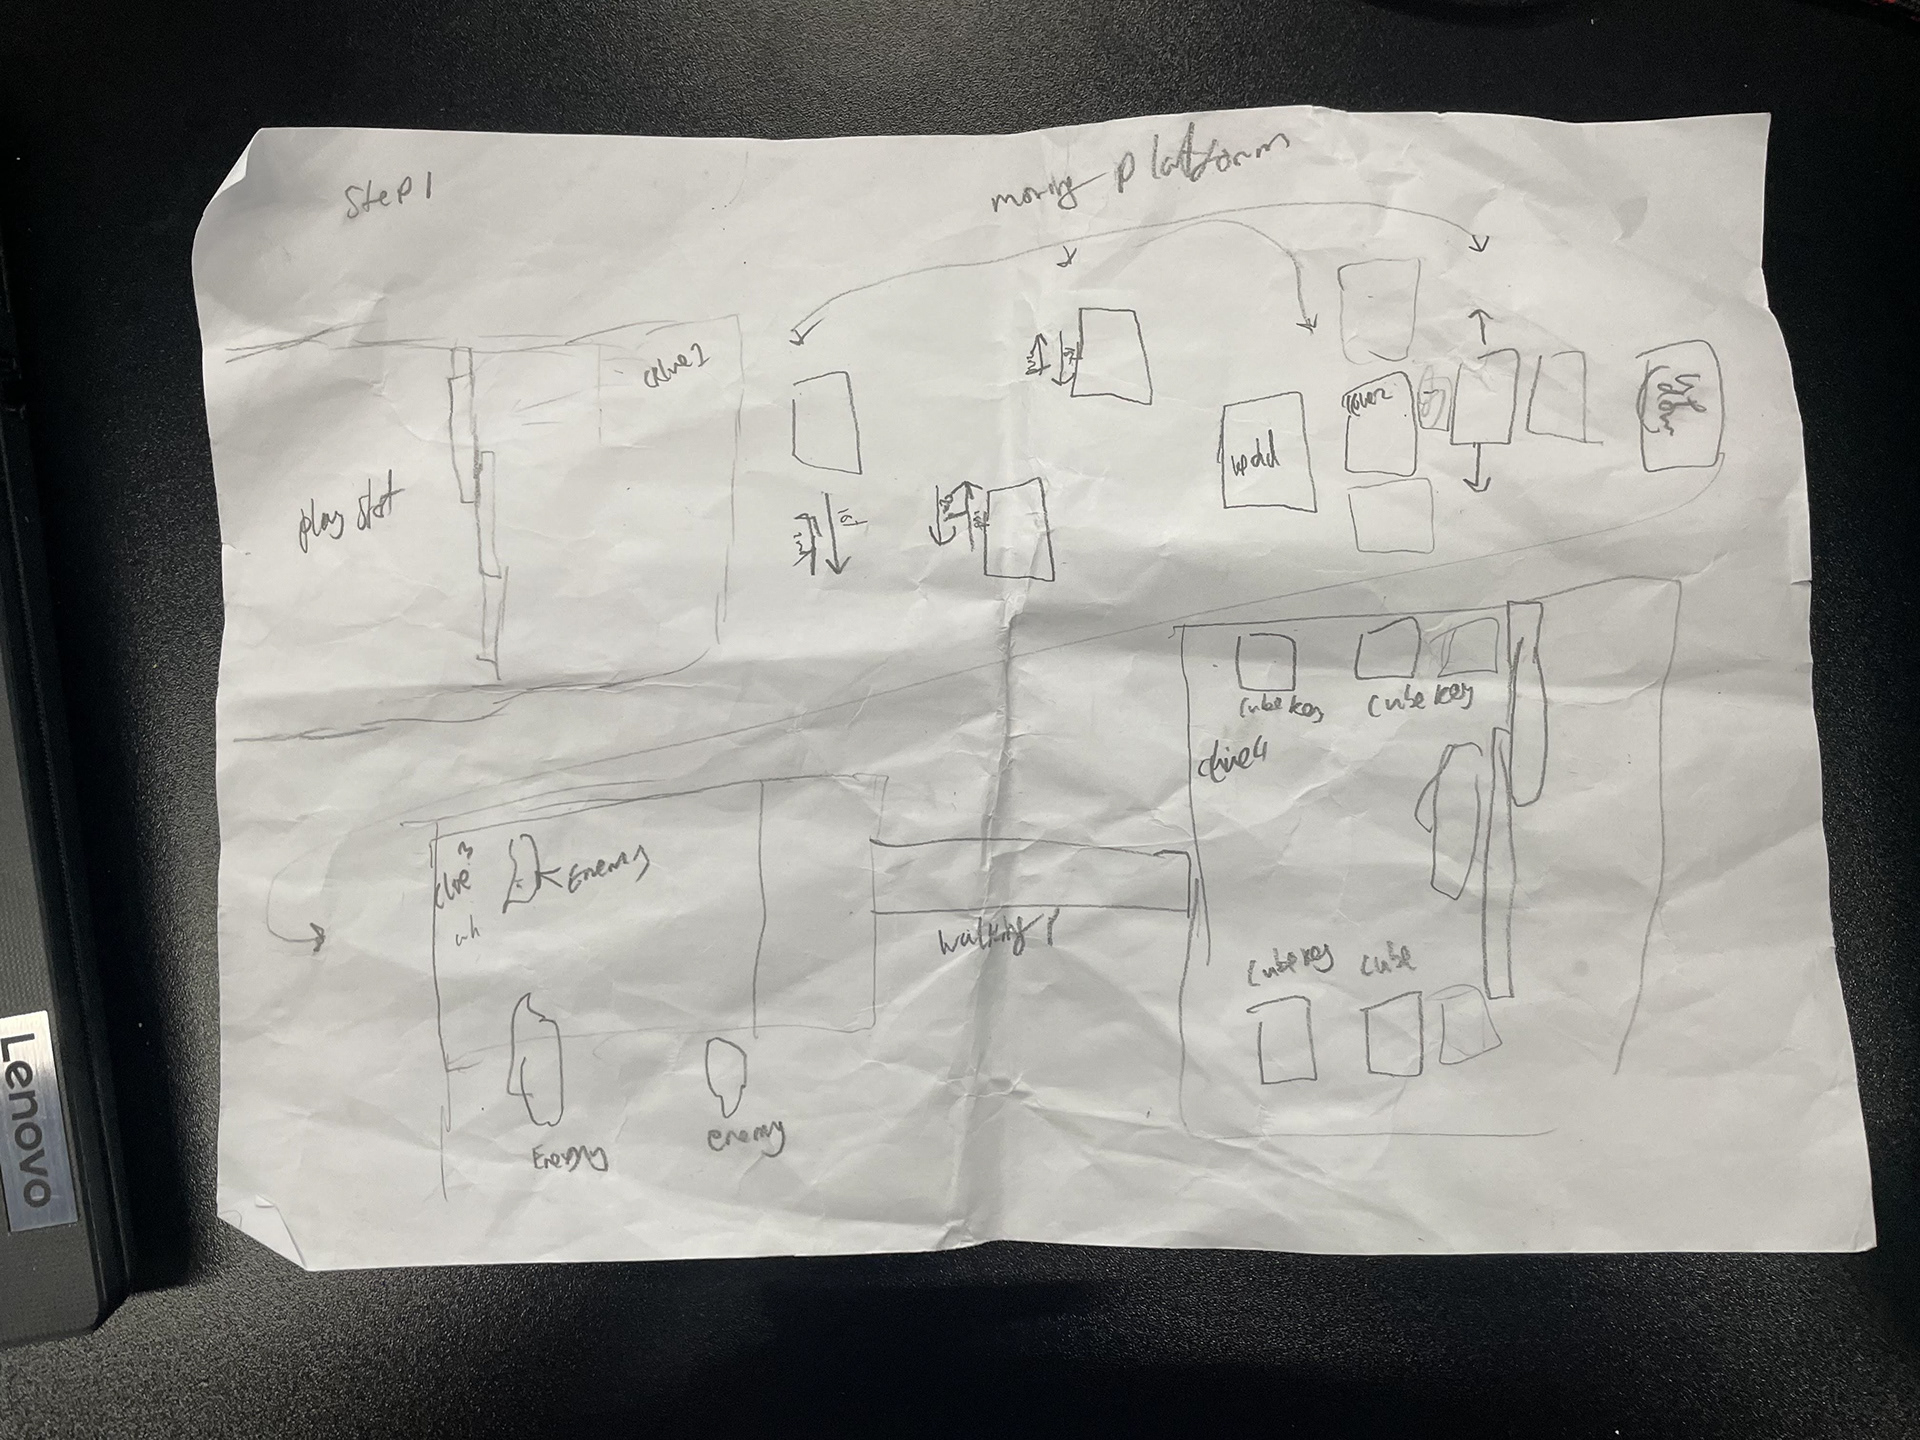
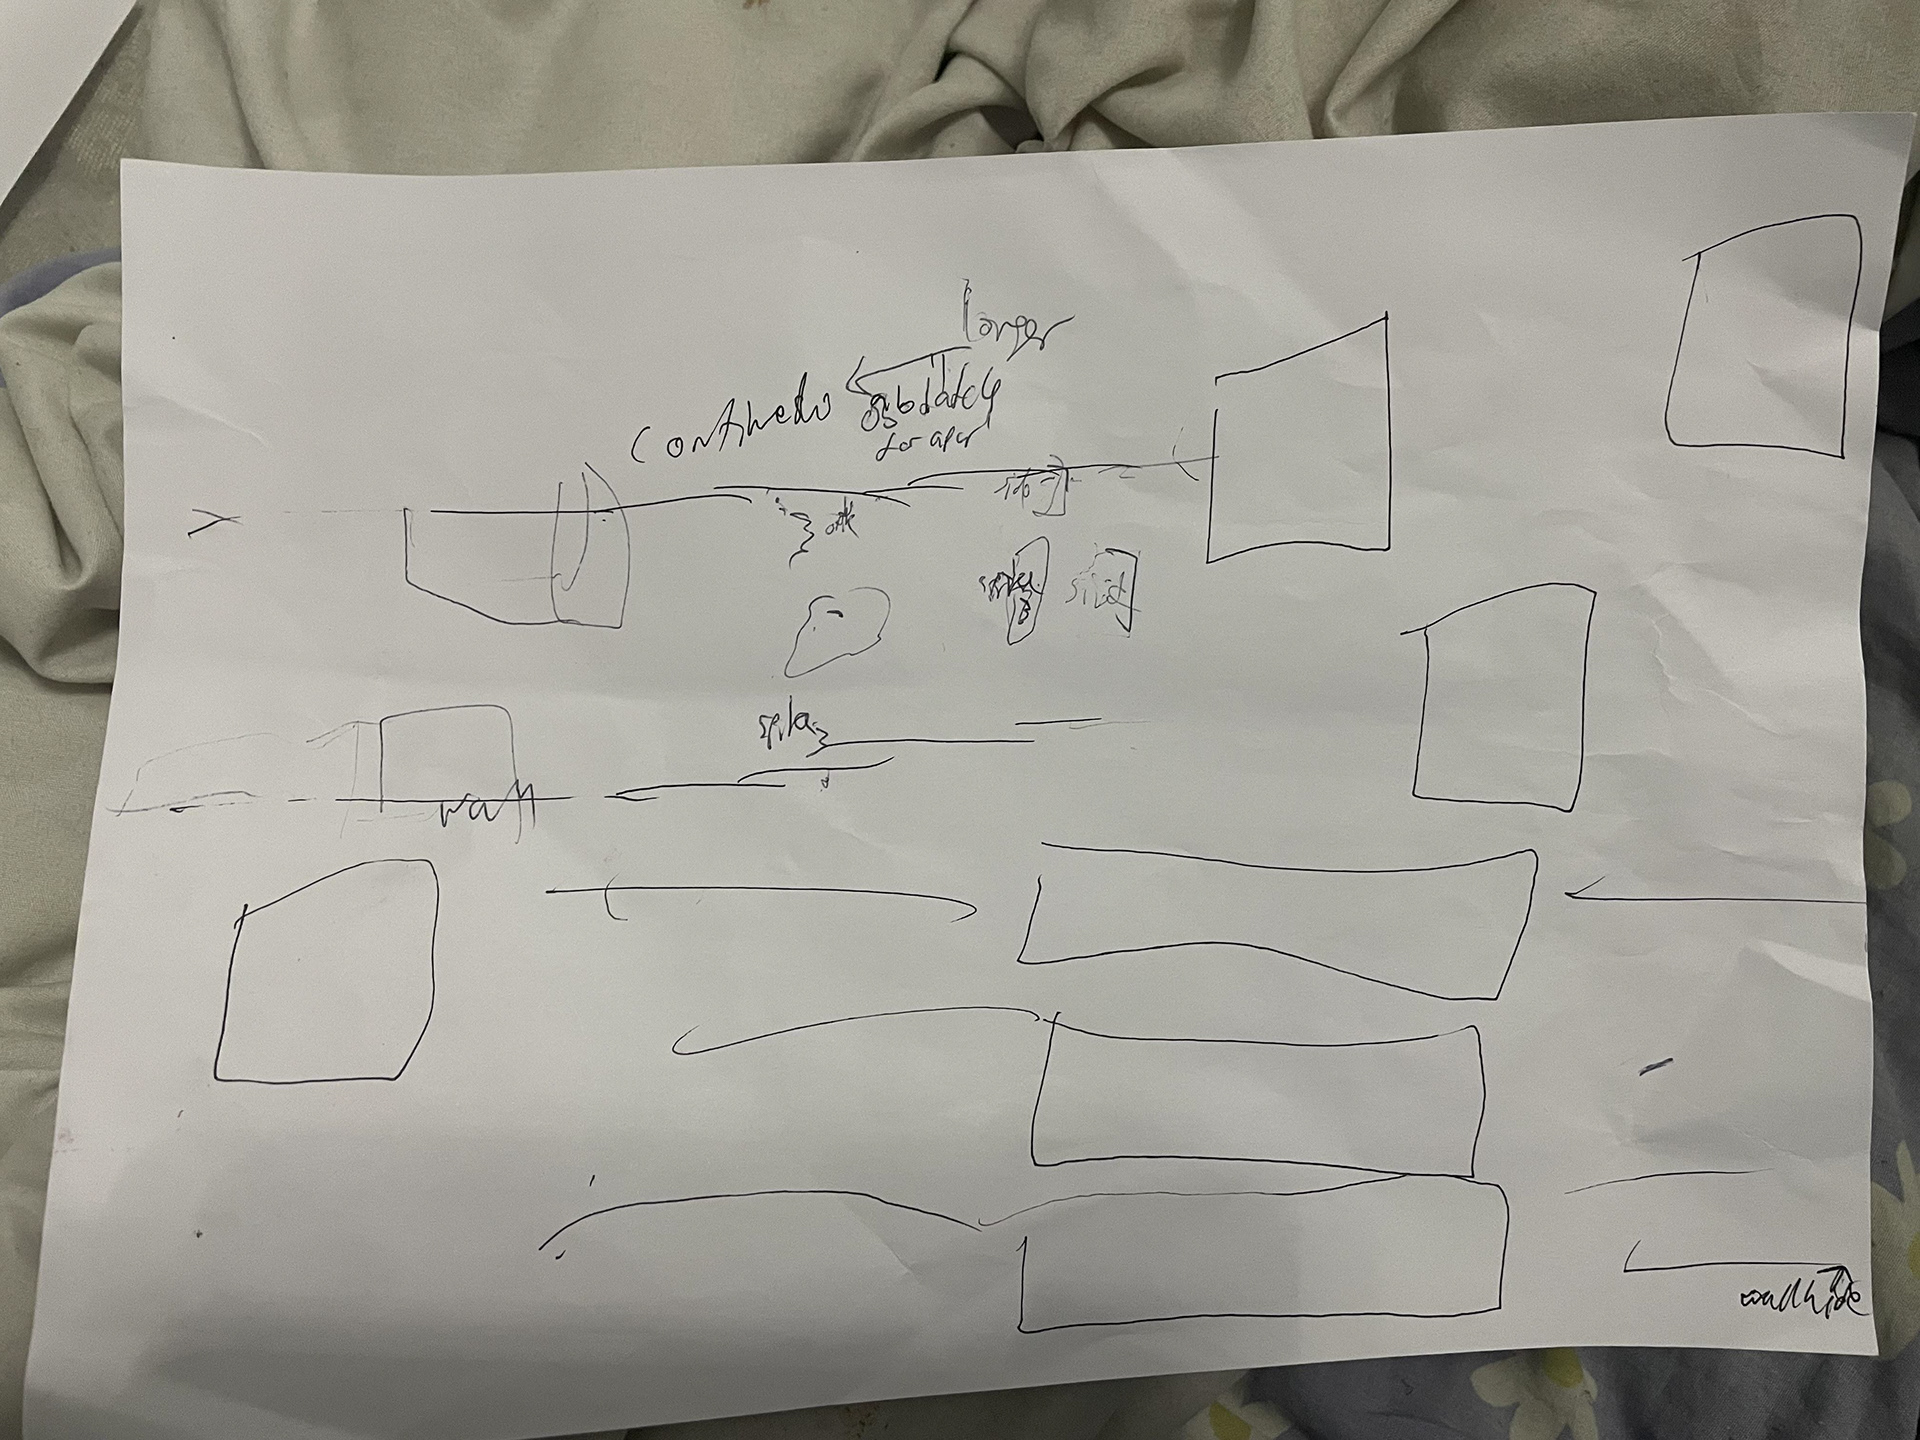
There are 4 steps., creating a design, which I am very familiar had used complex versions a lot in the past. But simplified steps:
Create Level design layout on paper
A Descriptive run through of the game from or level
What Blueprint is needed?
Creating actual stage.
The Mini project is FPS platform game:
First person Platform game
# Step 2
This is a simple mini project platform game that II will be creating.
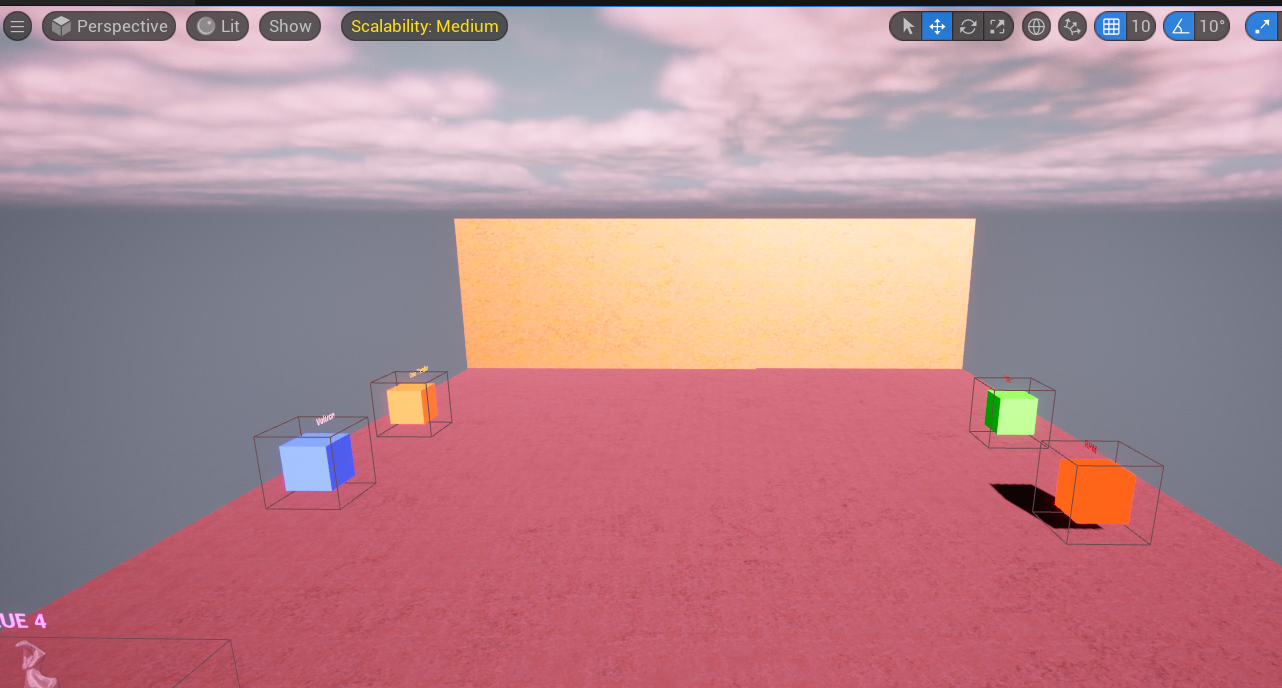
The motive of the game is to get from start of level to the end. It is a platforming games so you will be jumping on platforms and make sure you don’t fall to your doom and touch that kill you. You start of Walking through automatic open door. Then there’s Moving platforms that goes up, down and side to side watch out of the things can have hurt. Then You come across AI enemies that will try to get. At the end you will have to open a door, by doing that you will place cube there on the trigger box area. Choose the right cube choose the wrong one and you restart and choose right one you will be safe.
Step 3 Blueprint Needed:
First Person set up BP
Restarting Player,
Moving Door, platform (TimeLine)
Ragdoll
Step 1.5
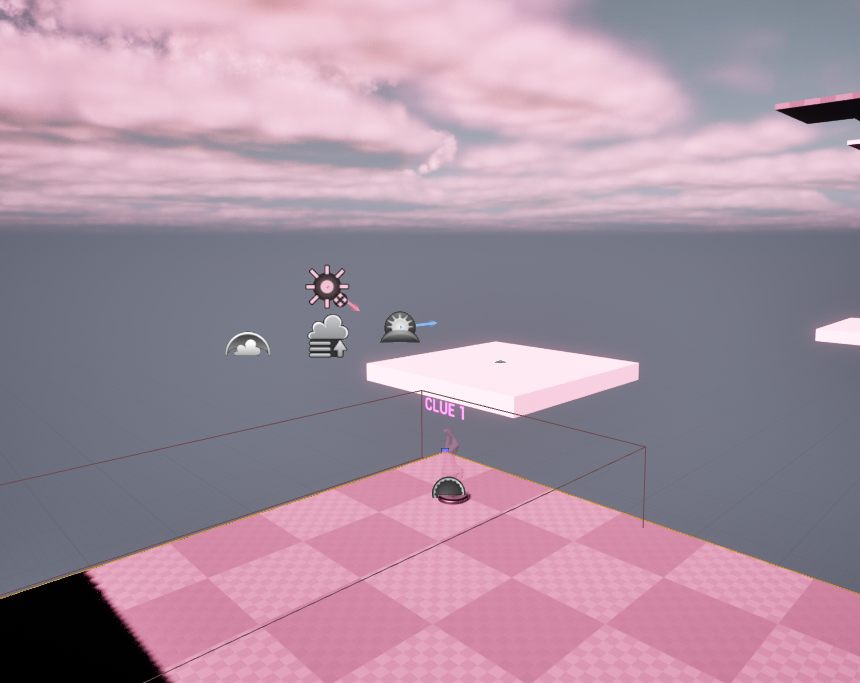
There going to be some clues in through out the level to help figure out which cube can open the door.
4 CUBES:
There's 4 clues
Clue 1: It is franchise series that about team squad that fight evil
Clue 2 : It is about driving
Clue 3: It takes place in apocalyptic time.
Clue 4: It is a series came out in 2009 Jetix /XD(UK) & ABC KIDS(US)
I Cube – RPM
Cube - Dino Thunder
Cube – TMNT
Cube - Voltron
WEEK 5 - 2/21/2024
Part 2 of Simple Mini Project.
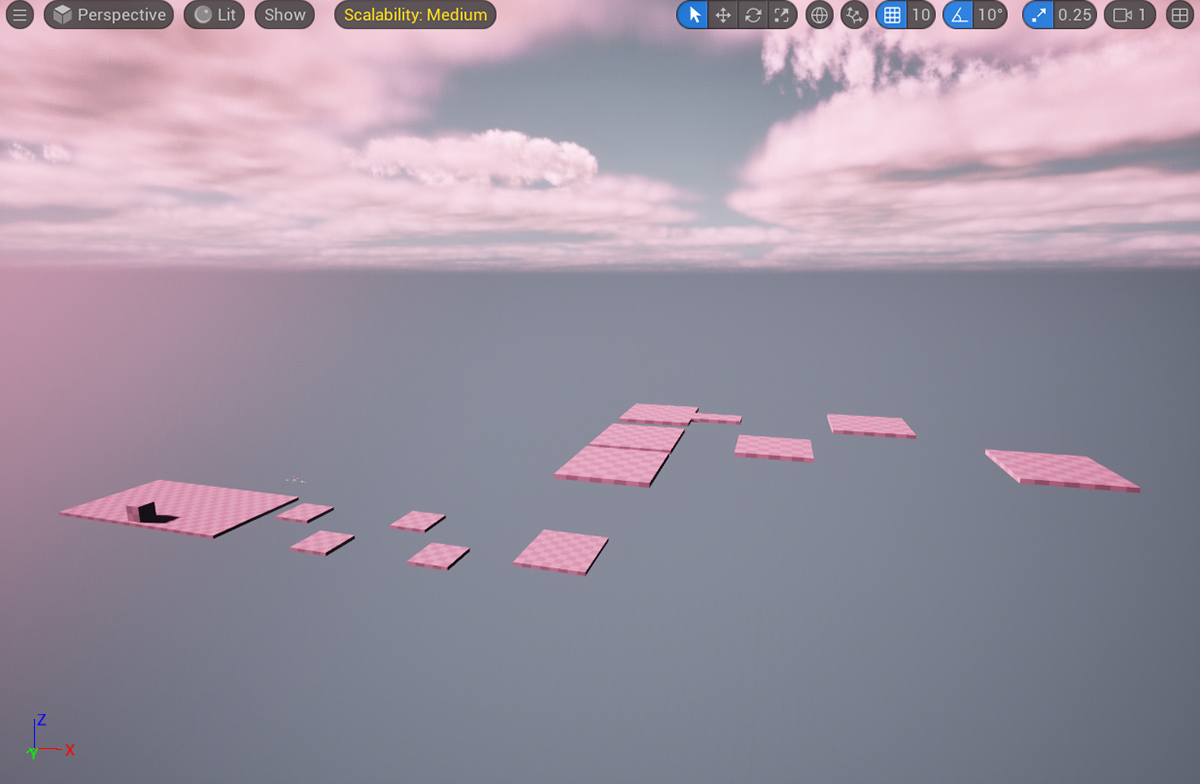
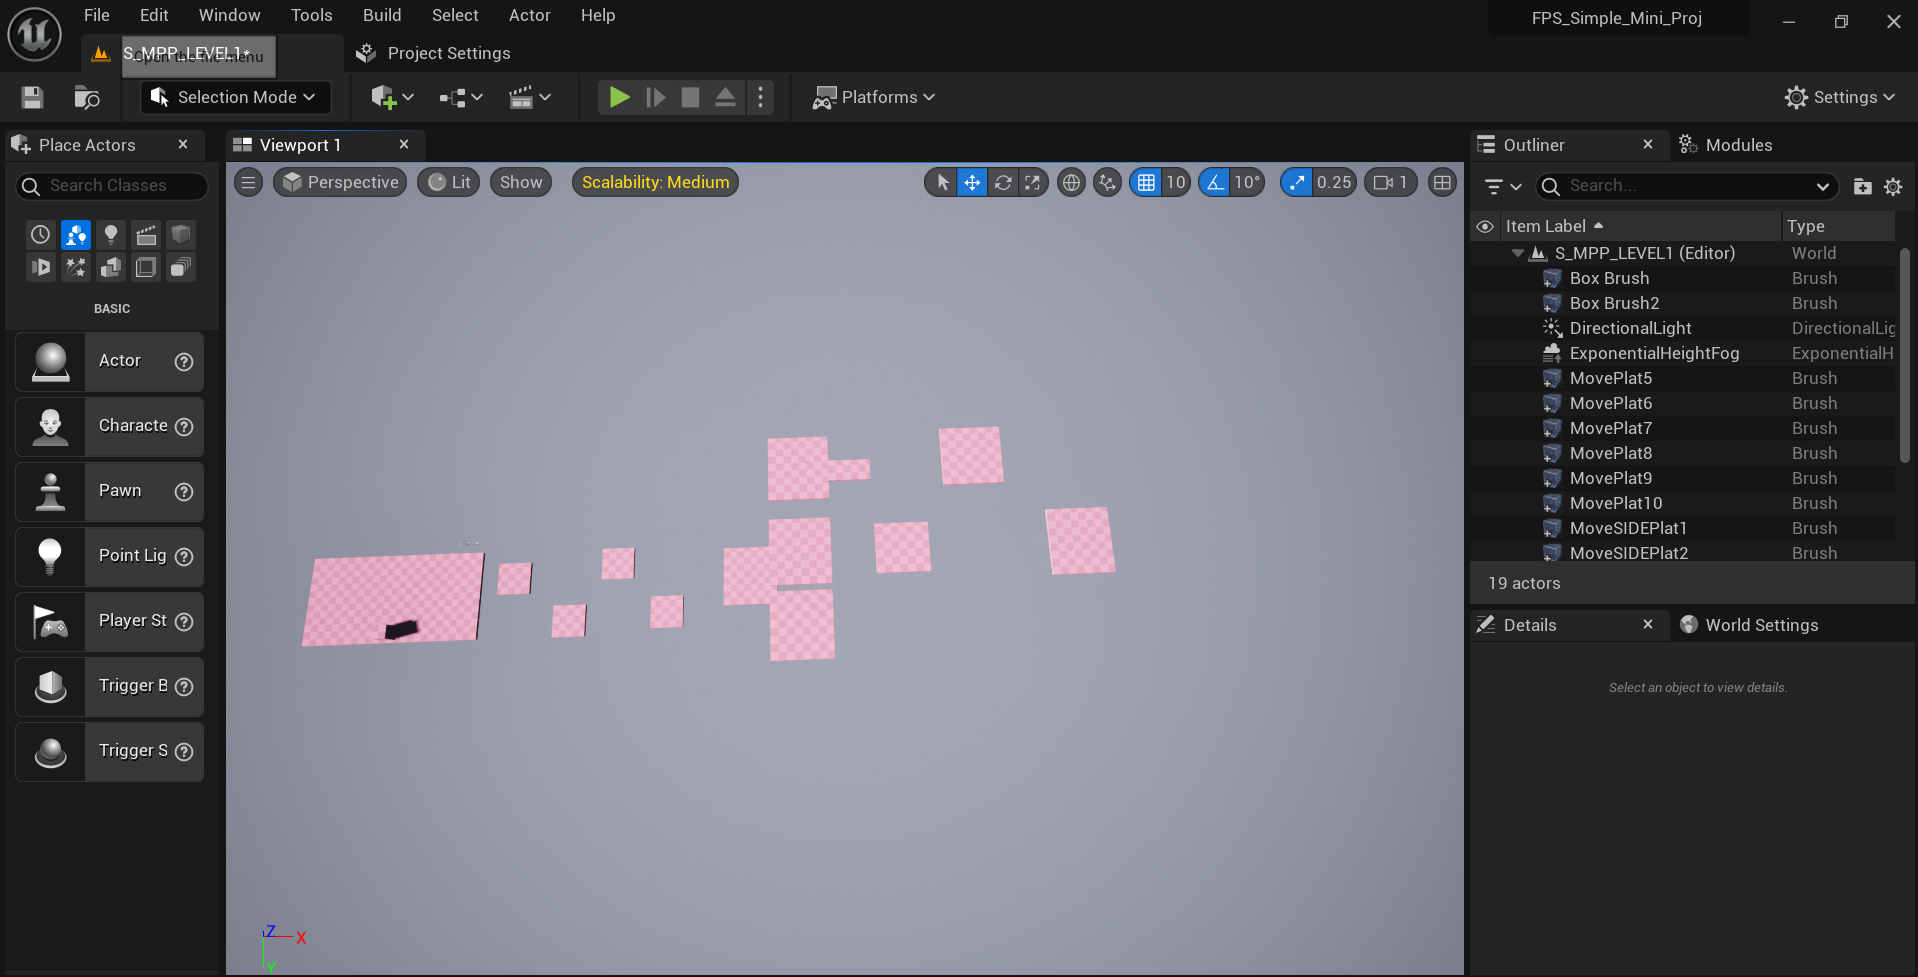
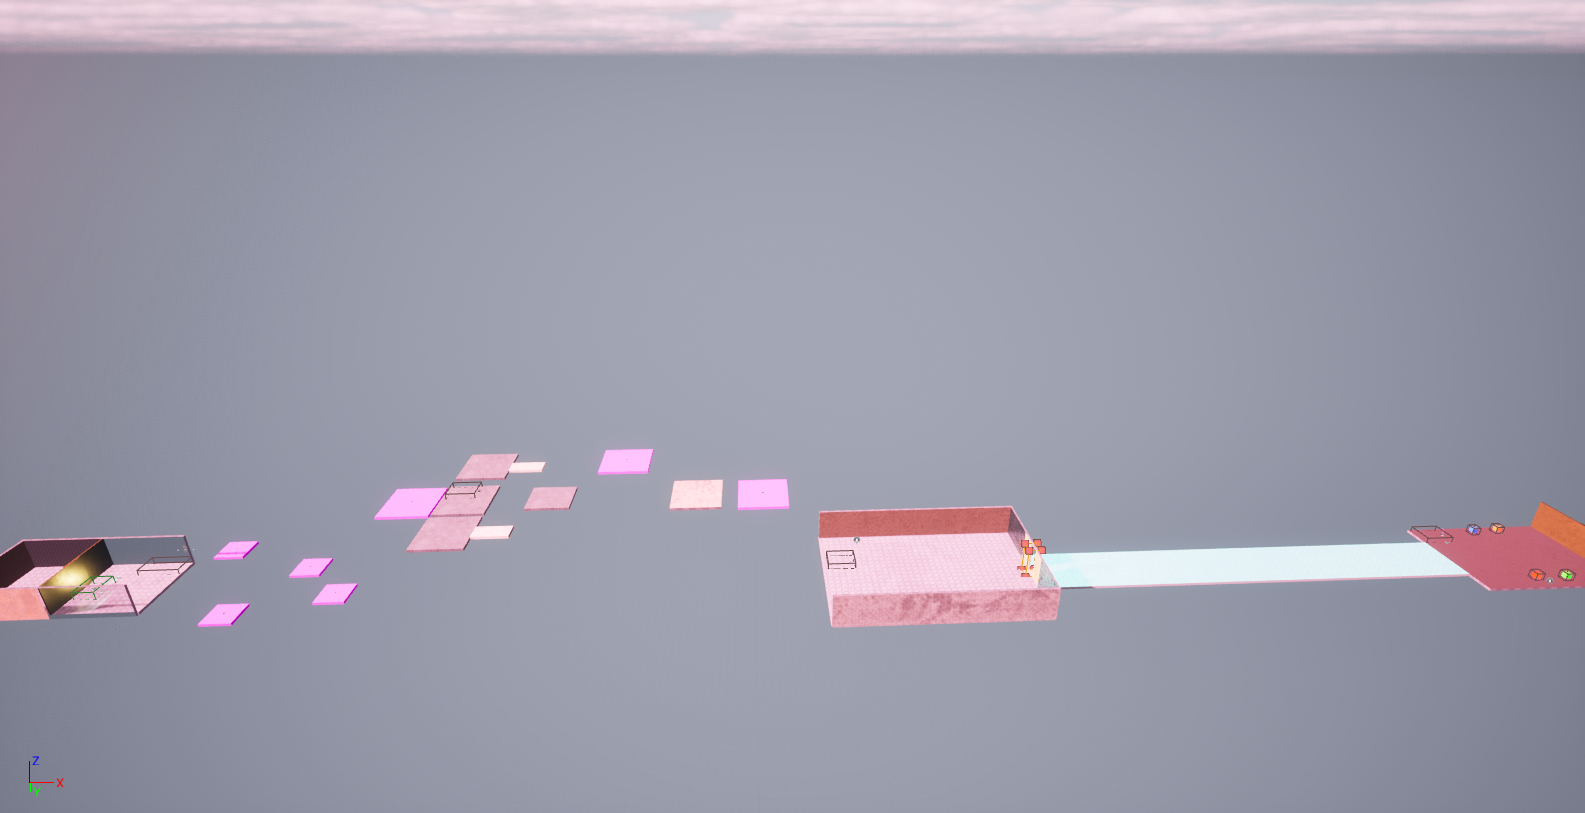
Today I attempted to build the layout of my level. Following my level design layout. I also recreated the FP to use for this Mini project.
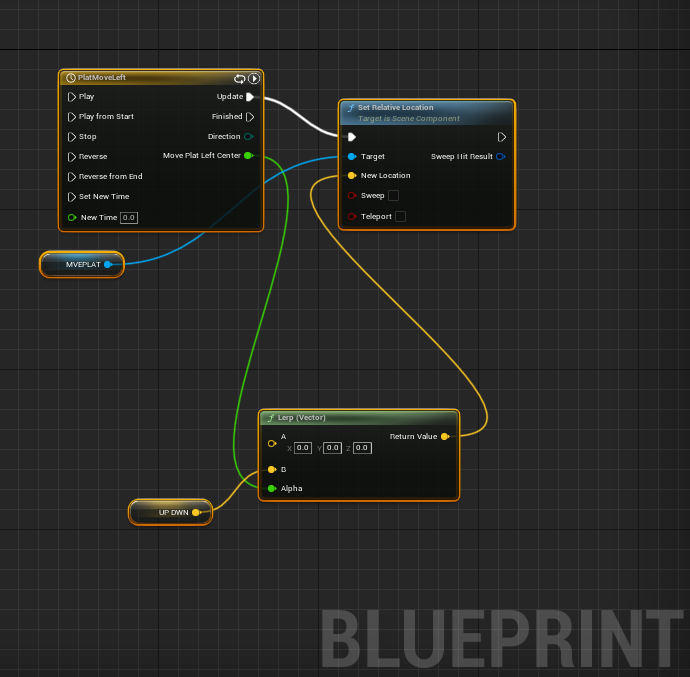
After I made open door like the way I always do it. And this time I wanted to do this with for the moving platforming but this time automatic I tried to tweak I normally I could get it to work. I have done moving platform the way I normally do it but it needed trigger response but I haven't done without one.
2/22/24 Night( Early Morning) continue:
I finally able to find a solution. one of my prof had tutorial about Moving platform that I didn't watch. The reason is that I already know how to have a moving platform. But what I didn't realize it was automatic way which it is what I needed. As well it uses float instead Vector(Which I used). One unique thing is called a 3d widget vector , which allow you to drag in any direction and the object move in the direction. Which is dope.
WEEK 5 - 2/22/2024
day:
Today I quickly laid out all the moving platform. Then I set up clues, and used the text change method that I was taught by prof and showed on this site. And what I did was used the Unreal starter content statue as a host for clues. I was able to tweak code so that my character name doesn't show up clue text. And finally I key holder(used cube as a place holder) ,and used text render for name and answer choice. And I recreated the grab drop function.
WEEK 5 - 2/23/2024
Today I started I follow the instruction sent on how to edit defaultengine.ini, ad include some line of code in it.
I also place materials in my games and texture most of the level using start content. Looks simple and good.
I decided t create a trap walls that goes back and forward and was able too look up how to make so when my player hit collision on the wall he dies and restart him/her to the beginning of the game.
WEEK 6 -(Mar)3/4/2024
For this lesson, I created another unreal project but this time this for the endless runner game we will make. This time on a third-person template. This session sir went over how to modify my third person so I can only move left and right. Change and transition instantly to go side to side.
GDD
Benjamin Nunoo’s Endless Runner game.
For this simple build , is to get from Point A to Point B in one direction without getting touch by the moving Spikes. The Player character will automatically run forwards while I press the A or D key to move In the different that I set. I will put abstocal to slow you down the player for the Moving spike to have a easier time catching up to you. And to end the player run. You can use power up or speed pads(like what they use in sonic. I m
What I need :
Moving spike with collisions
Speed pad
Slow down liquid floor
Hud
What you might add:
Collectible

(MAR)3/6/2024
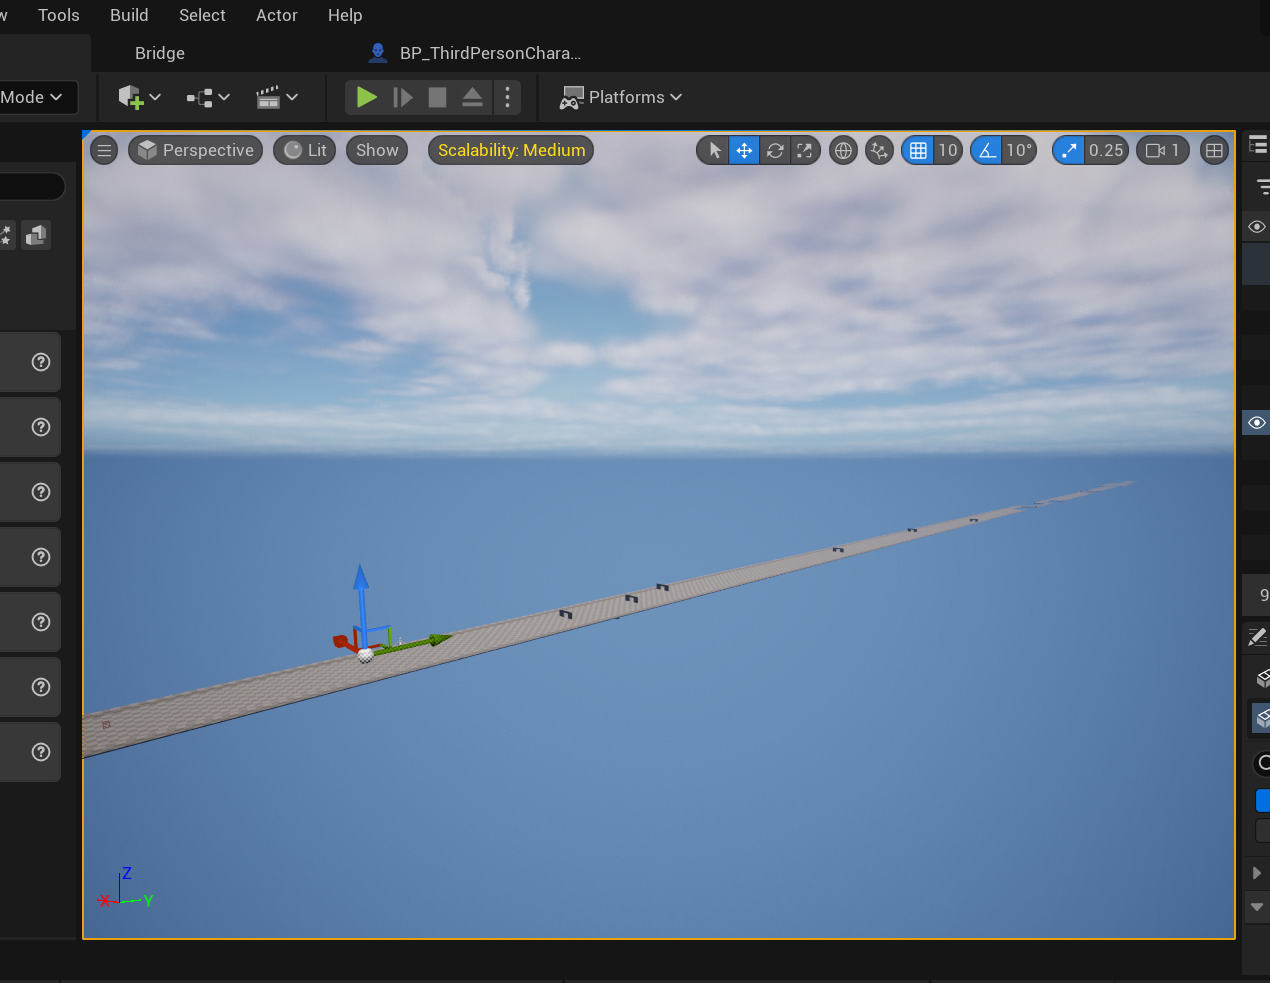
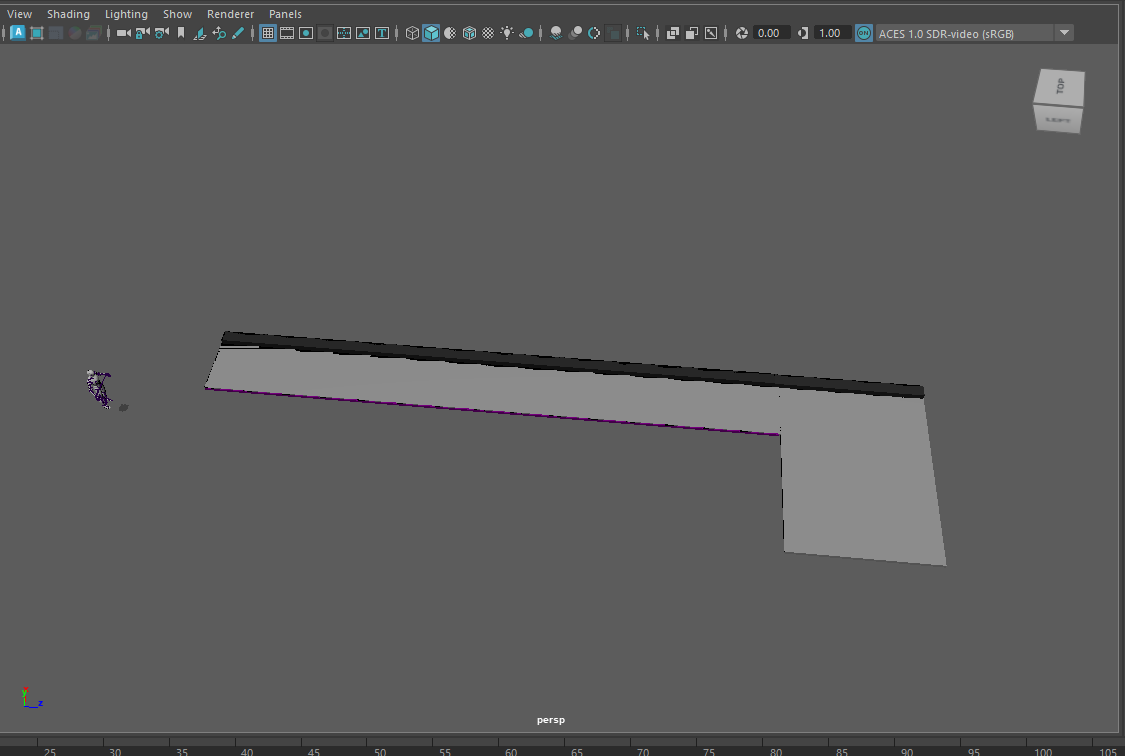
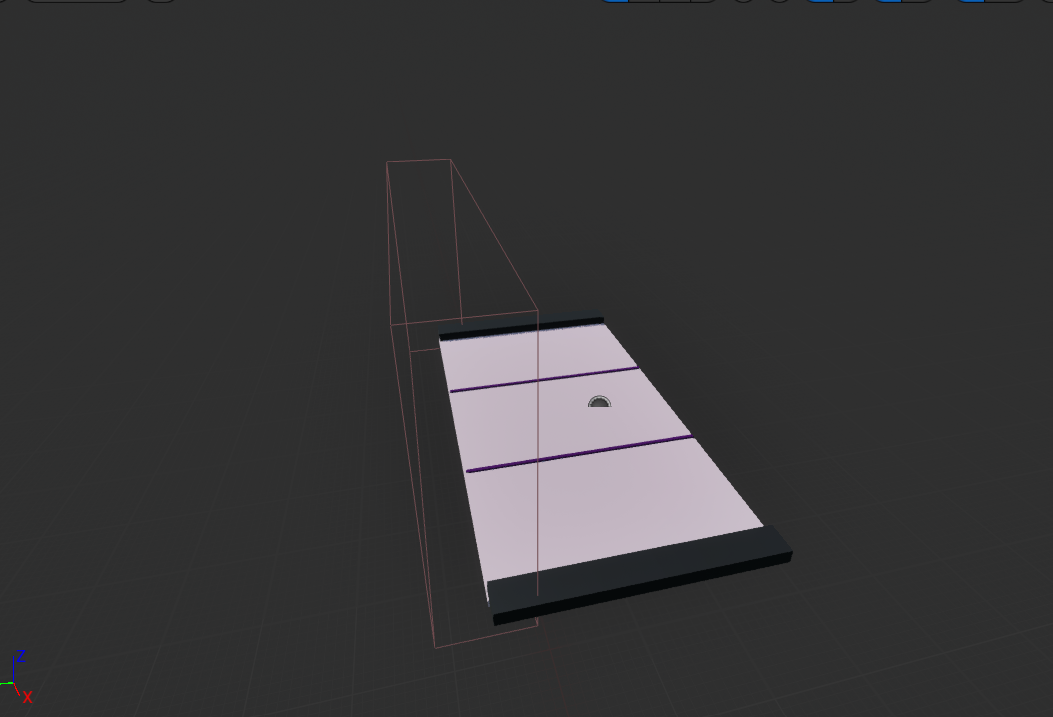
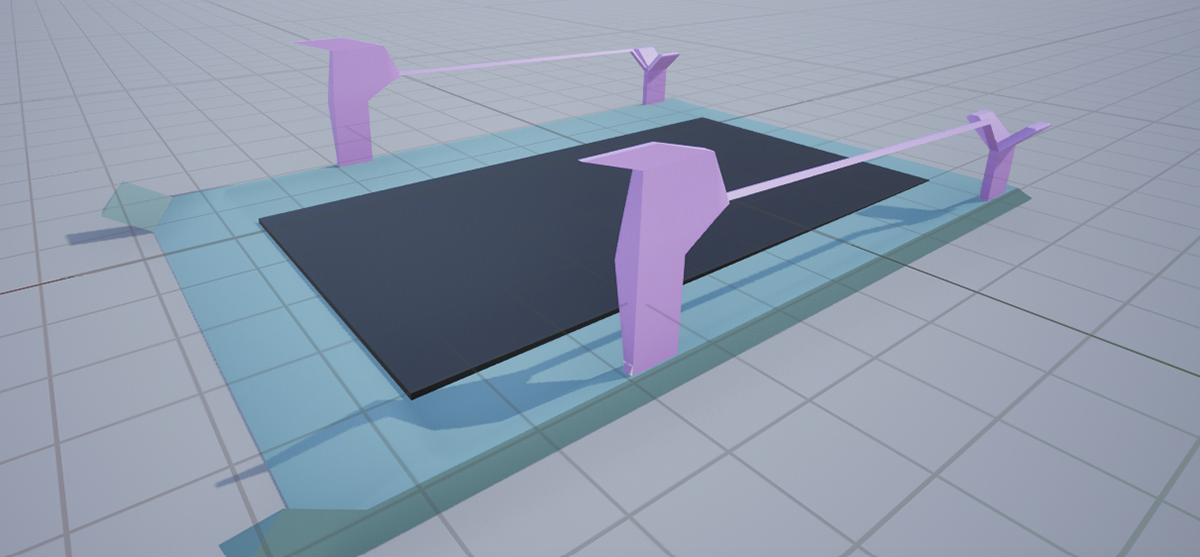
Today I continue building My endless runner level. Here is how it look like so far in the Image , I built some of the obstacle day before or two I don't remember because I was so busy building I forgot ;) . The type level design platform build I made is type I decided to choose to be what is common In the game , I drew it out on paper on Monday. because Im freestyle how the beginning part of level will look and then today drew out the rest of it. Later on this week or next I will try out spawning tile method my teacher in video which I didn't know he did, ,more like he was going to do that. I thought it was going to be something its going to be useful easier own me . I because i have different way my platform look I will figure on how to some randomally generate together while being endless. But for now I will focus on the other function slow down and speed pad and character destroyed when he/she hit spike on this week.
(Mar)3/7/2024
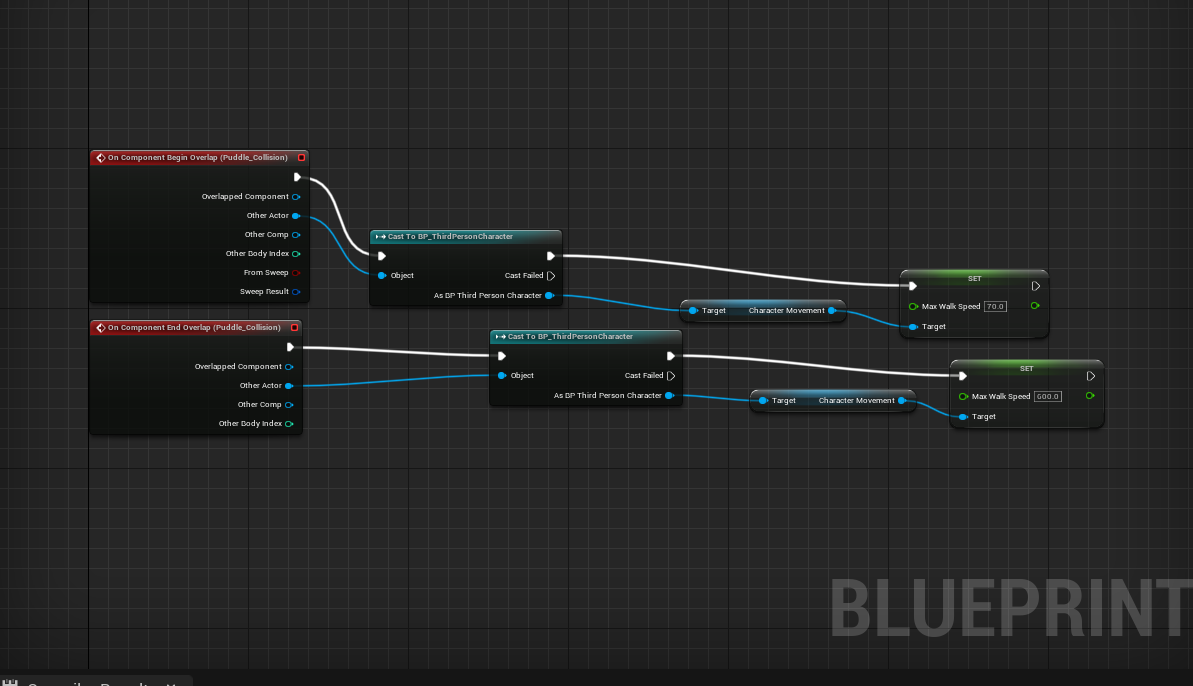
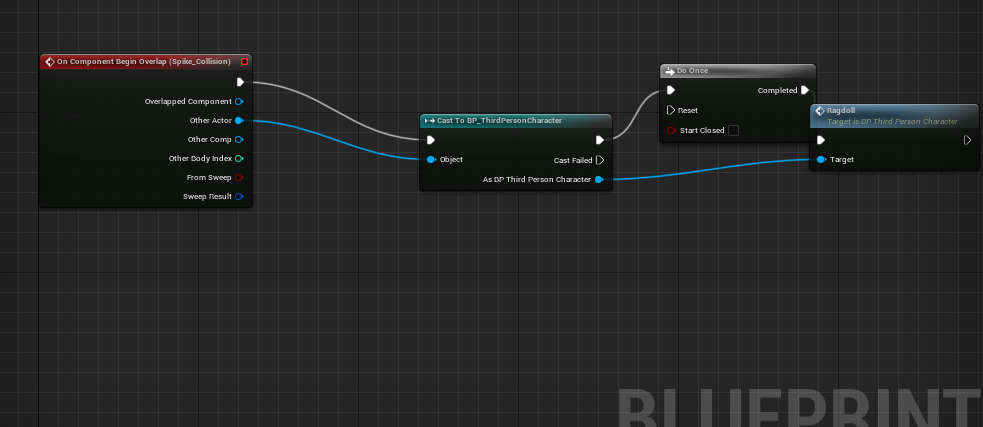
Today, I made a liquid puddle that would slow the character while on the puddle, but it would go back to normal when the overlap ends( I was going include in project at my last school in college but couldn't)(link: https://www.youtube.com/watch?v=EoaS9GLGIvA&t=292s&ab_channel=MattAspland)(I used liquid mat and used flat cube for mine). I also caused ragdoll collision for my spike, spike wall, and slide dmg. What it does is when the player touches the collision, like failing to slide on time, fail to jump or move out of the way on time or was too slow, then the collision it will ragdoll end immediately end the game( I had remind myself how to do it so I used a bit of this as influence to help setup the ragdoll link: https://www.youtube.com/watch?v=H2I7I8blgn8&ab_channel=GorkaGames).
WEEk7 - (MAR)3/11/2024
Today I finally made my spike and I'm still in the middle of working on my speed pad model, but I put on hold. The reason is that I wanted to work on my Auto-generated Platform level, I am following the tutorial my teacher set out. Before I continue and followed the video I decided to remake the separate section of platform in my level on Maya then upload it on unreal. So I have done that part of generated there's is some tweaking needed to be done because there is issue where the platform spawn somewhere else's to continue to multiply there instead , I will try to figure out what the problem is.

WEEK 7 - 3/14/2024 & 14/2024
When I build the different level platform for my level on Maya on Monday. I attempted to watch video sir set last week for the generating level platform. There was issue there is a lot I realize on Thur This what I said( by the thing I said was said to sir:
"From what I realize it something is teleporting the generated platform to the specific axis in game mode, that need to be tweaked. I also realize if you take bp out of the world it will still generate at the same place so i dont need to place it. So i need to make so it so it can platform in any coordinate."
And
"One of things I realized is that location x for the player is linked to red axis not green maybe im wrong s o tried to change from float to vector so i can get x, y , z . and if you start game and pause then check the generate coordinate it tells the coordinate first platform generate coordinate. but the question how to modify the generate location only thing i can do is move player start to the generate location."
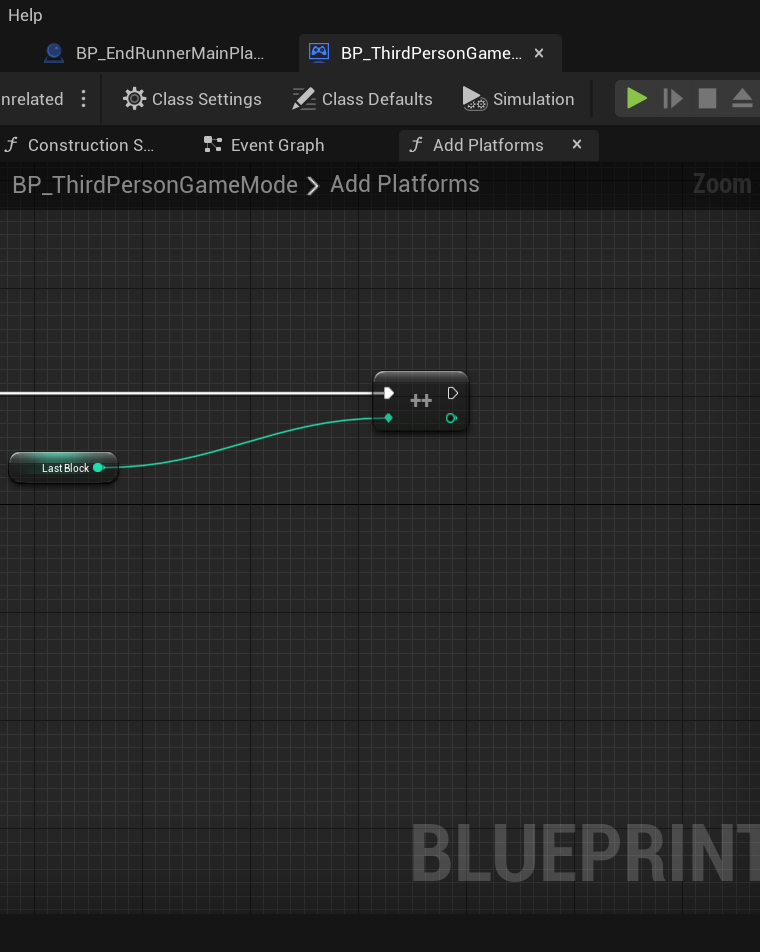
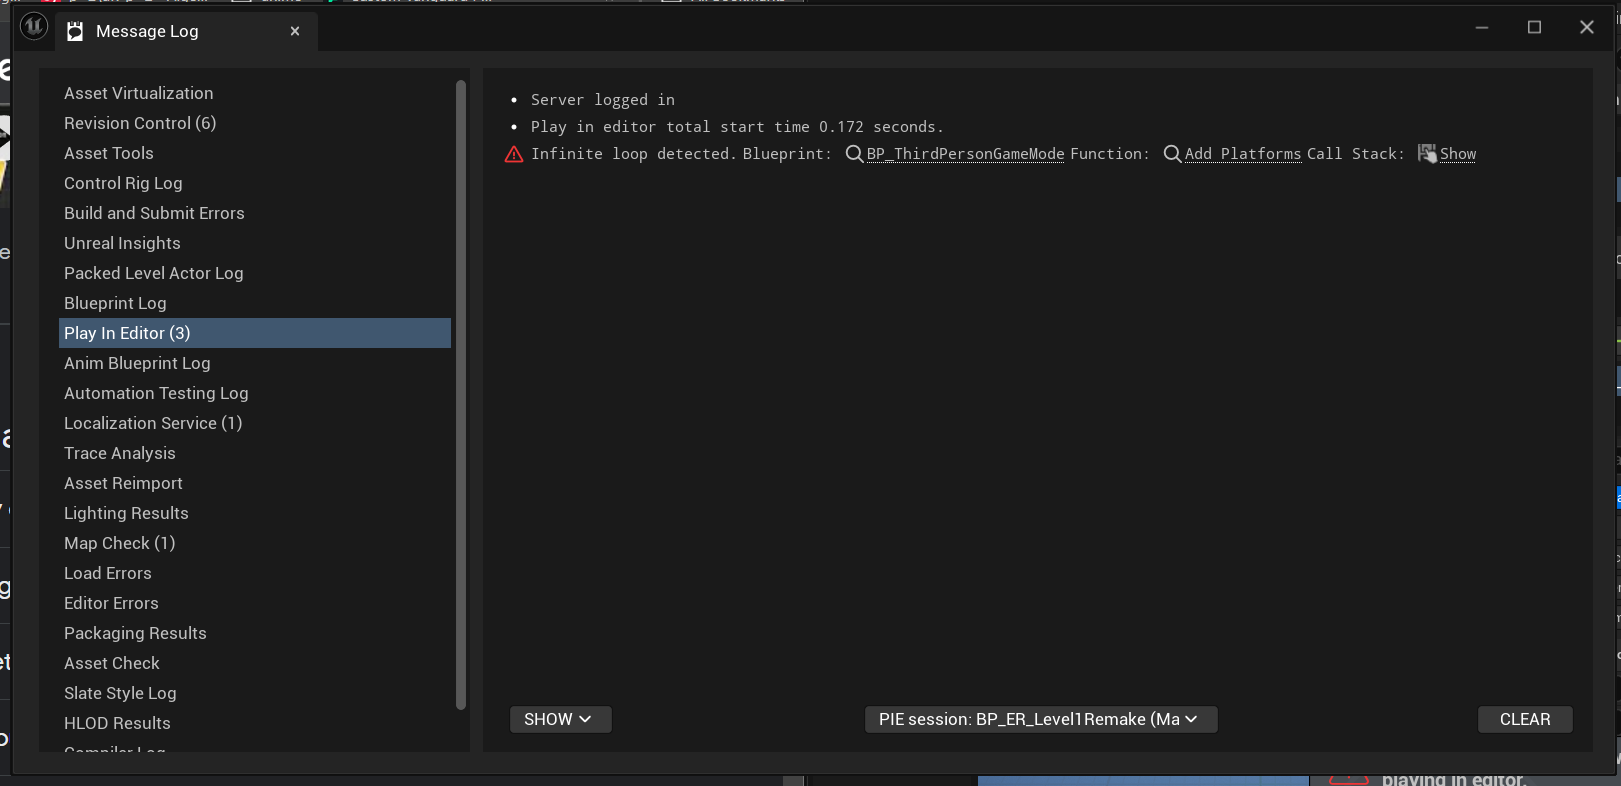
... Besides that all I did was move the main plat where the auto random generate is located voila it looks like how sir. I then followed next video so it will generate more plat and then delete previous platform every 5 sec. The video was straight forward on Thursday continue on Friday I was able set most of blueprint but there was one issue. It is if I continue it will error and infinite loop. But realize what was the problem and all I needed to do was move my player start, change the -360 int into 360 multiply on addplatform and then move my platform to generate plat location again. Then finally work . Almost forgot we created a new integer las block to link to the add platform.
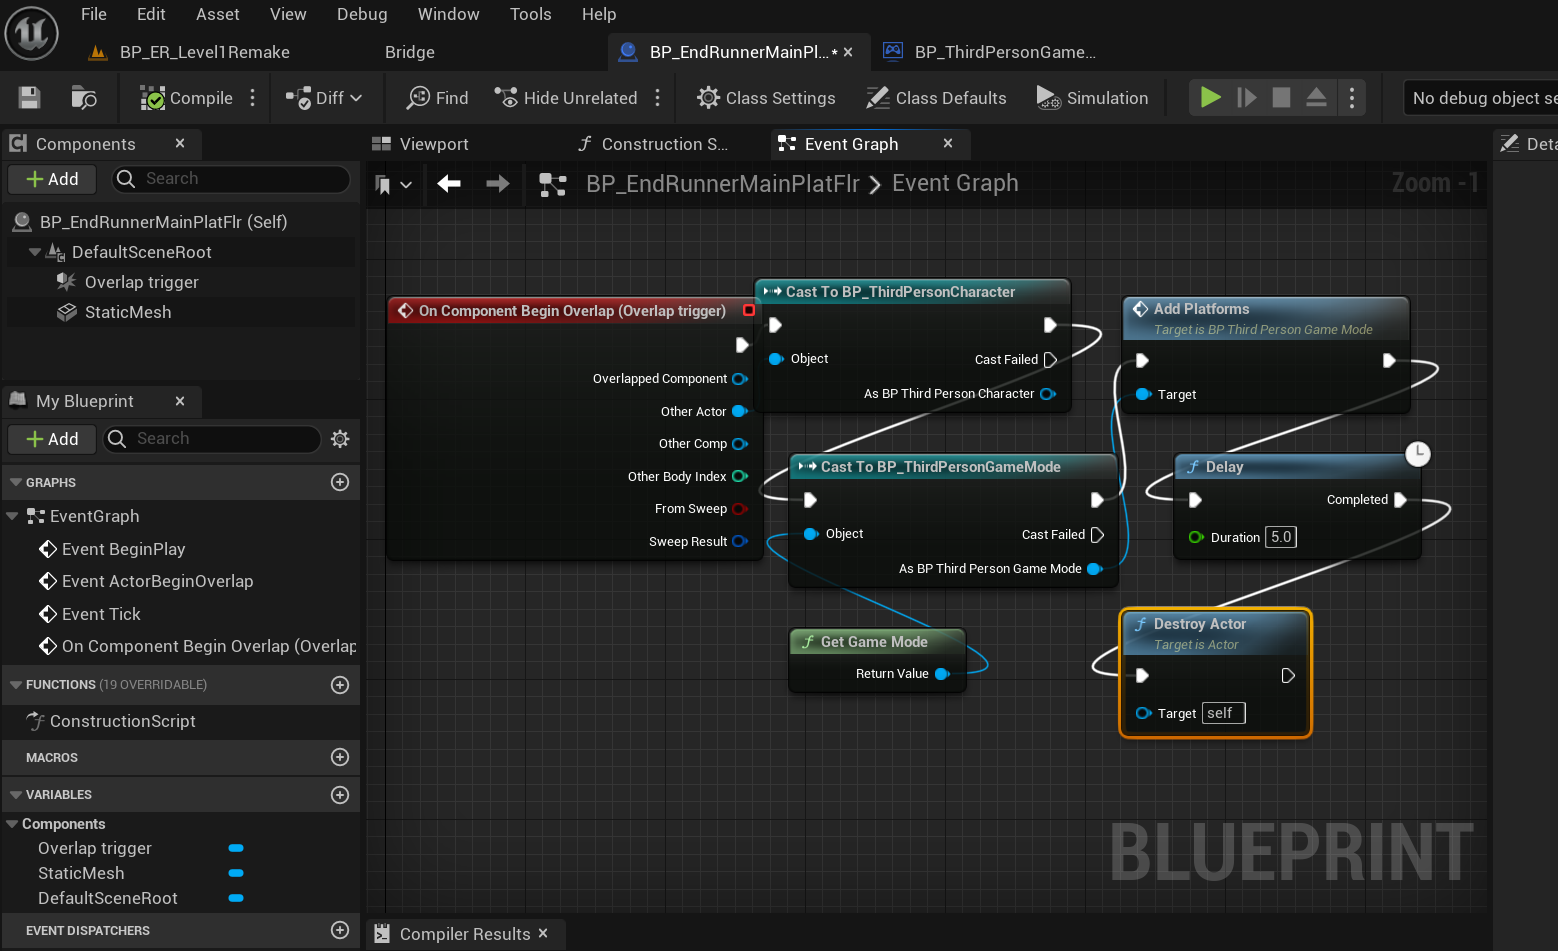
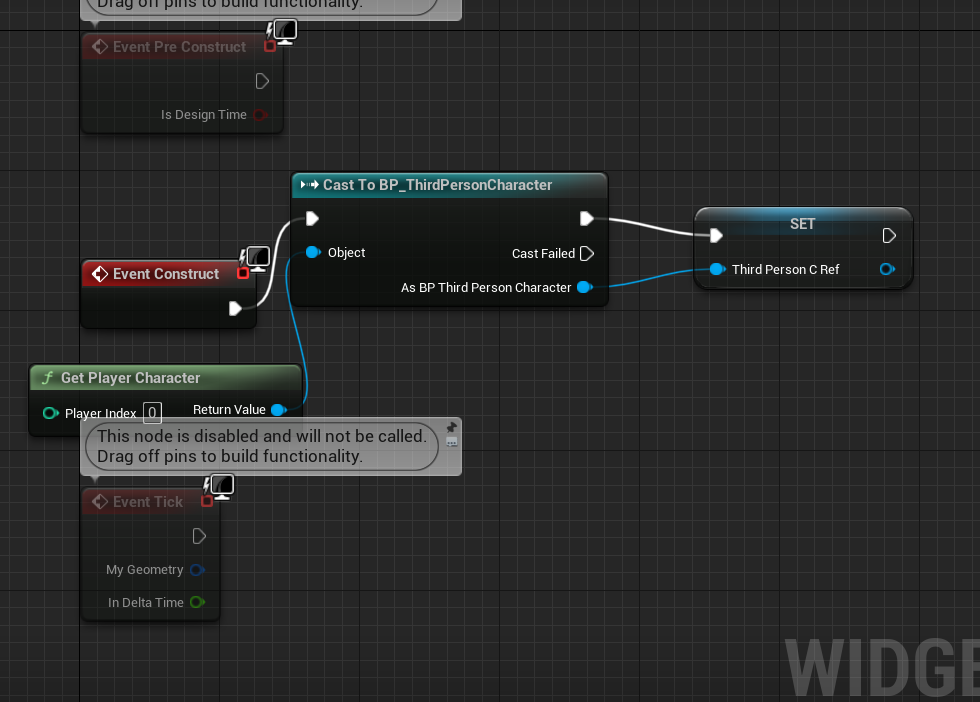
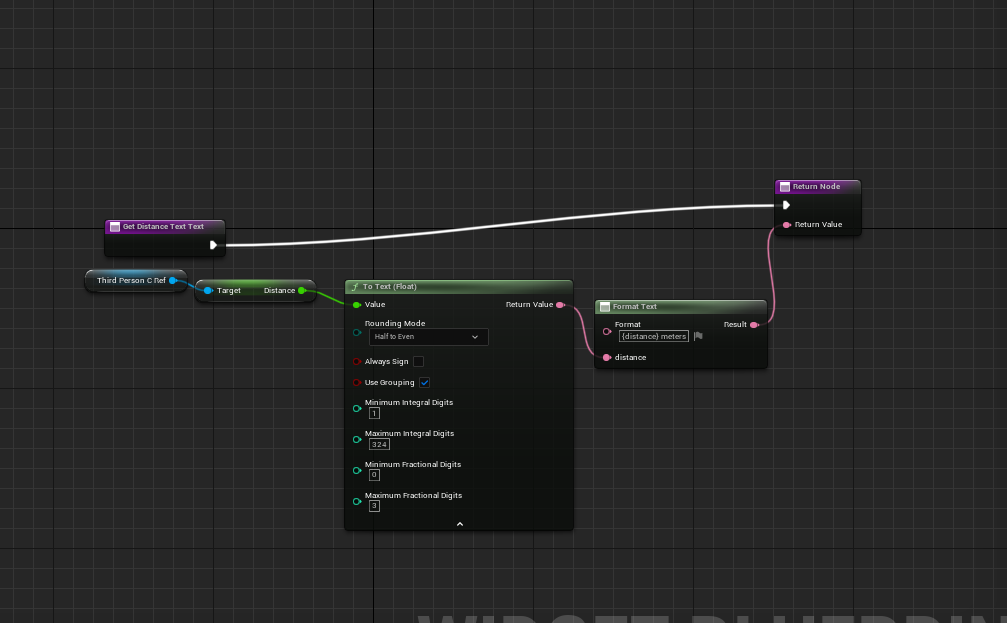
How the code work is that when your overlap the trigger , which is the thirdperson character(BP_thirdpersonCharacter) it will add platform and the plat will delay 5 sec then destroy it self(destroy actor) and reproduce plat.
Next I will go to the next vid.

WEEK 8 ~3/18/2024~
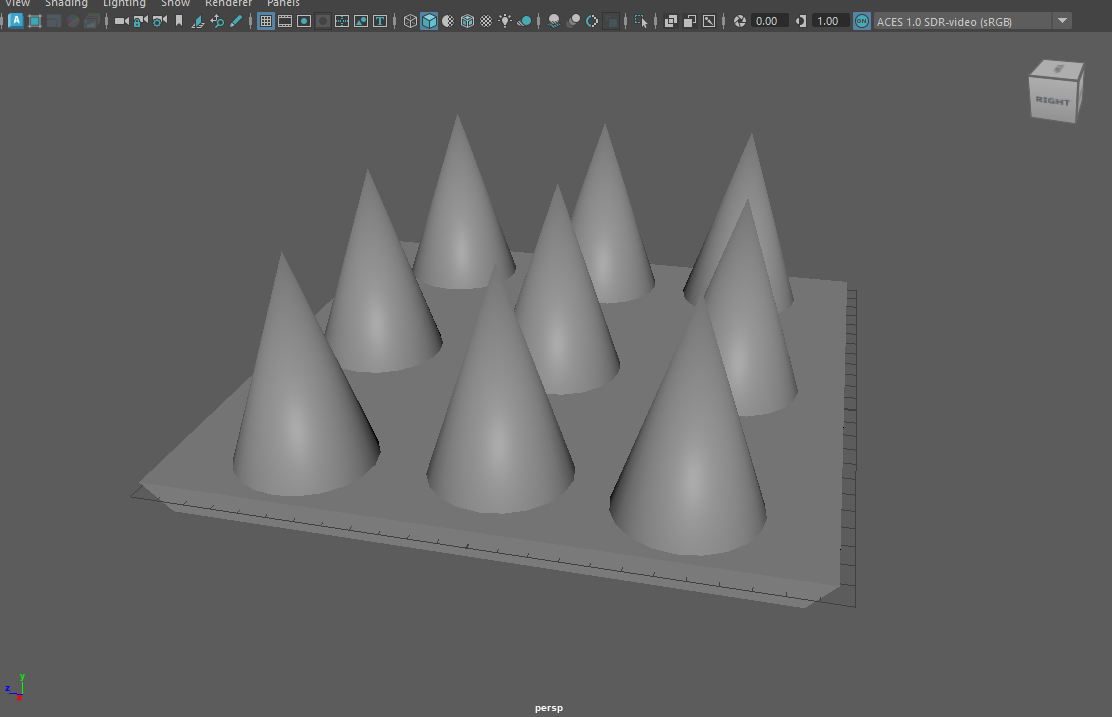
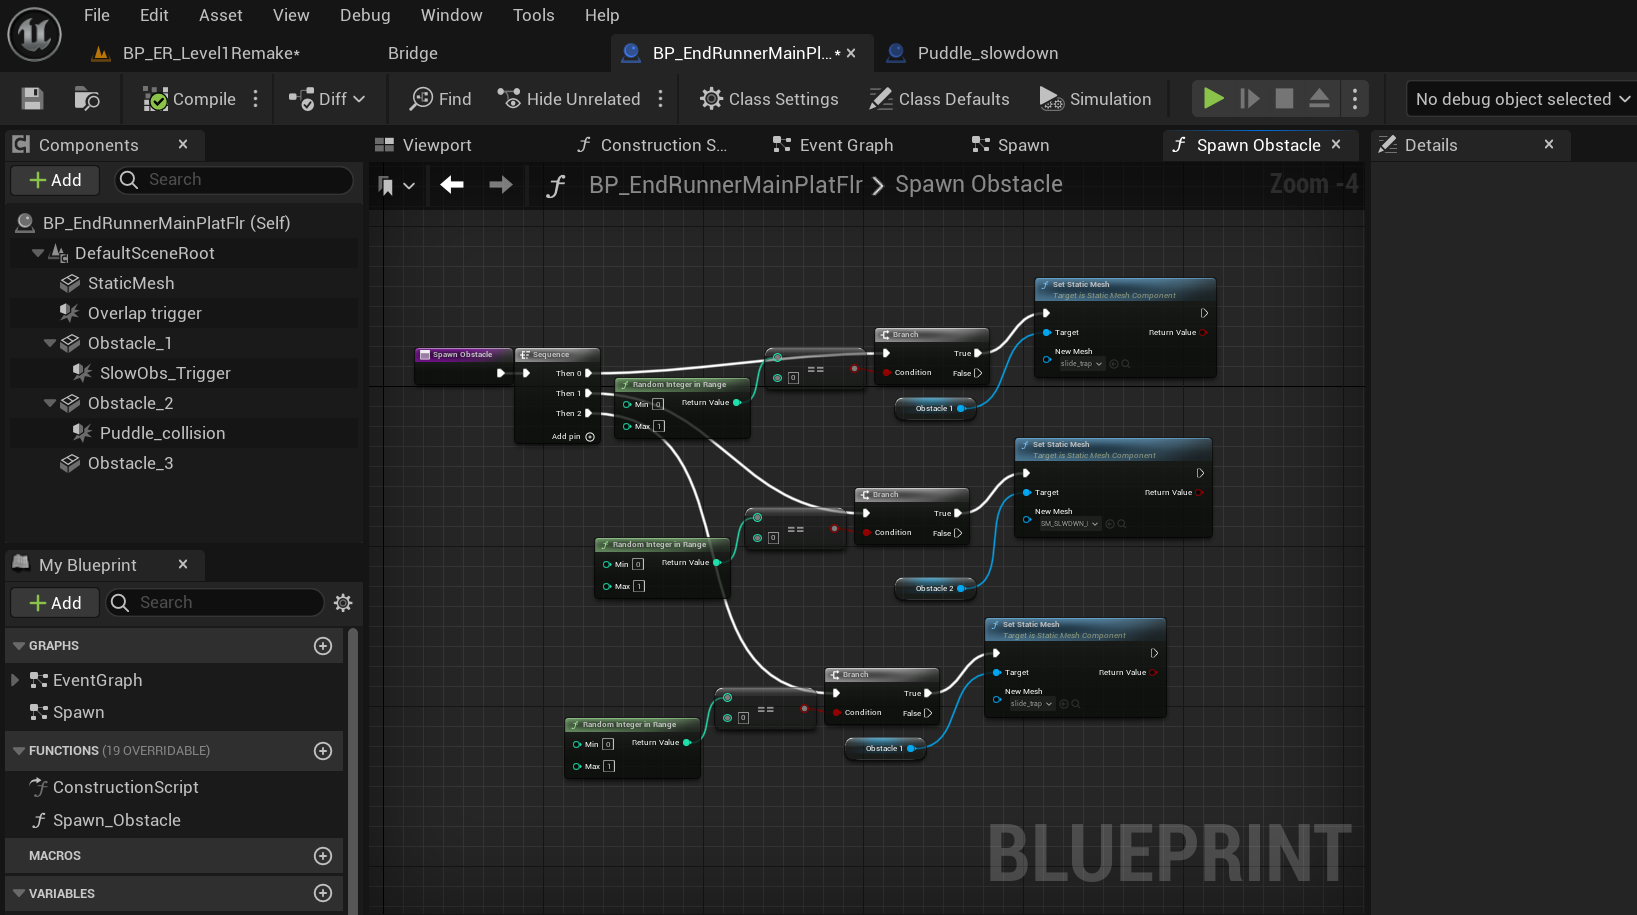
Today I watchd the obstacle video,started with first part. It wasn't easy midway especially the part when setup auto-generate obstacle, because there too many obstacle spawning and that some I wanted to modify the video method to work with my. The reason is that different item beside obstacles you can slide and jump over , so had to re-watch video to better understand, tweak and modify the bp. During that time I had to rebuild one of my obstacles which was slide trap Which I did on Maya. And also had to tweak other assets on.
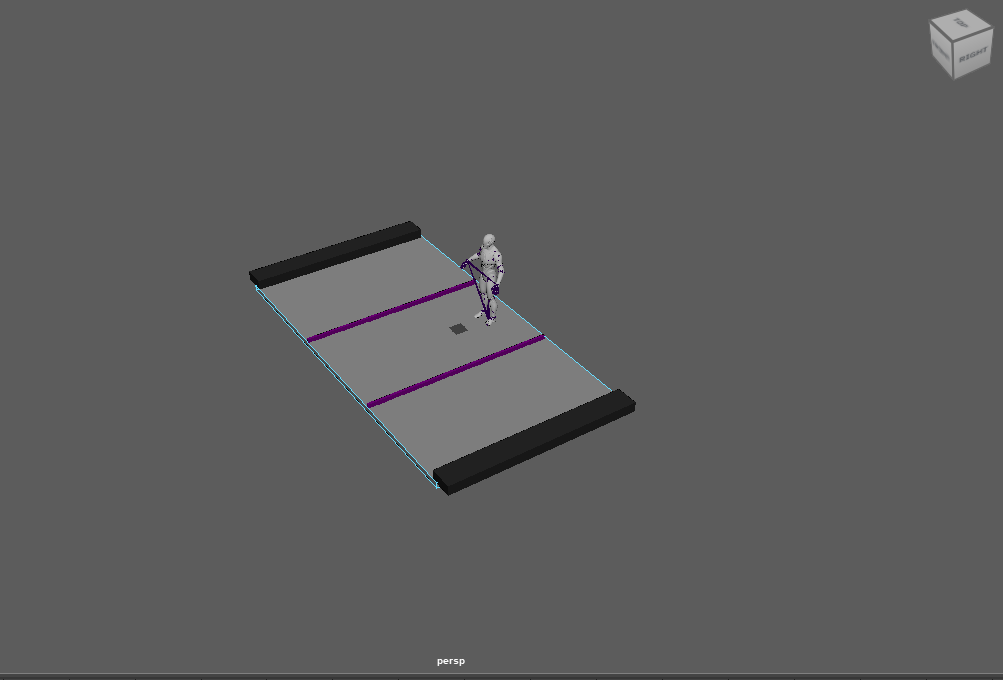
So the way code work is that , in the script , through the sequence its runs random interger function randomize the different array in each static mesh, for this one there's different assets that represent and array , 0,1 and I have 3 static mesh that represent 3 lanes which has obstacles which are the arrays. And this will generate on each lane a random obstacle that represent and array from 0 to 1.
WEEK 8 3/19-22/ 2024
I spent these days building and tweaking auto generated obstacles , for example stopping a lot objects spawn at once etc.I came across an issue that my teach have take a look and he will get back to me soon. What I said "Sir, how to give a specific index A Reference so I can get index that represents a static mesh so it can be use in event play give function. Like for example obstacle 2 event get index 0 (which is speed pad" I finished the design of my speed pad and made the BP code of it, using "dilation", I finished my spike design and uploaded on Unreal. I also made the main menu and next week I will created a design for it.
On the last day of the week Im working Ai chase that I will continue next week.Im using wall spike for the Ai chase.
WEEk 9- 3/25-30/2024
This is what I worked during this worked:
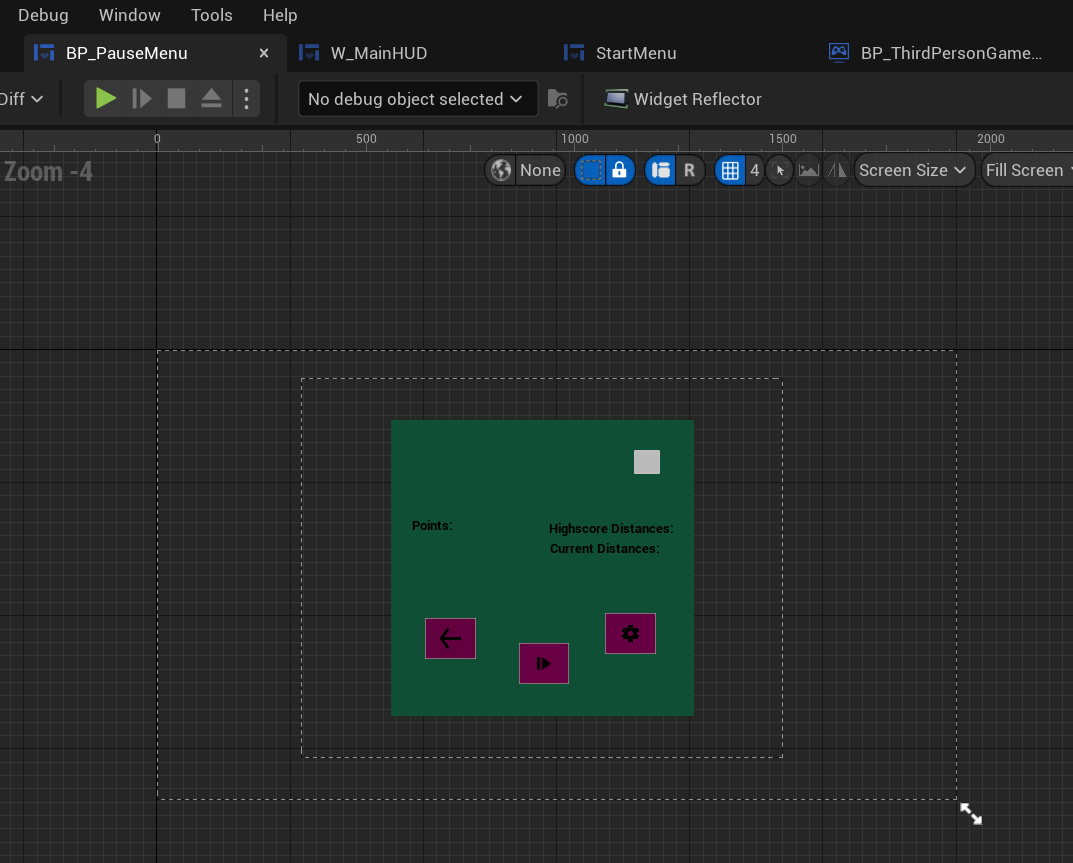
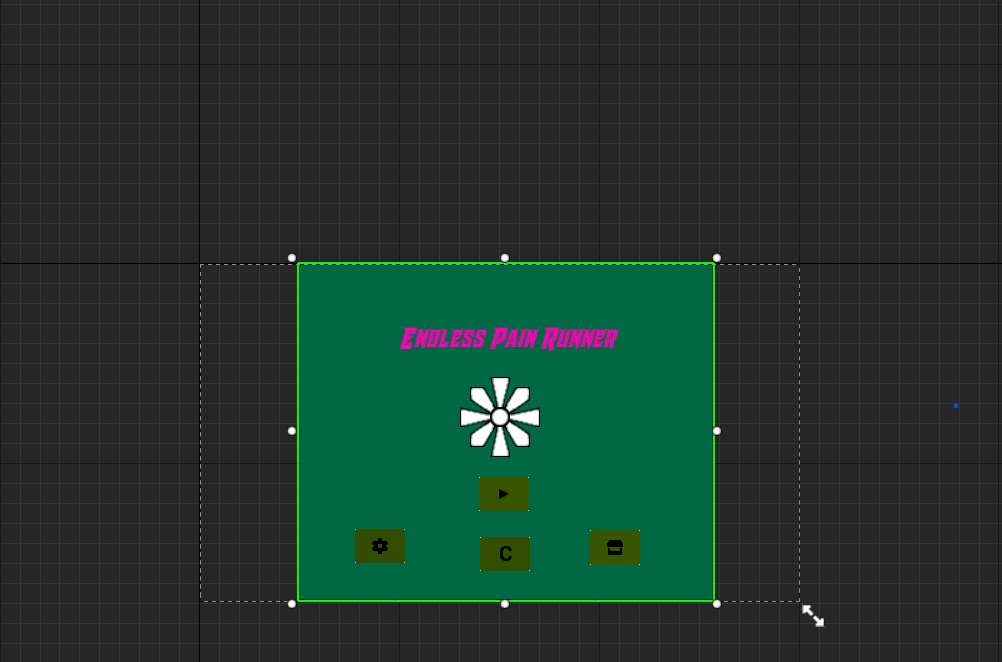
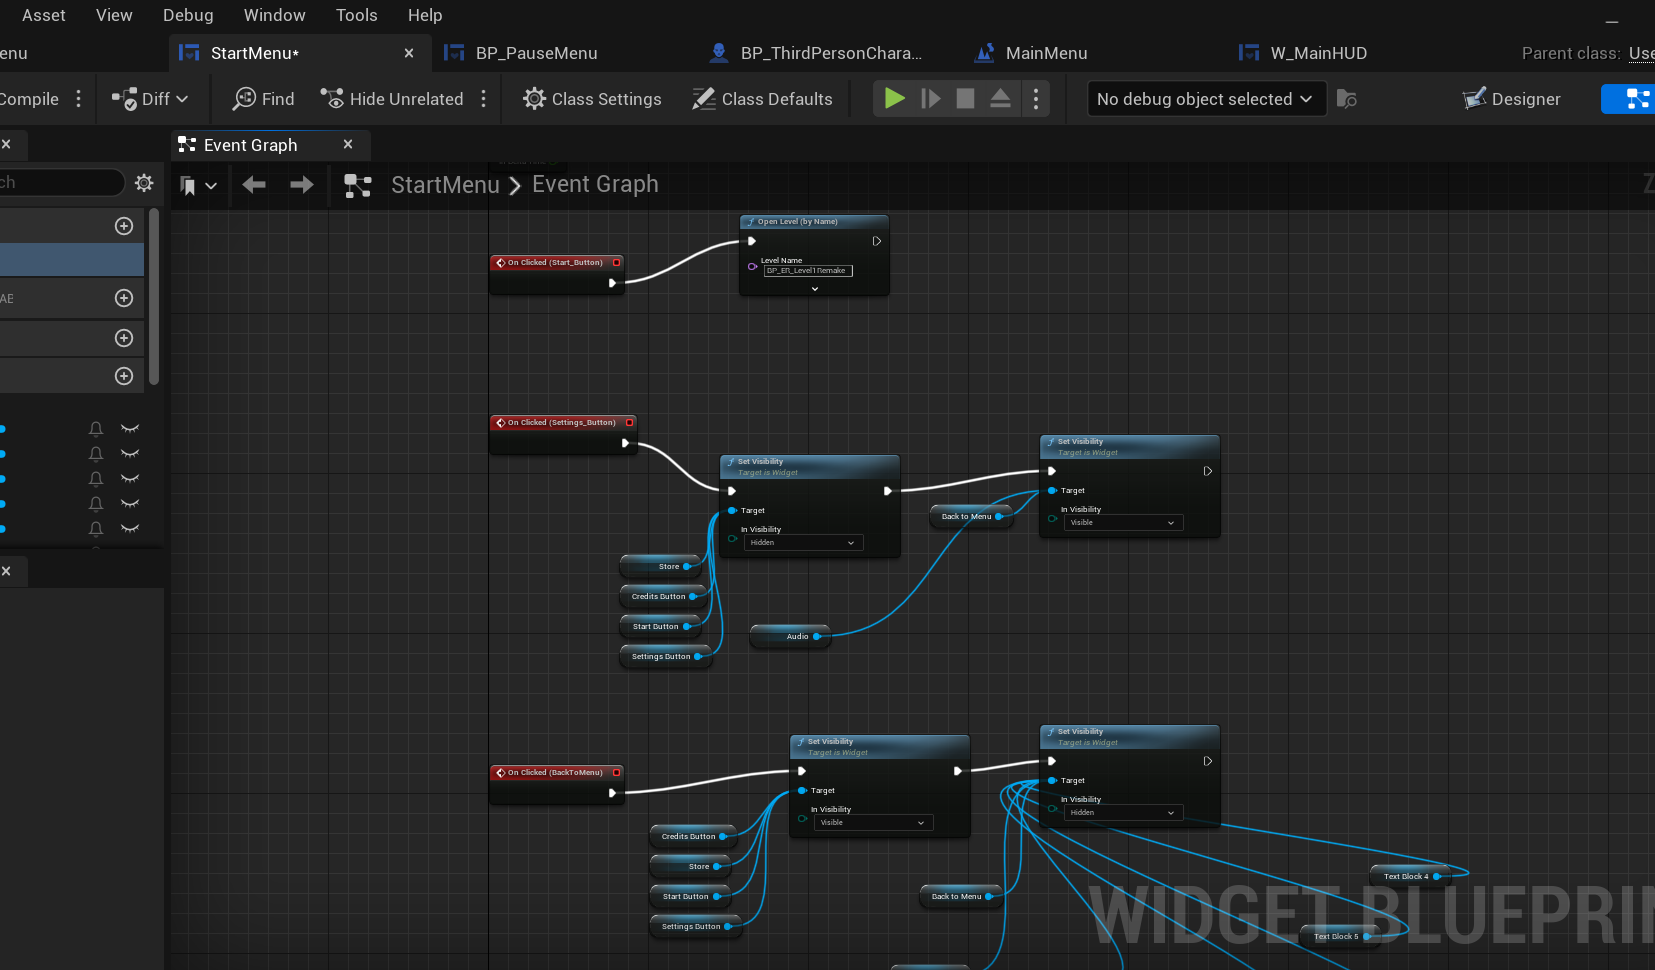
Made the main/Pausepause menu
Camera shake
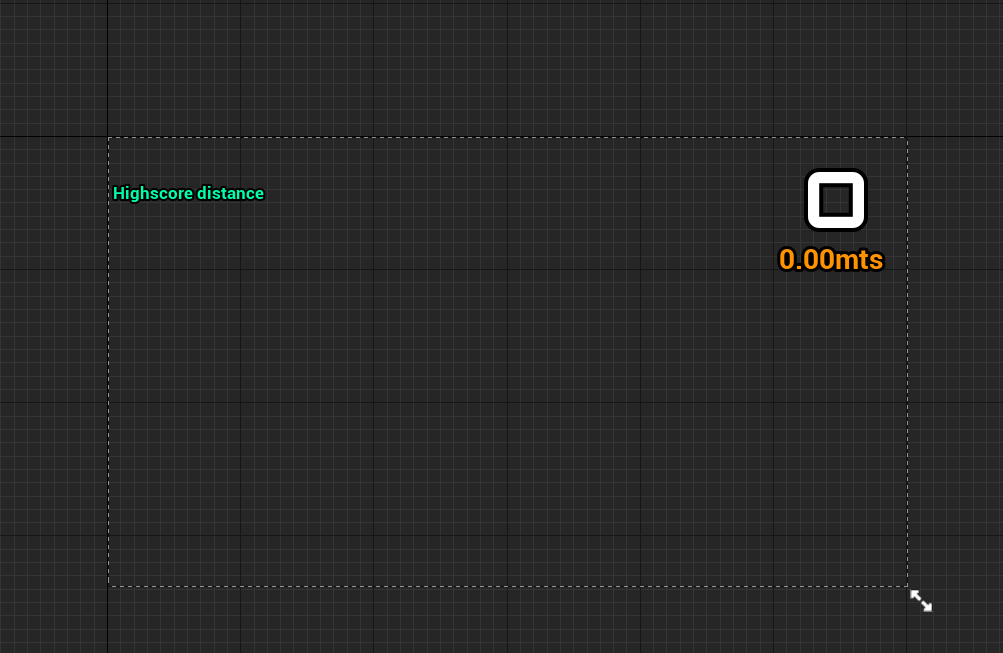
Highscore UI
Tweak the play acceleration.
I was able to finish creating the AI chase , instead of ai player chasing me I chose wall with spike to chase me instead. For it to work I would need my triggers to asset to worked which I ask my prof to help I will ask him how its doing.

WEEK 10 - 4/3/2024
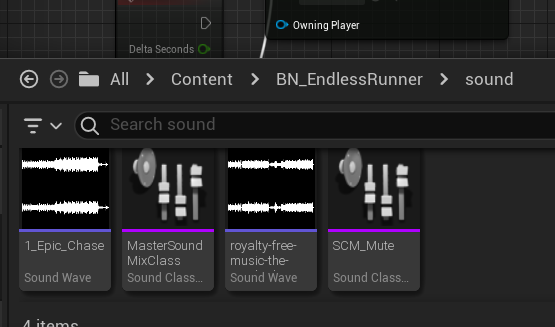
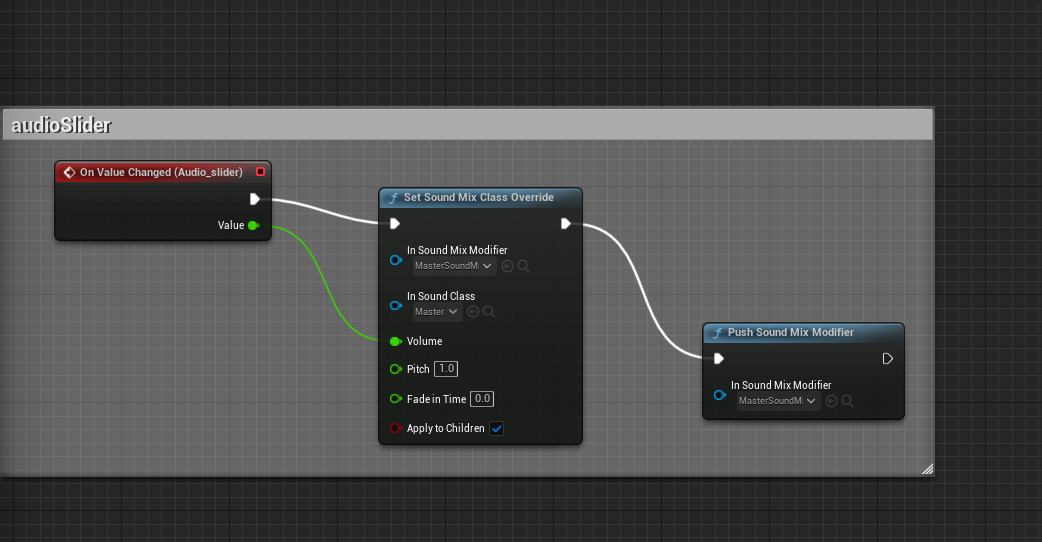
Today I created the audio system for my game so far for the main menu, I will later on do it for main level. It wasnt easy, I had made the slider audio and the mute and unmute . It was some what hard especially having to follow videos and going back forth on the videos. But luckly with my cleverness i was ble to figure it out, on how to set it up probaly.
These are the most helpful videos:
Audioslider: https://www.youtube.com/watch?v=VSy4ybZQK3I&t=57s
Mute/Unmute: https://www.youtube.com/watch?v=t3Xw6l1Y68w
I was originally only going to do the "Mute" and 2unmute" , but i thought if I did the slider it will be easier and help me understand it abit more to do the mute/unmute.
One issue I had was when you move slider once and move it slince , it will not go back to normal but I look through the comments and found out in the Mastersoundmixclass , the "audio audjuster" should set to 0.001 instead of 0.1. which i had problem early before, which put me wild goose chase on forums and vids. by the i was introduce to "mastermixclass" and "sound class"
I would say that setting up audio on unreal is way easier than doing it on unity.
WEEK 11 - (APRIL)4/8/2024
Today, I had an online class lesson at home because of a tube strike. It was a small introduction to what to expect and what will happen in a couple of weeks to come for the end of the semester.
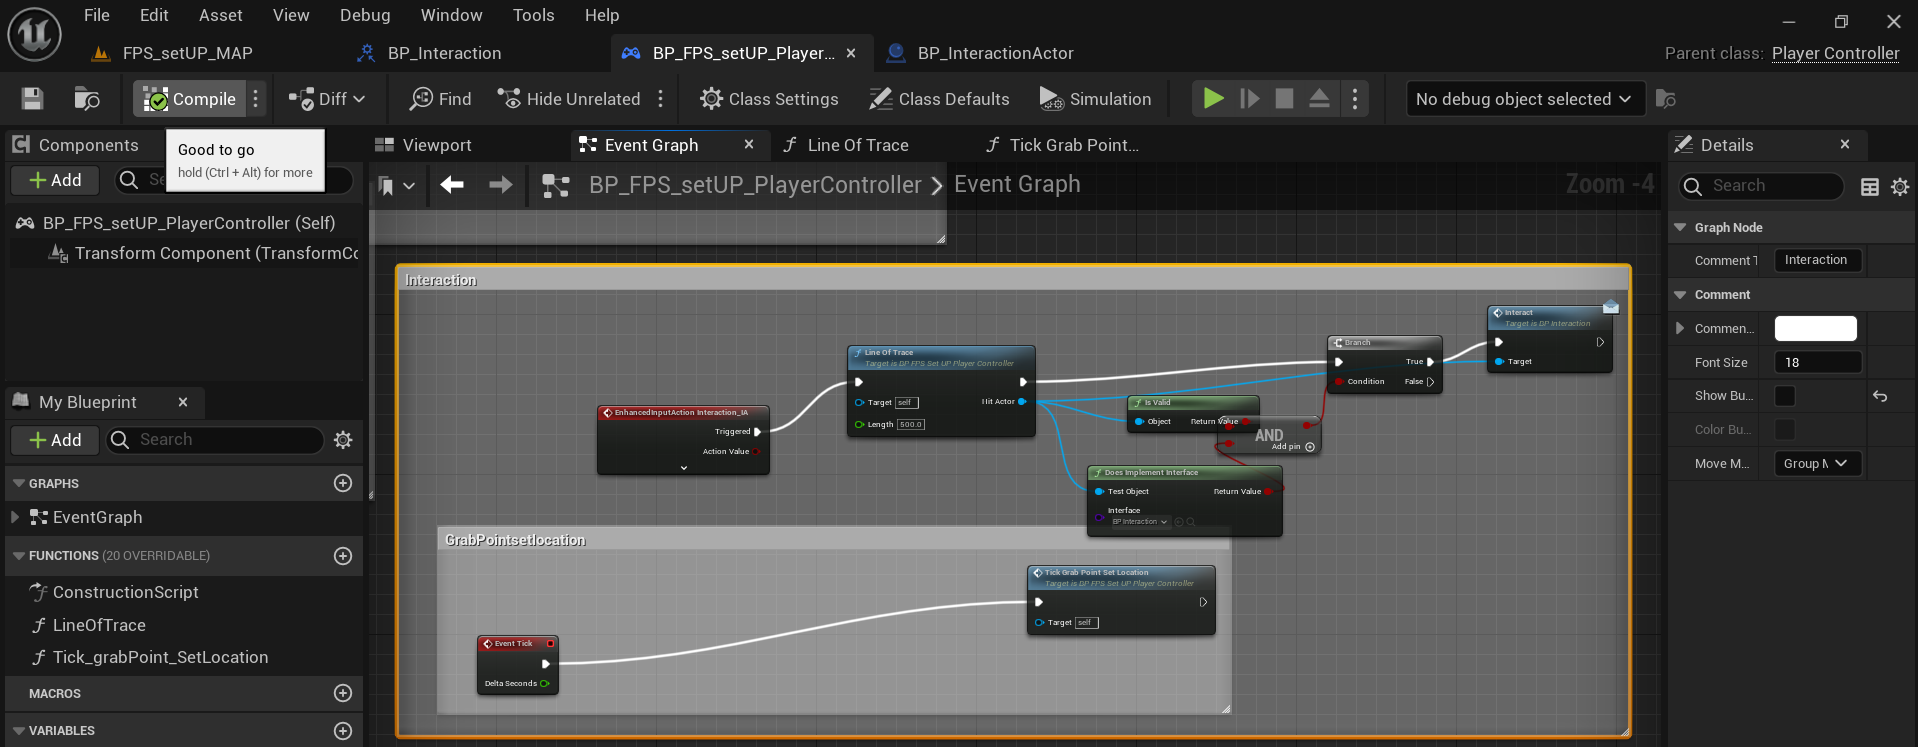
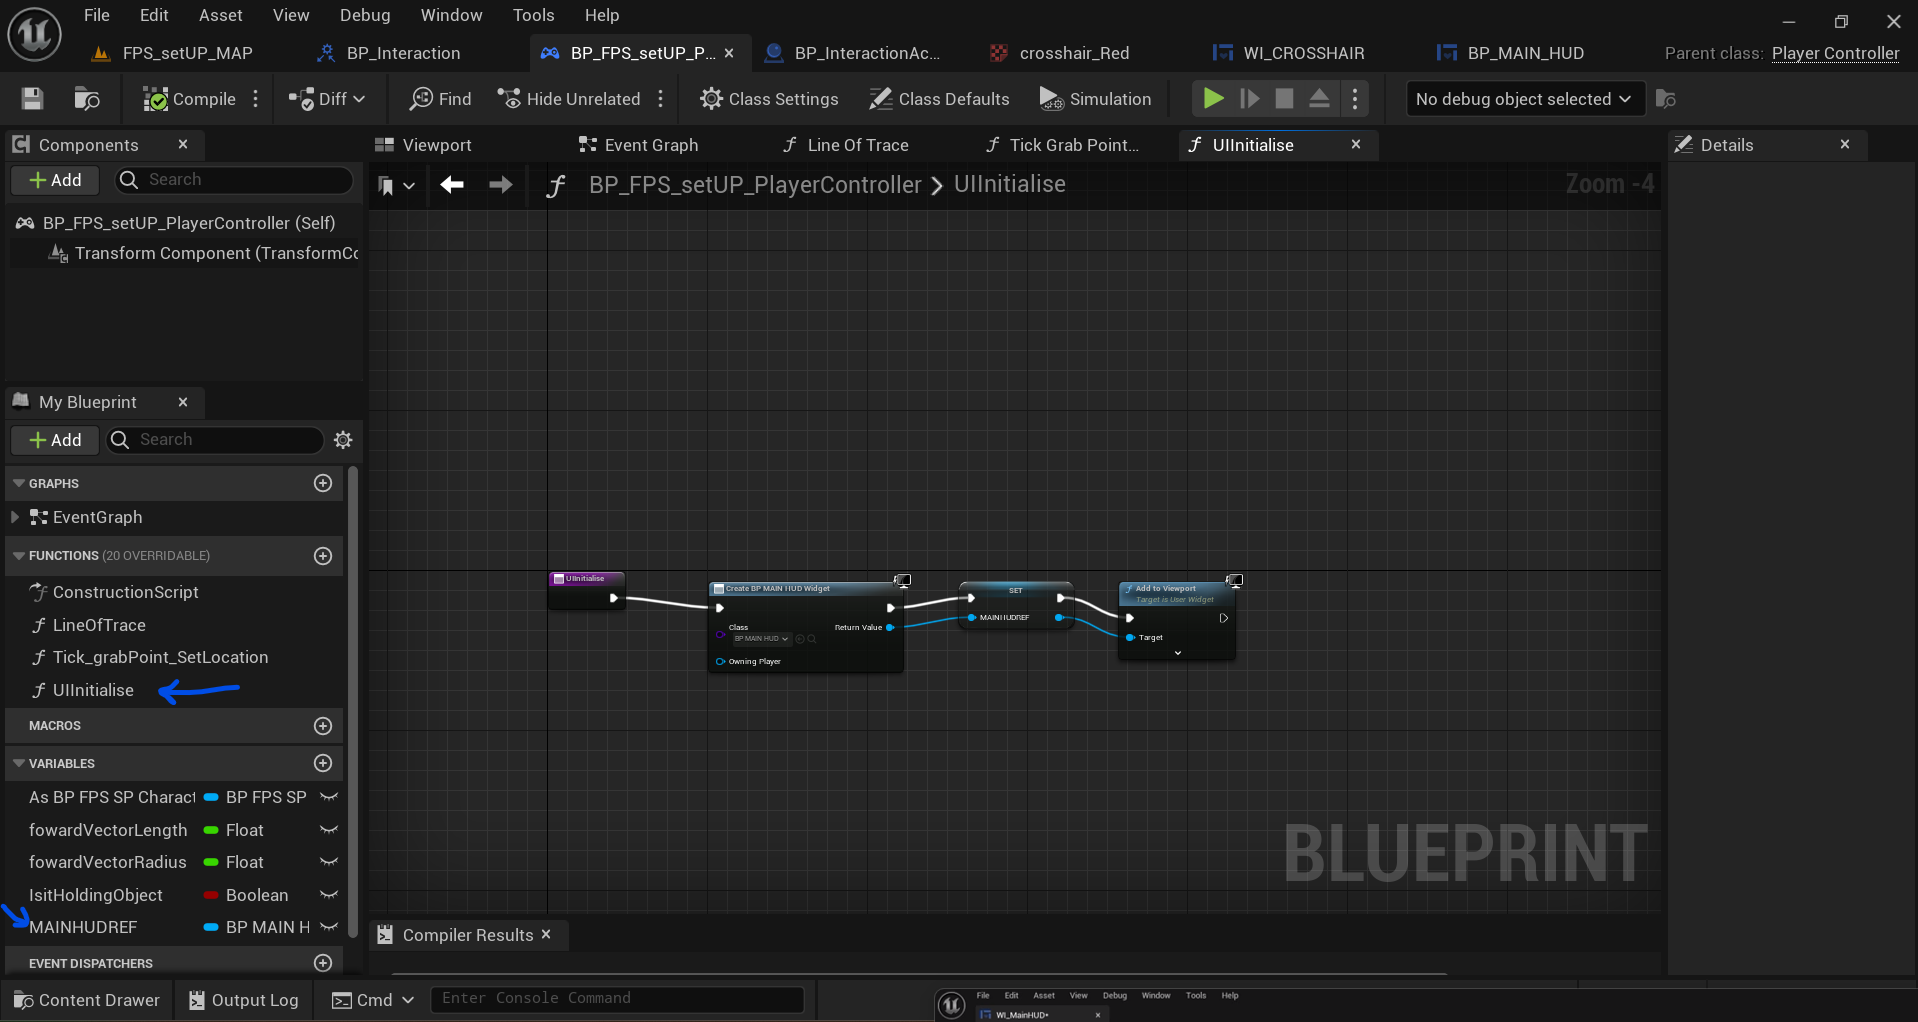
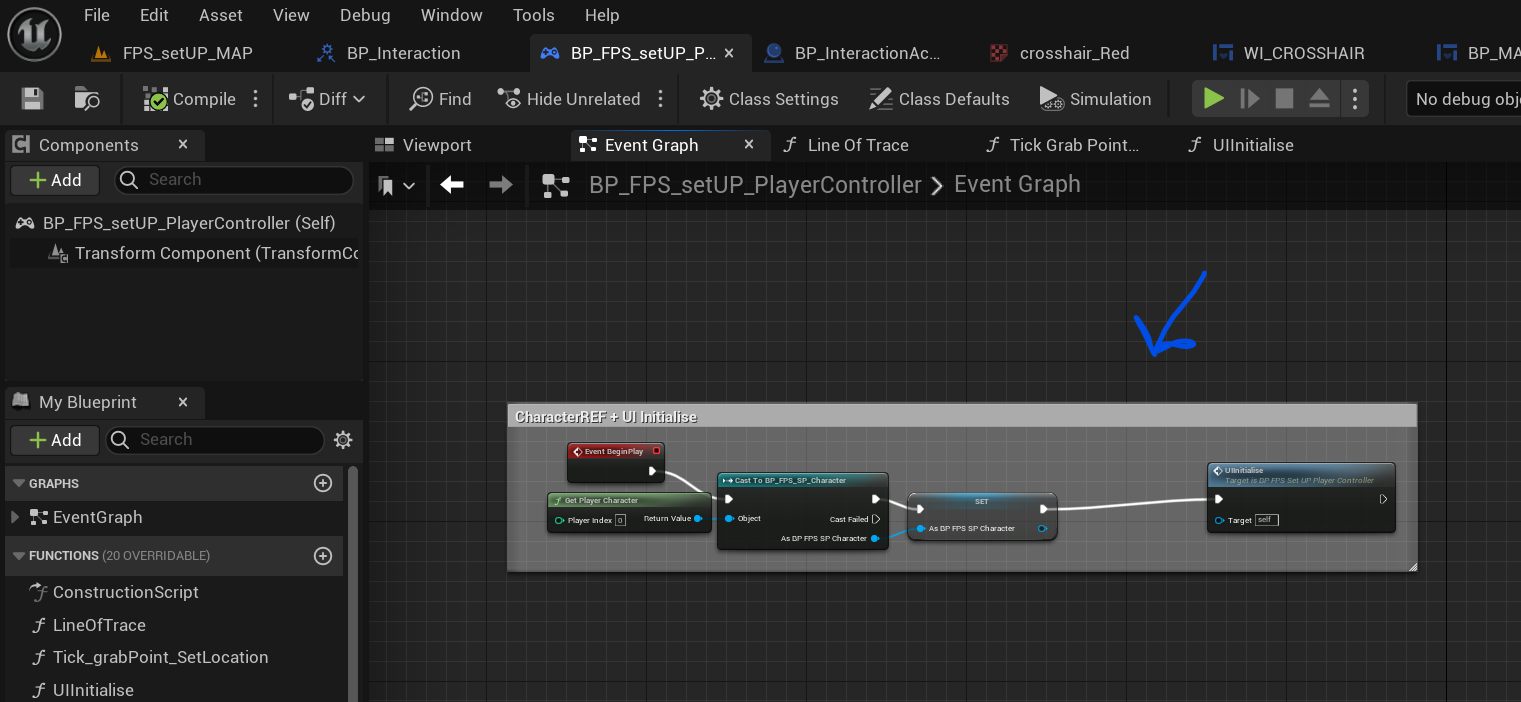
Starting this week, I started my survival game project for last semester's project for Programming 3. I will be using the main fps proj that I created couple weeks ago for as template based my game in. On it had to clone my project and renamed it. I wrote simple GDD on what to expect, More will be added on the duration of it all. I watched the first video concept , which had me tidy my interact code, by placing most of my "Interact" code function variable by collapsed function in another.
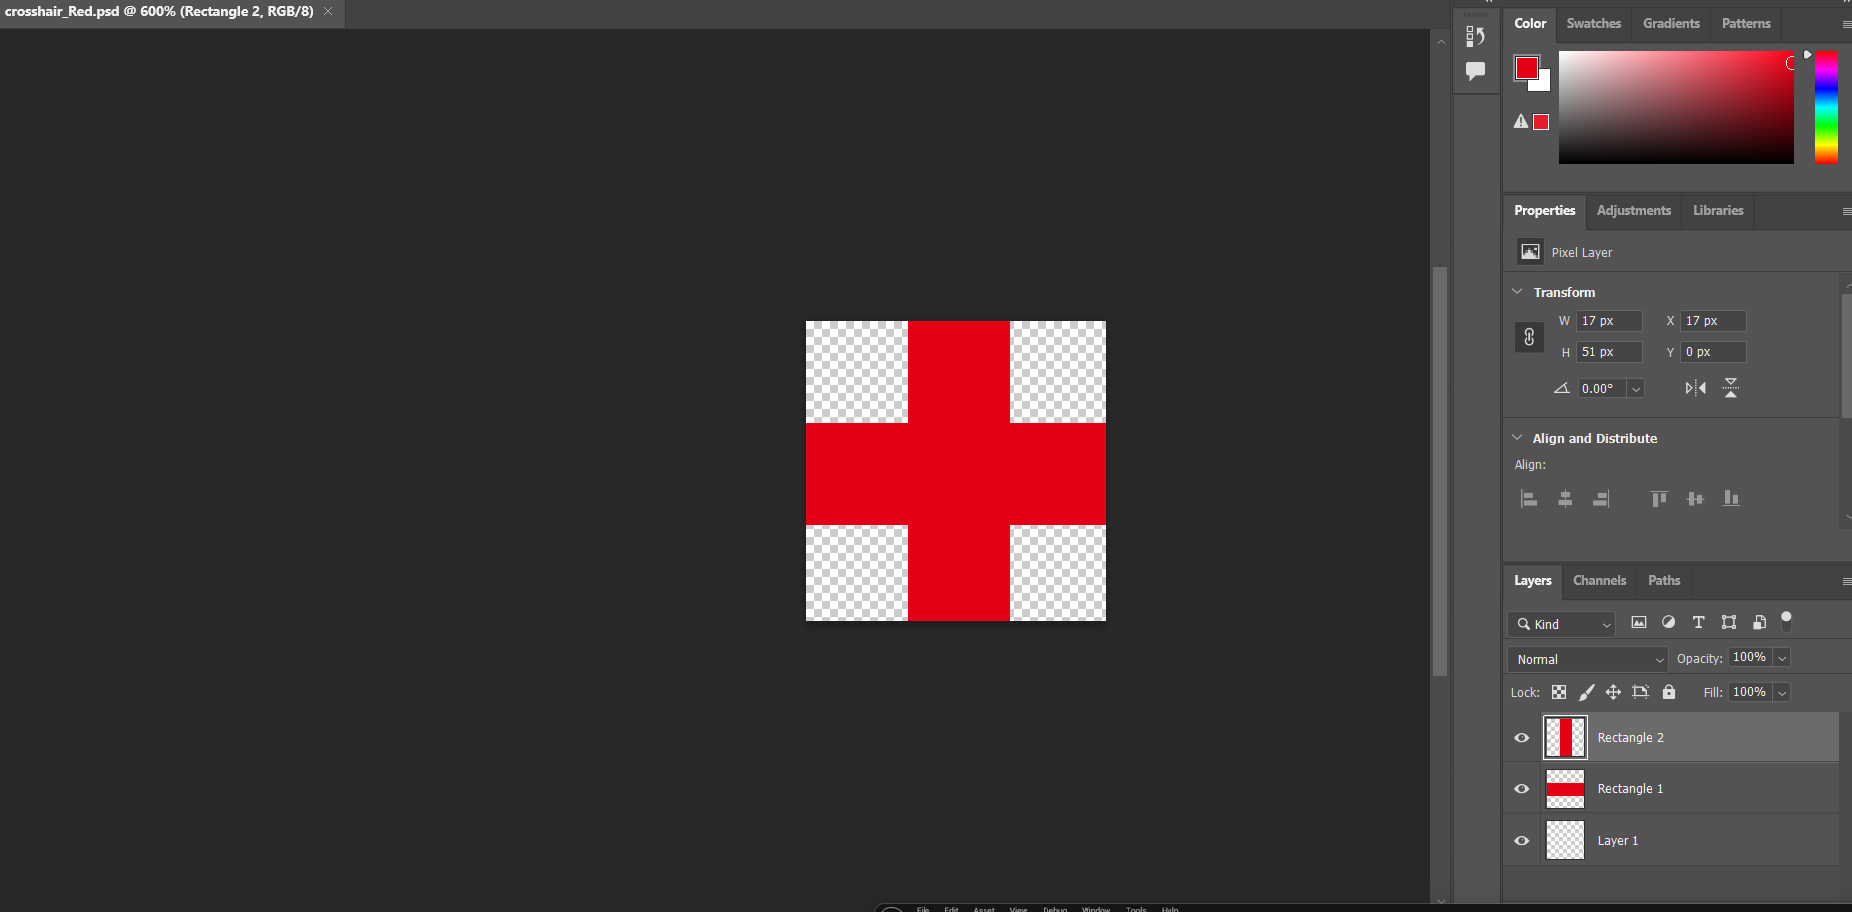
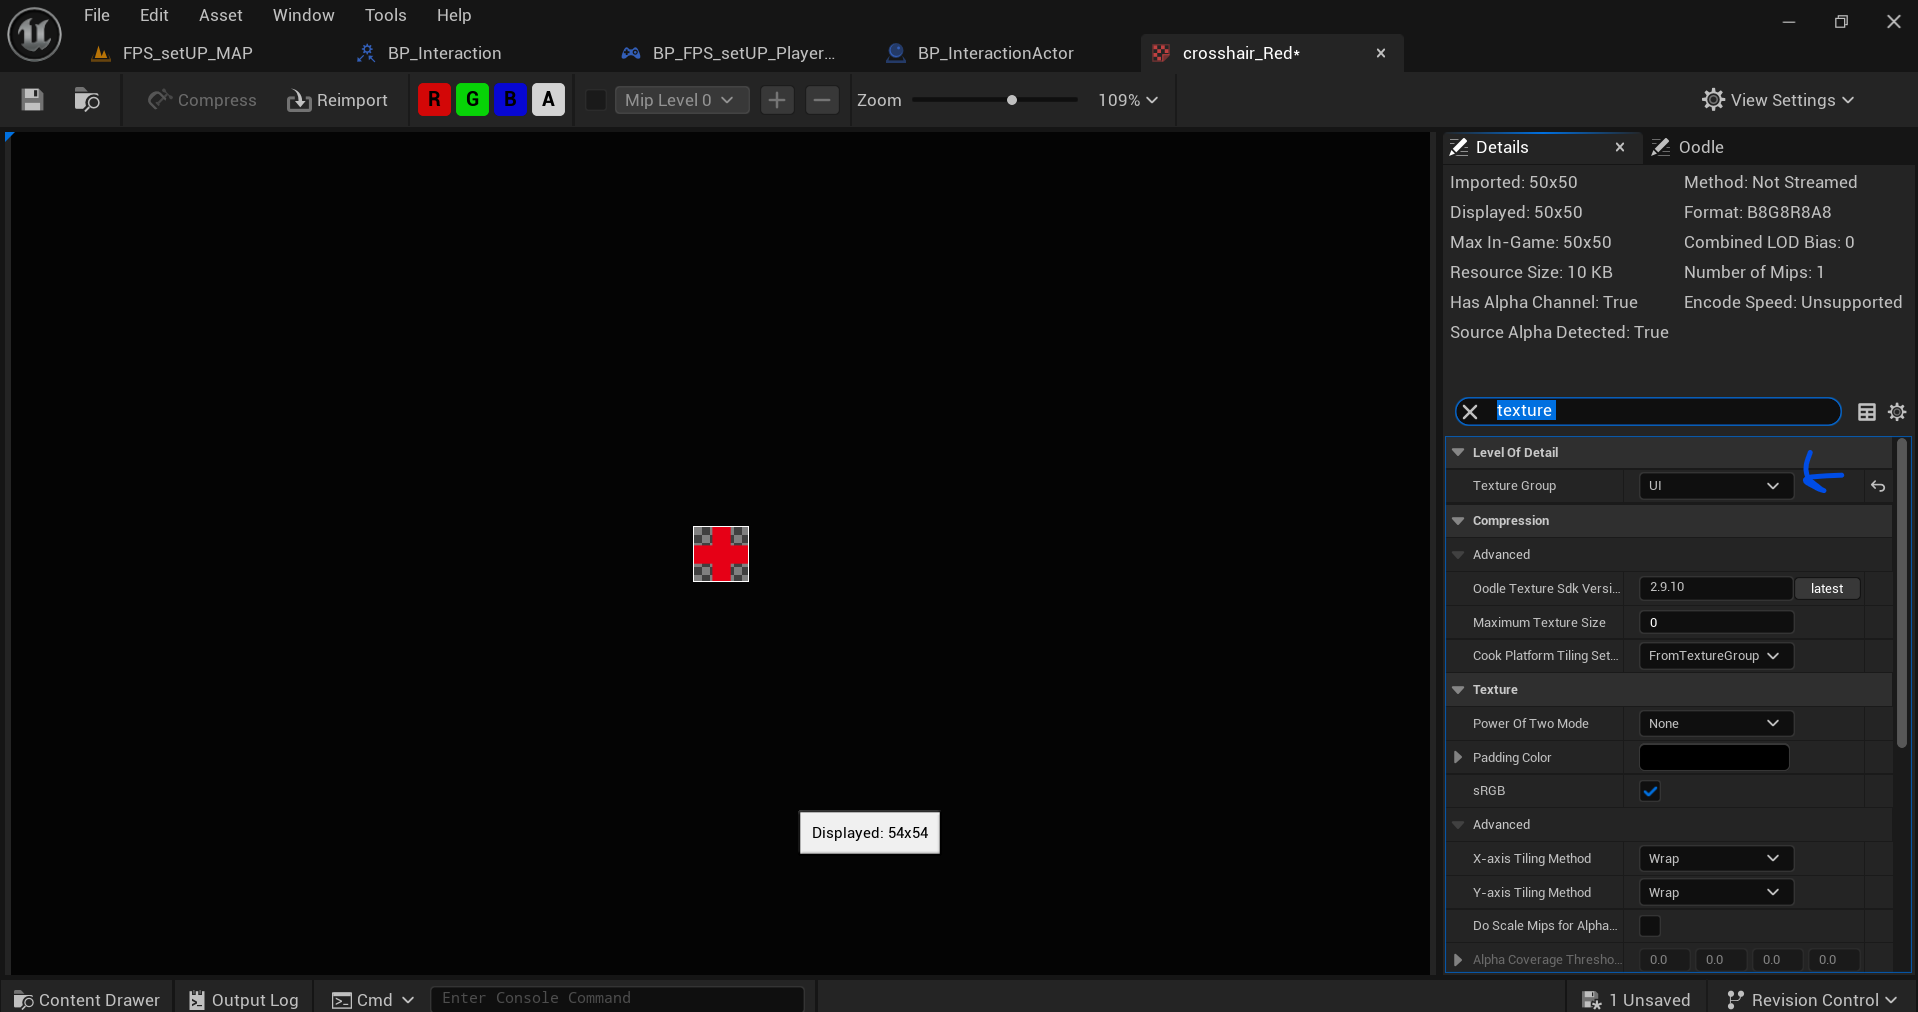
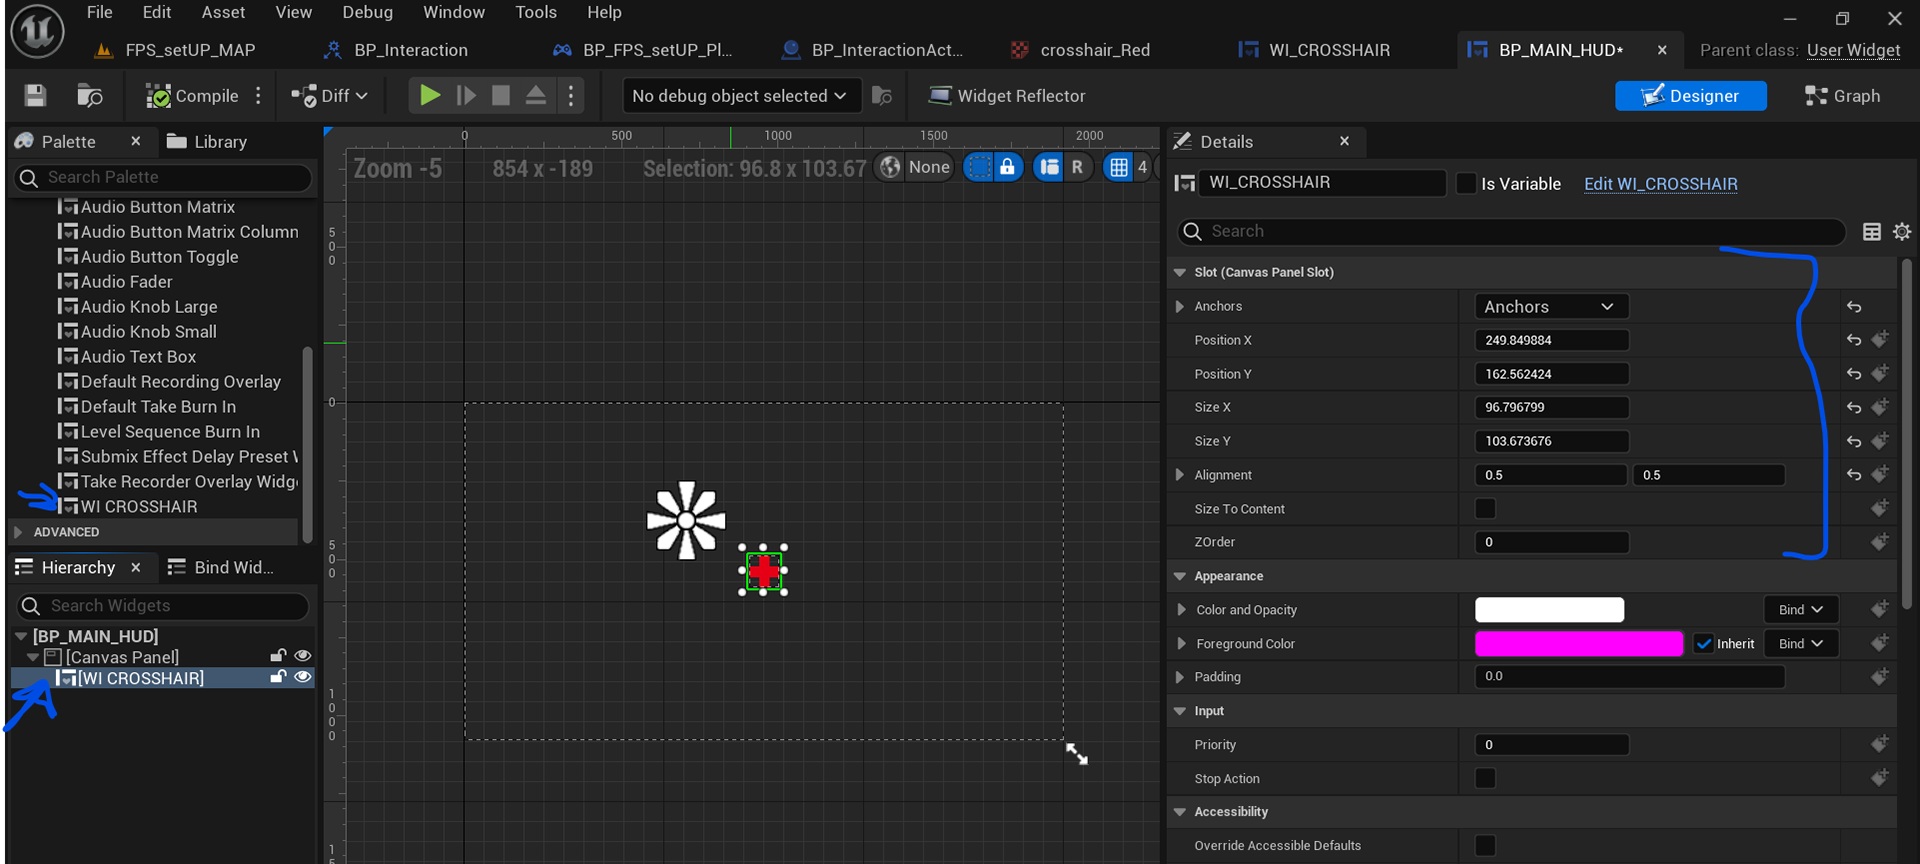
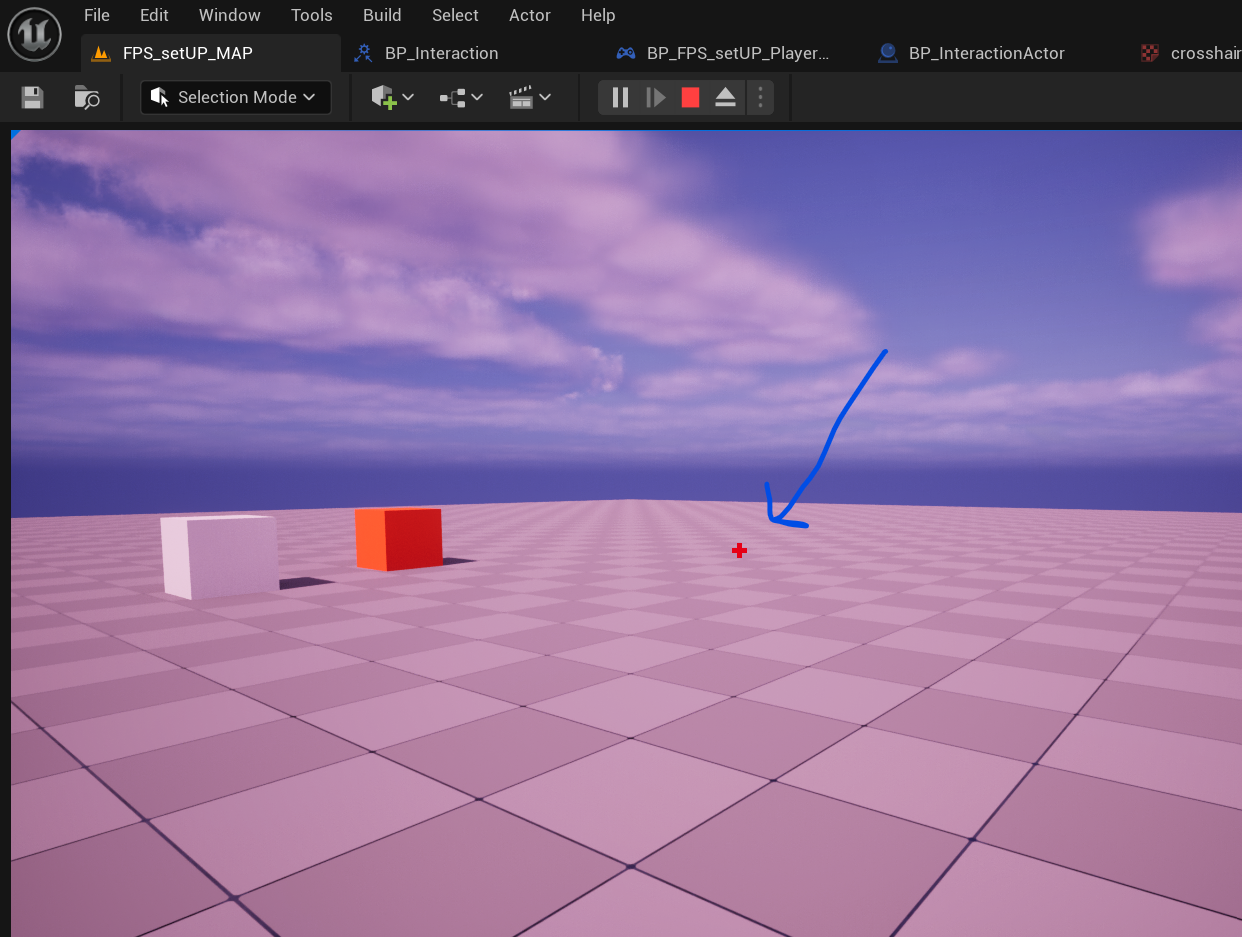
The second part of that video involves creating a crosshair. I designed my own simple red cross in Photoshop.
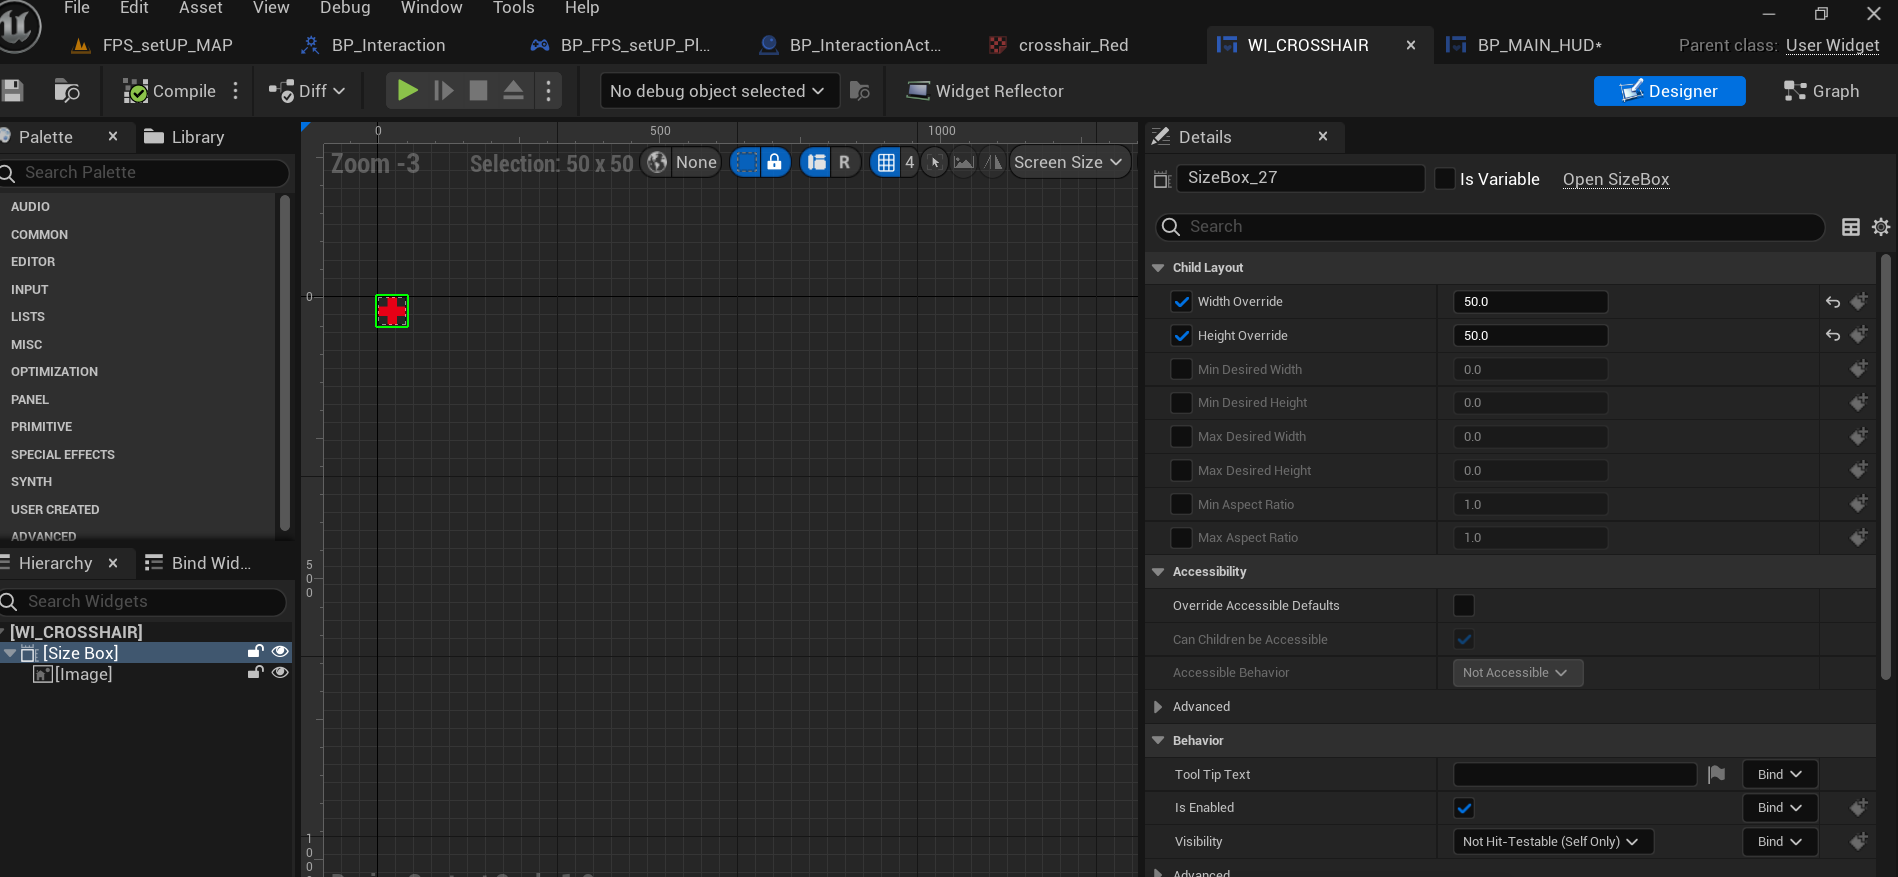
Then I went to Implement It on my in Unreal. We used widgets and functions. One thing I learnt is that you can make different widgets and place them in one widget. I think it's only design alone.
So we set up the widget and tidy set the up code in functions and viewport. On the last image its is shown on my screen. I made it right size , if I want to adjust all in widget.
WEEK 11 (APRIL)4/9/2024
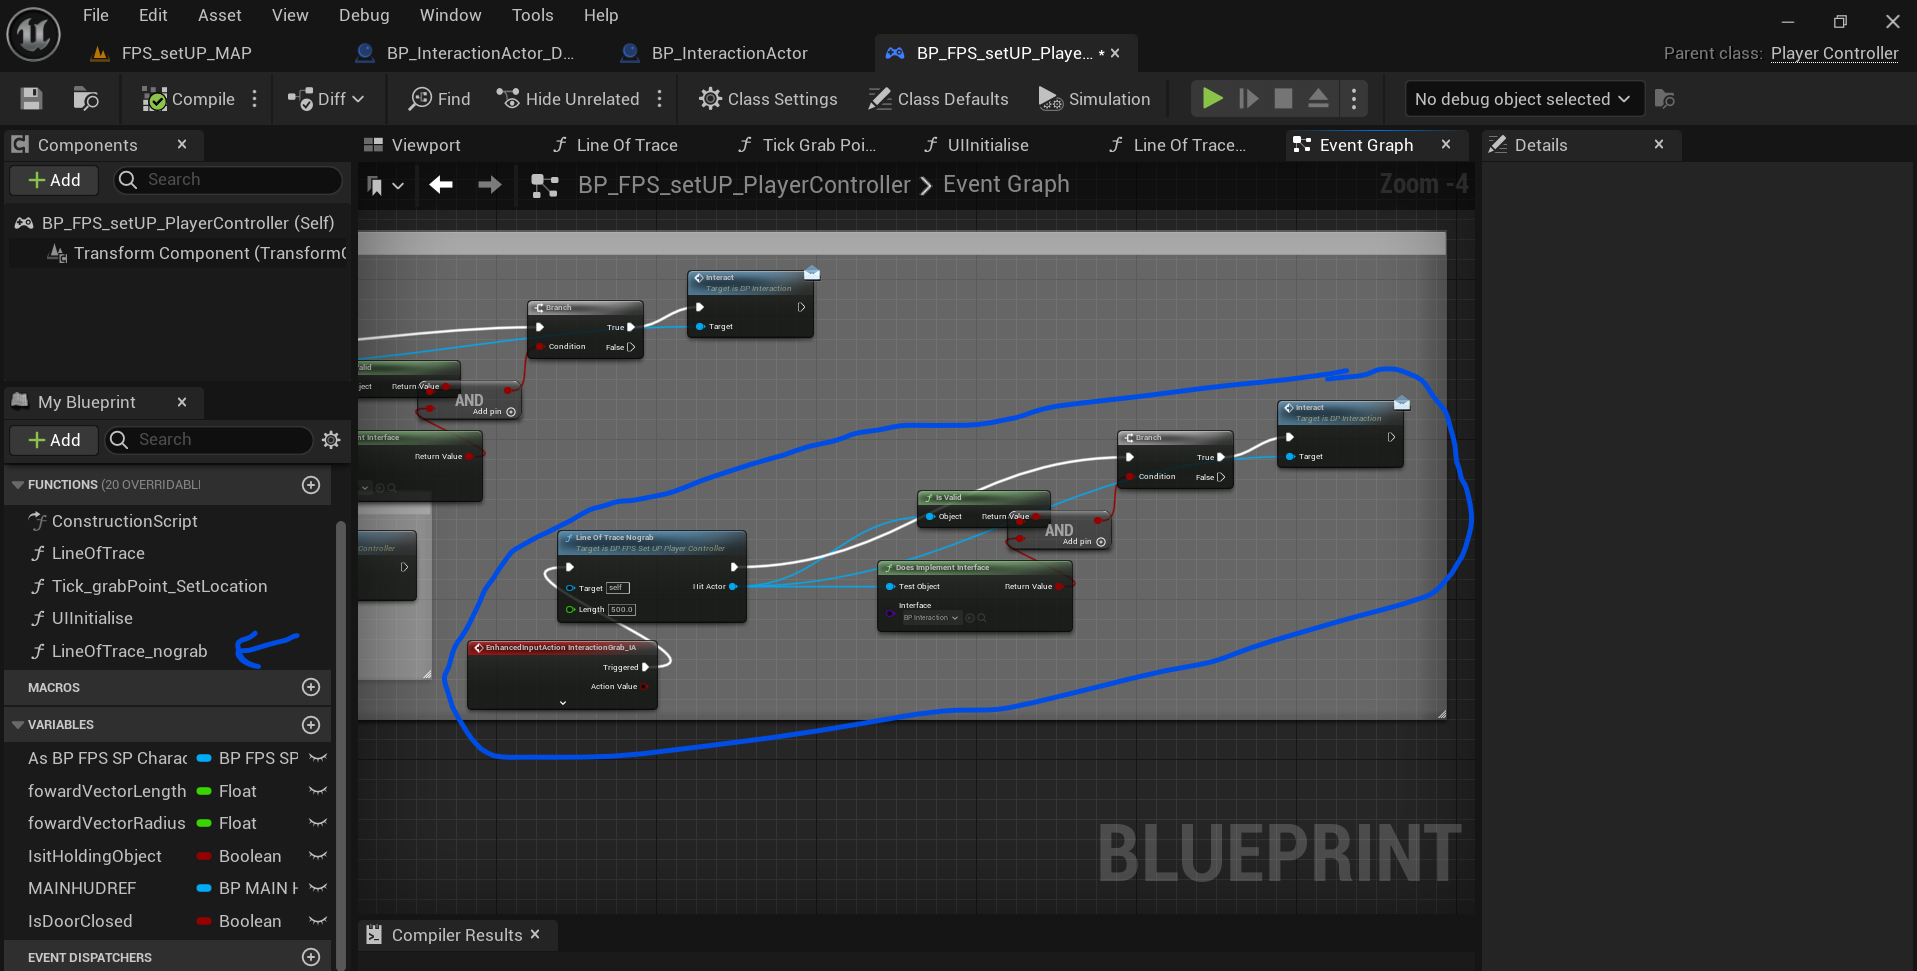
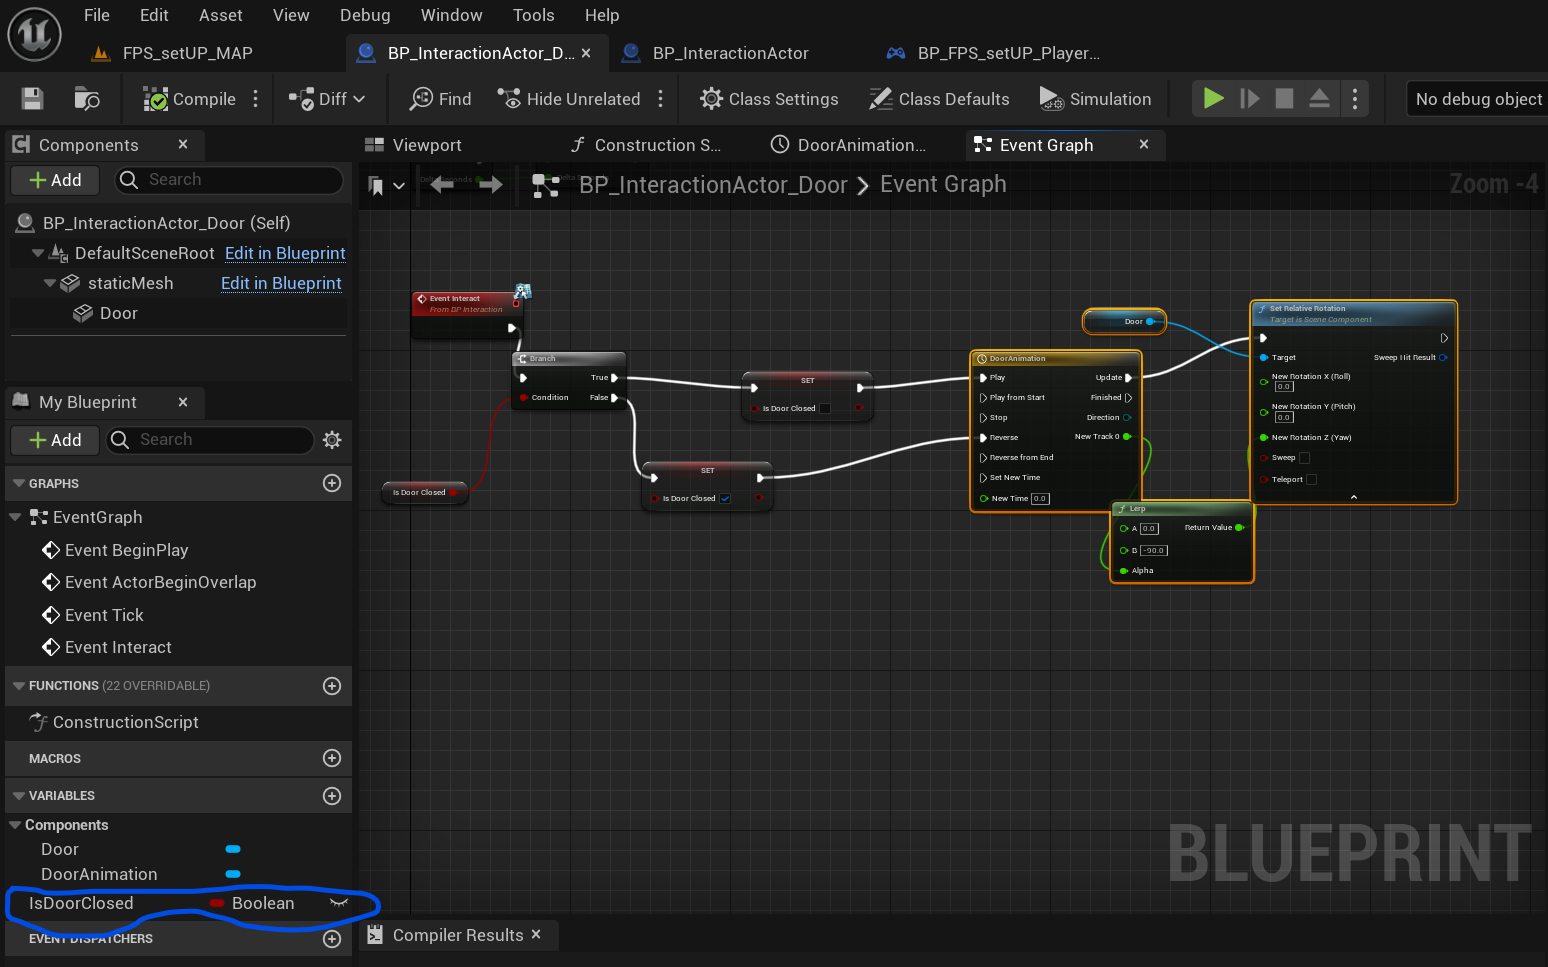
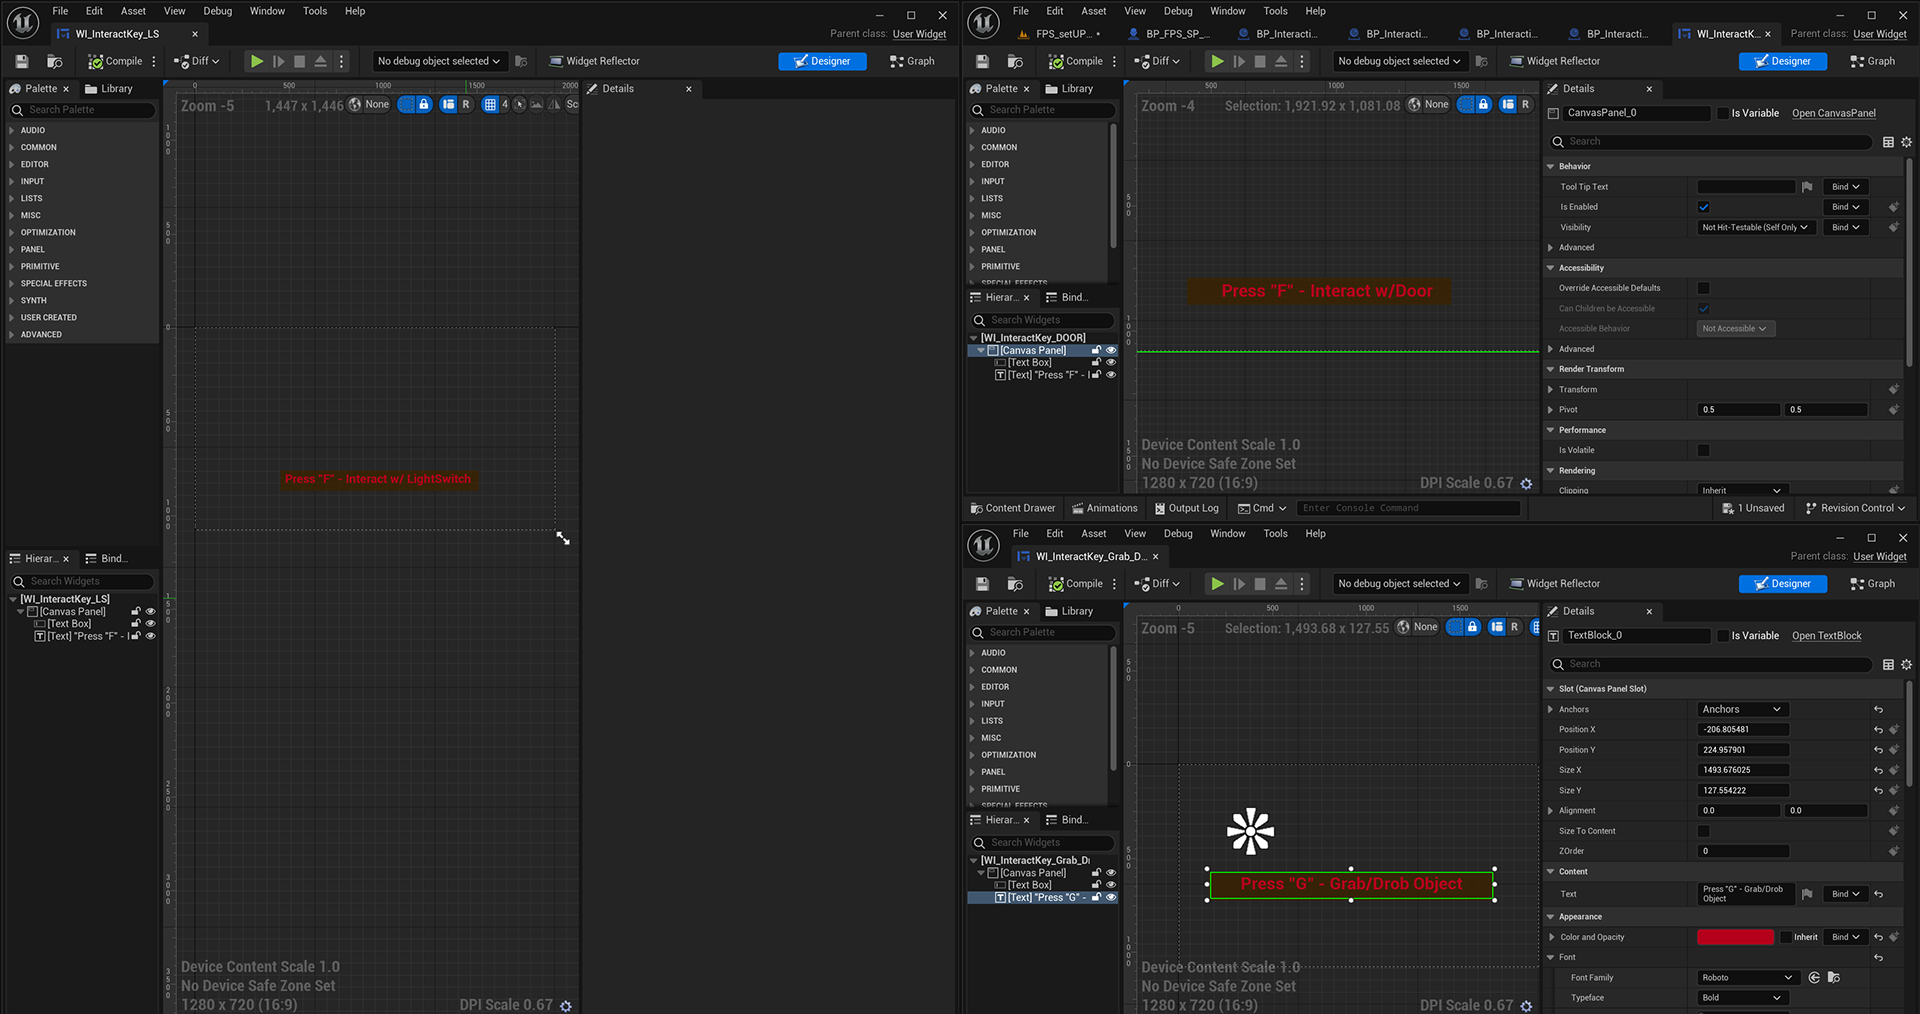
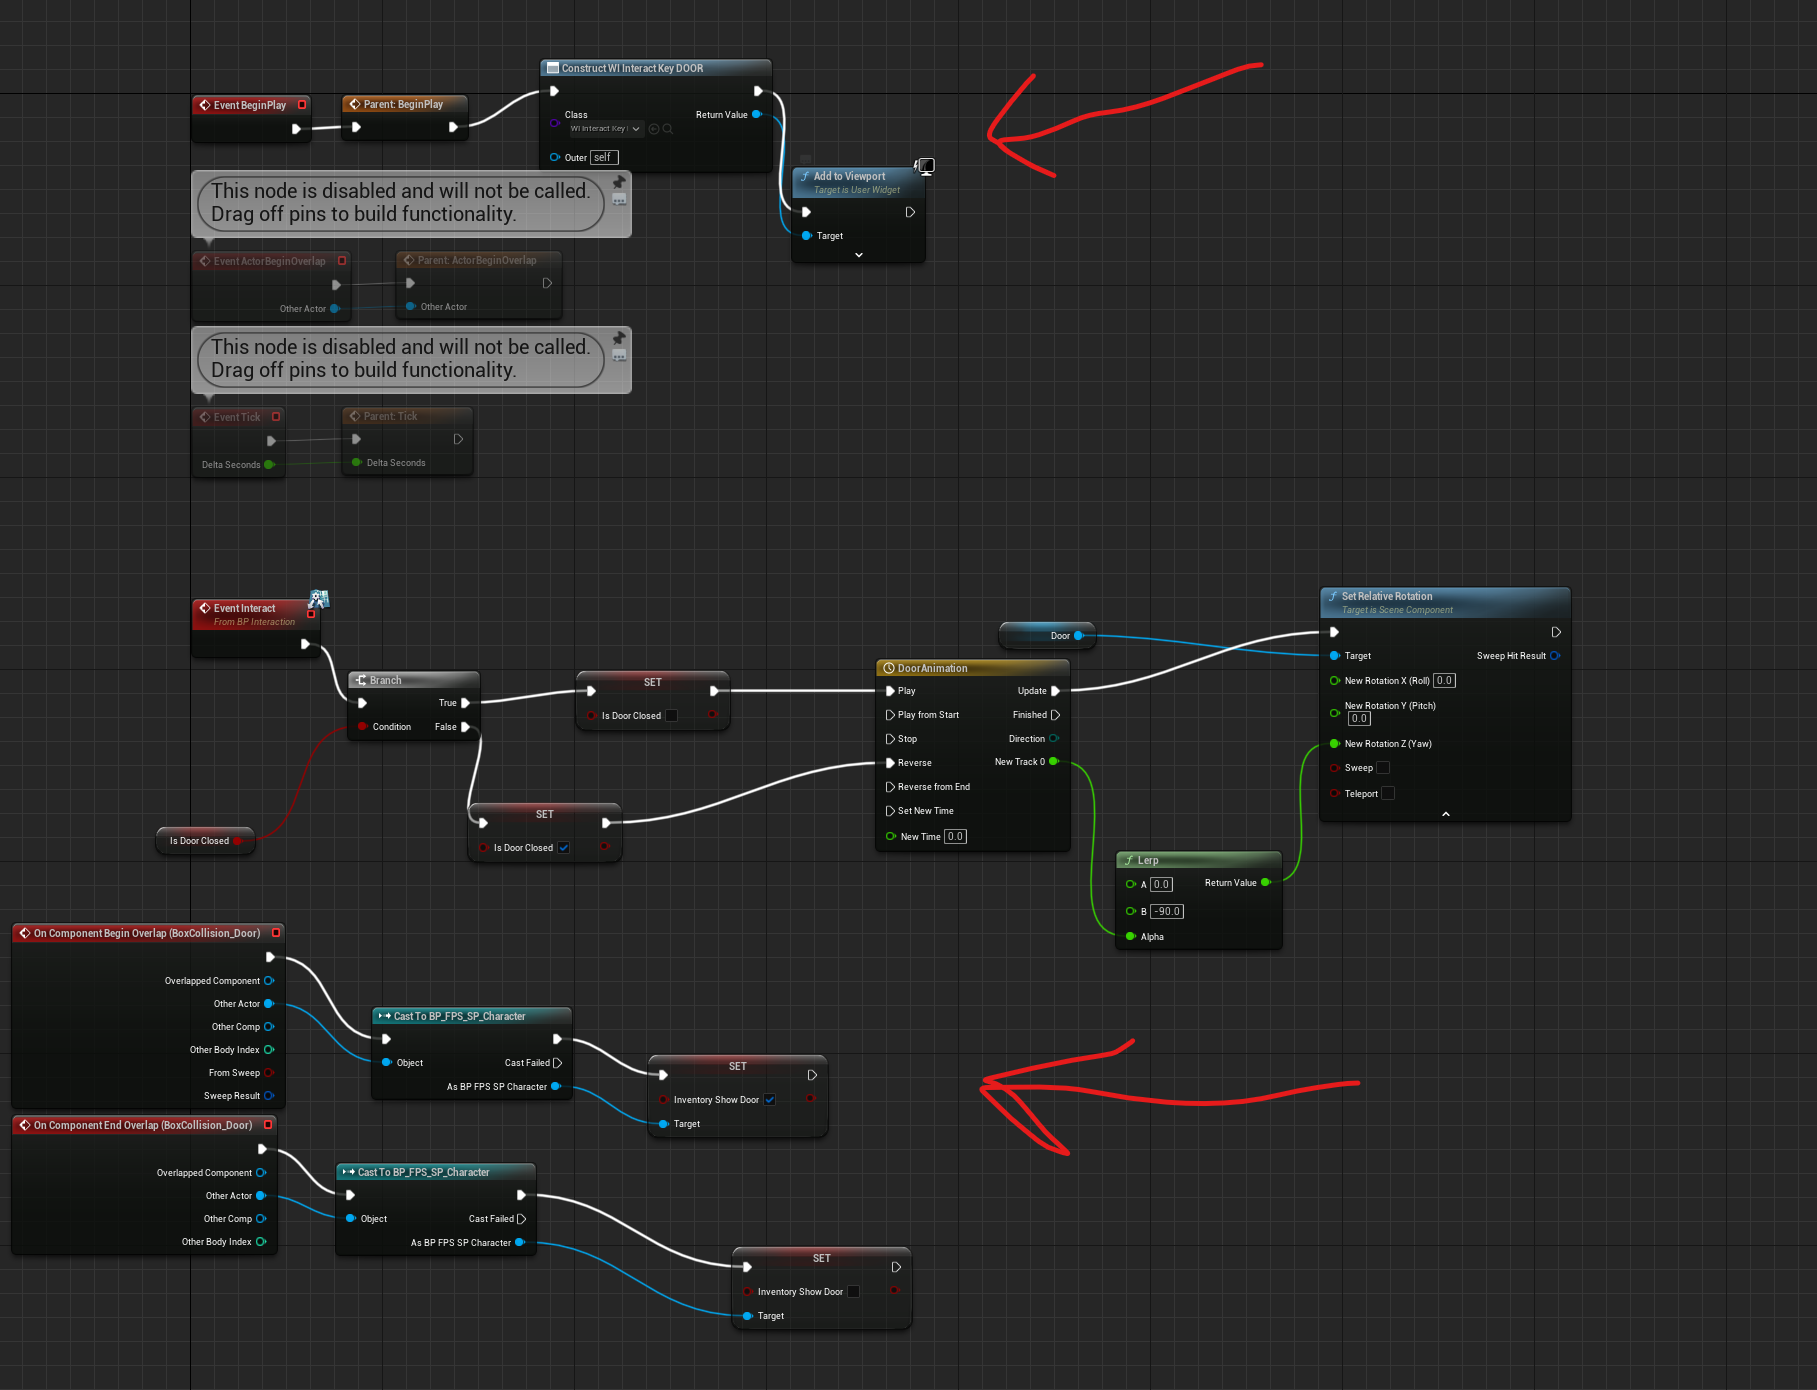
Interaction Door 01
Today, I learned how to make an interaction door work. Now, I have worked on interaction doors before, so you must wonder why I'm going through this tutorial. The reason is one: it's how to rotate the door when opening, because normally I I let move back and forward from left to right. Second, he made an interaction actor parent class to make the door a child class, which is cool and well-informed. i also a widget interface.
Once I was almost done, I encountered an issue. It wasn't a big issue, but I had to do a bit of begging for it to work strangely enough. My interact key was attached to both grab and door open maneuver, which made it hard . So I thought up and idea, so I copied and paste line trace function but this time removing the grab nodes calling this function "nograb", then one issue came across what should attach it to the same event, used normal key bind which those ideas didn't which may of been unreal fault or didn't work, should of flipflop or branch or maybe sequence. I wasn't sure. So I decided to make another input IA for normal in IA and attach to no grab interact. I t wasn't working so I waited next day.....
(April)4/10/2024
IT works for some reason. I also continue the rest and made so I can open and close with a single button.
(April)4/11/2024
Interaction Door OUTWARD
This was short and simple, this allowed me to open doors from the inside and outside. There was an issue, dot product var that was created , tried figure and find solution on my own by testing some more but errors keep coming, and it only work without when I remove it.
Next will be Horror / Survivor Game : Light Flickering - Material
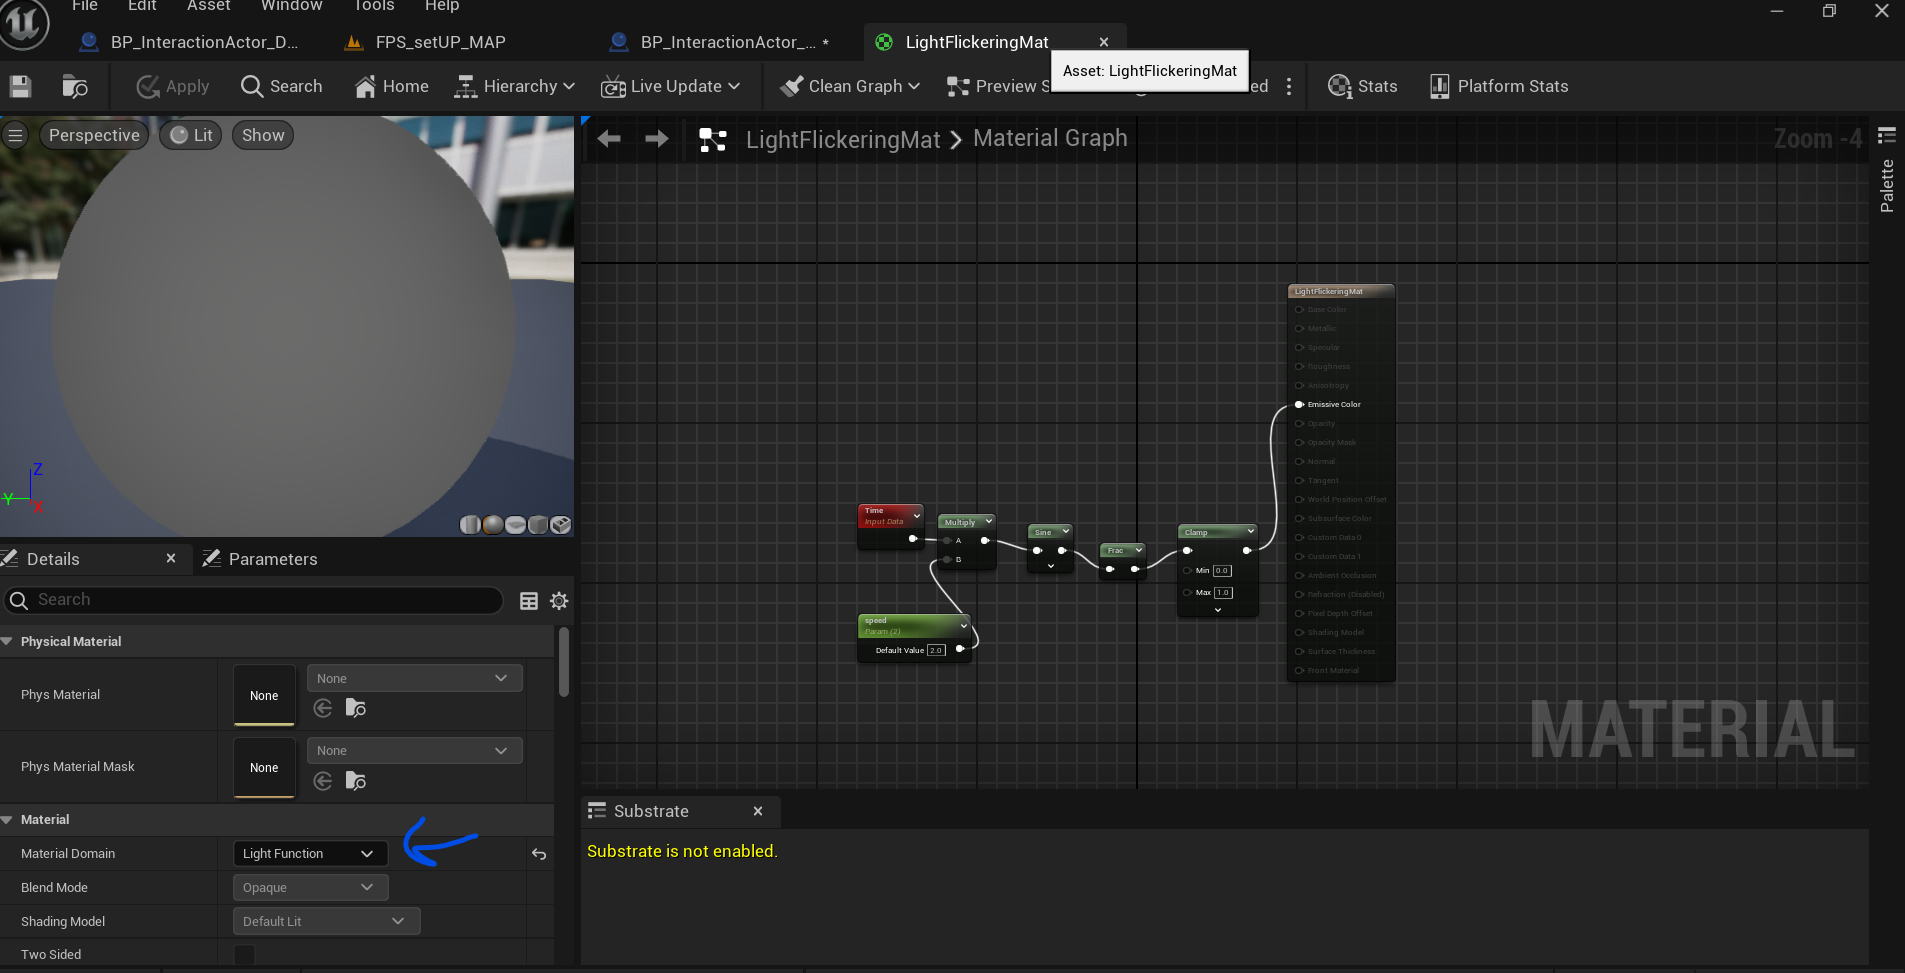
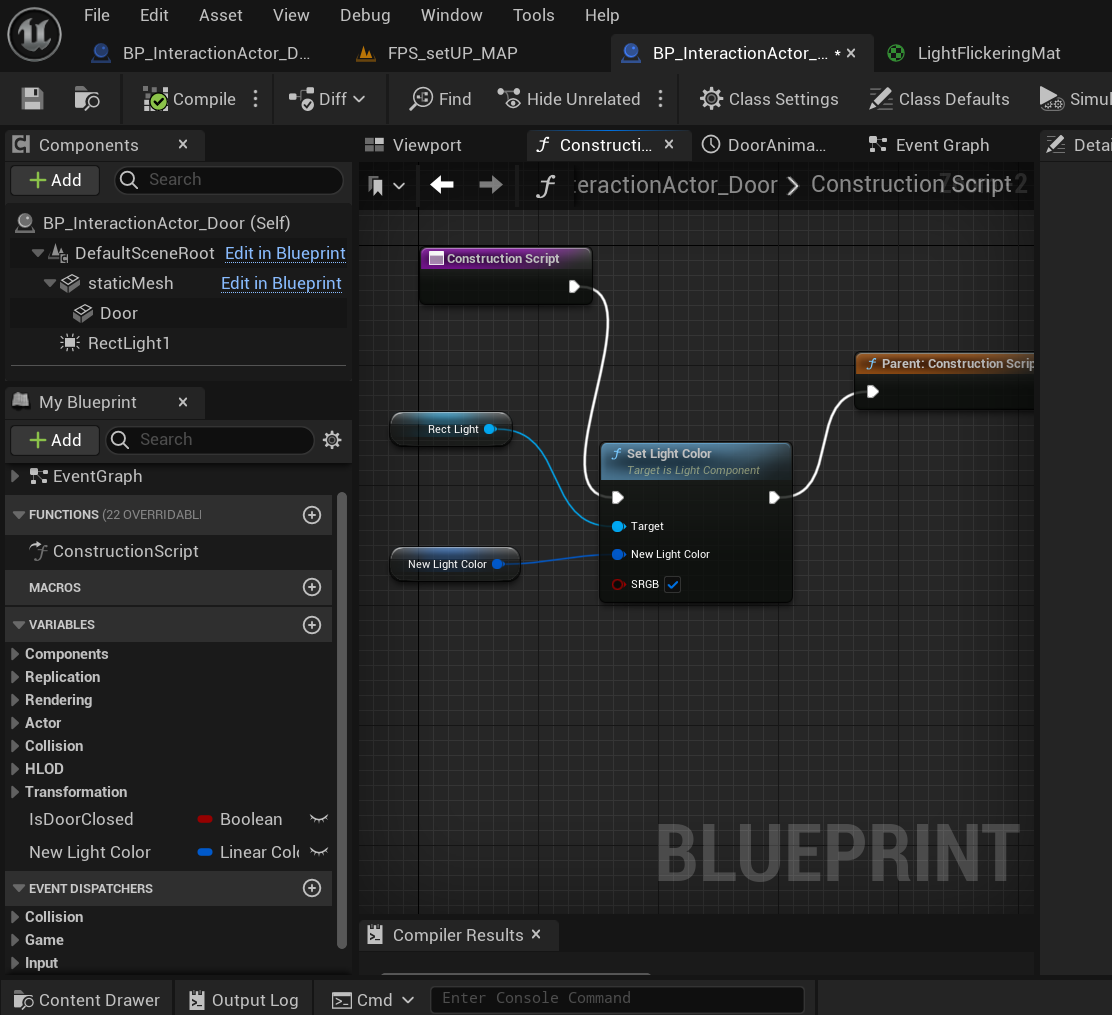
WEEK 11 (April)4/12/2024
Today I'll be making the "Light Flickering - Material" & "Light Flickering - Blueprint"
For the LF-Mat, It was simply straightforward, beside placing the rectlight(or any light you set up ) and setting up simple function. All I needed to do was set a Material, turn the mat domain into light function, use time, param, multiply, frac, sine and clamp and link them up to emissive color and flicker effect Is shown.
Whearas......
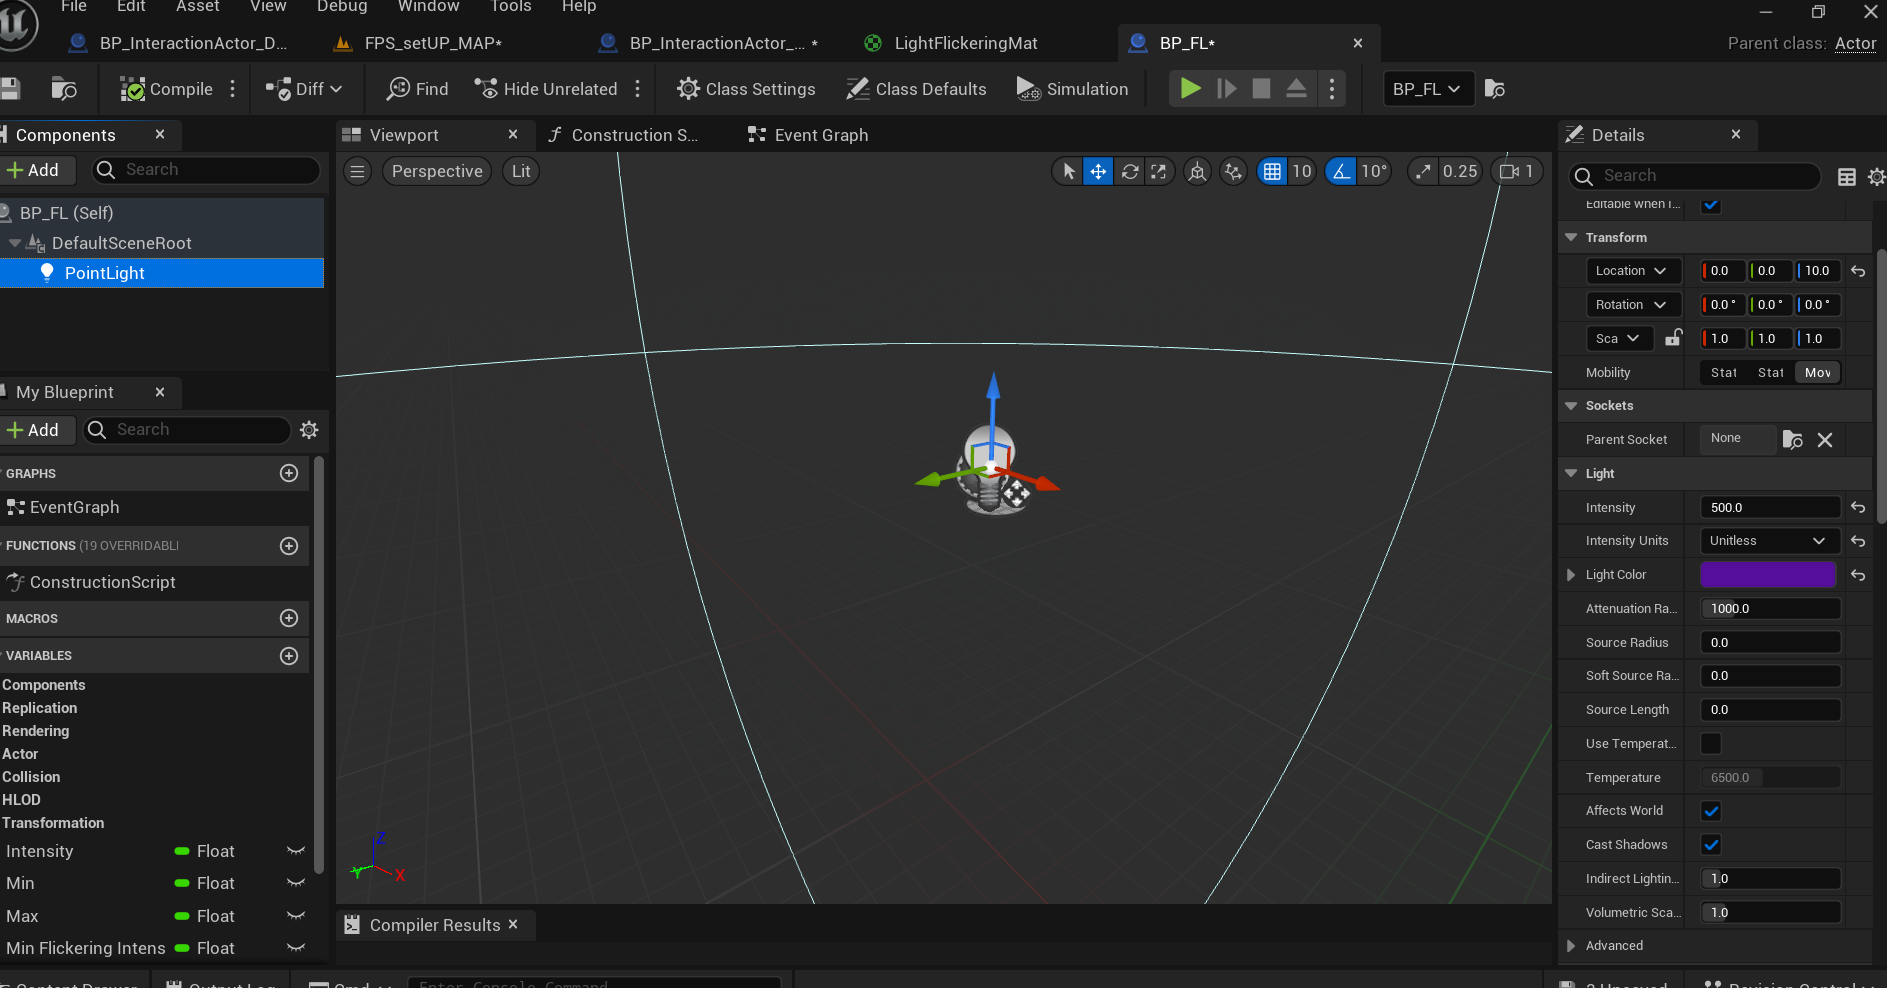
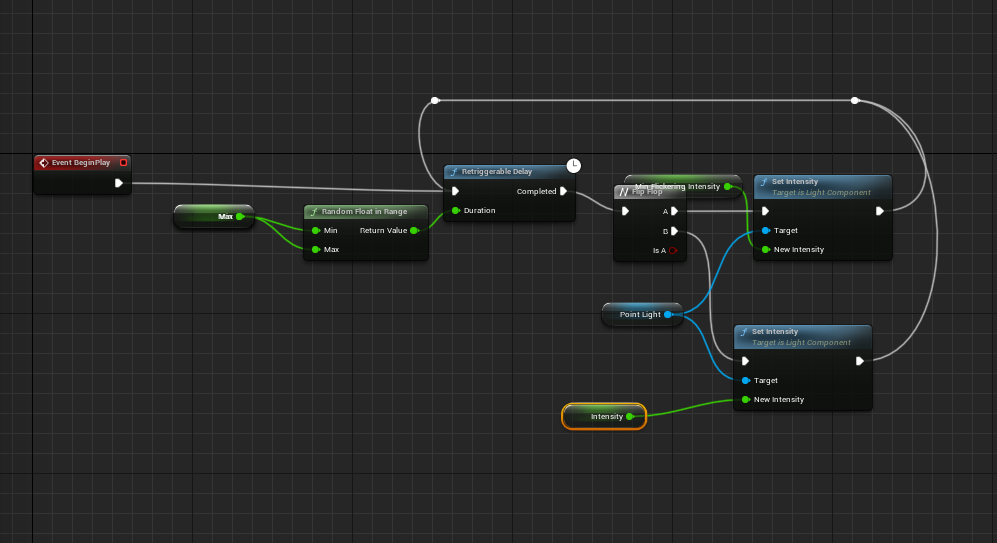
LF- Blueprint - It was blueprint focus and it improved on flickering light to make it better. This video uses point light instead for more exposure in area
WEEK 12- 4/15/2024
This week I worked 2 different videos , suppose to be 3 but could only do two because I had evualtion to write up. I wouldnt of been able to make if itbwasnt for my prof.
The two were, Interactive light switch and flash light. I started off with Interactive light switch.
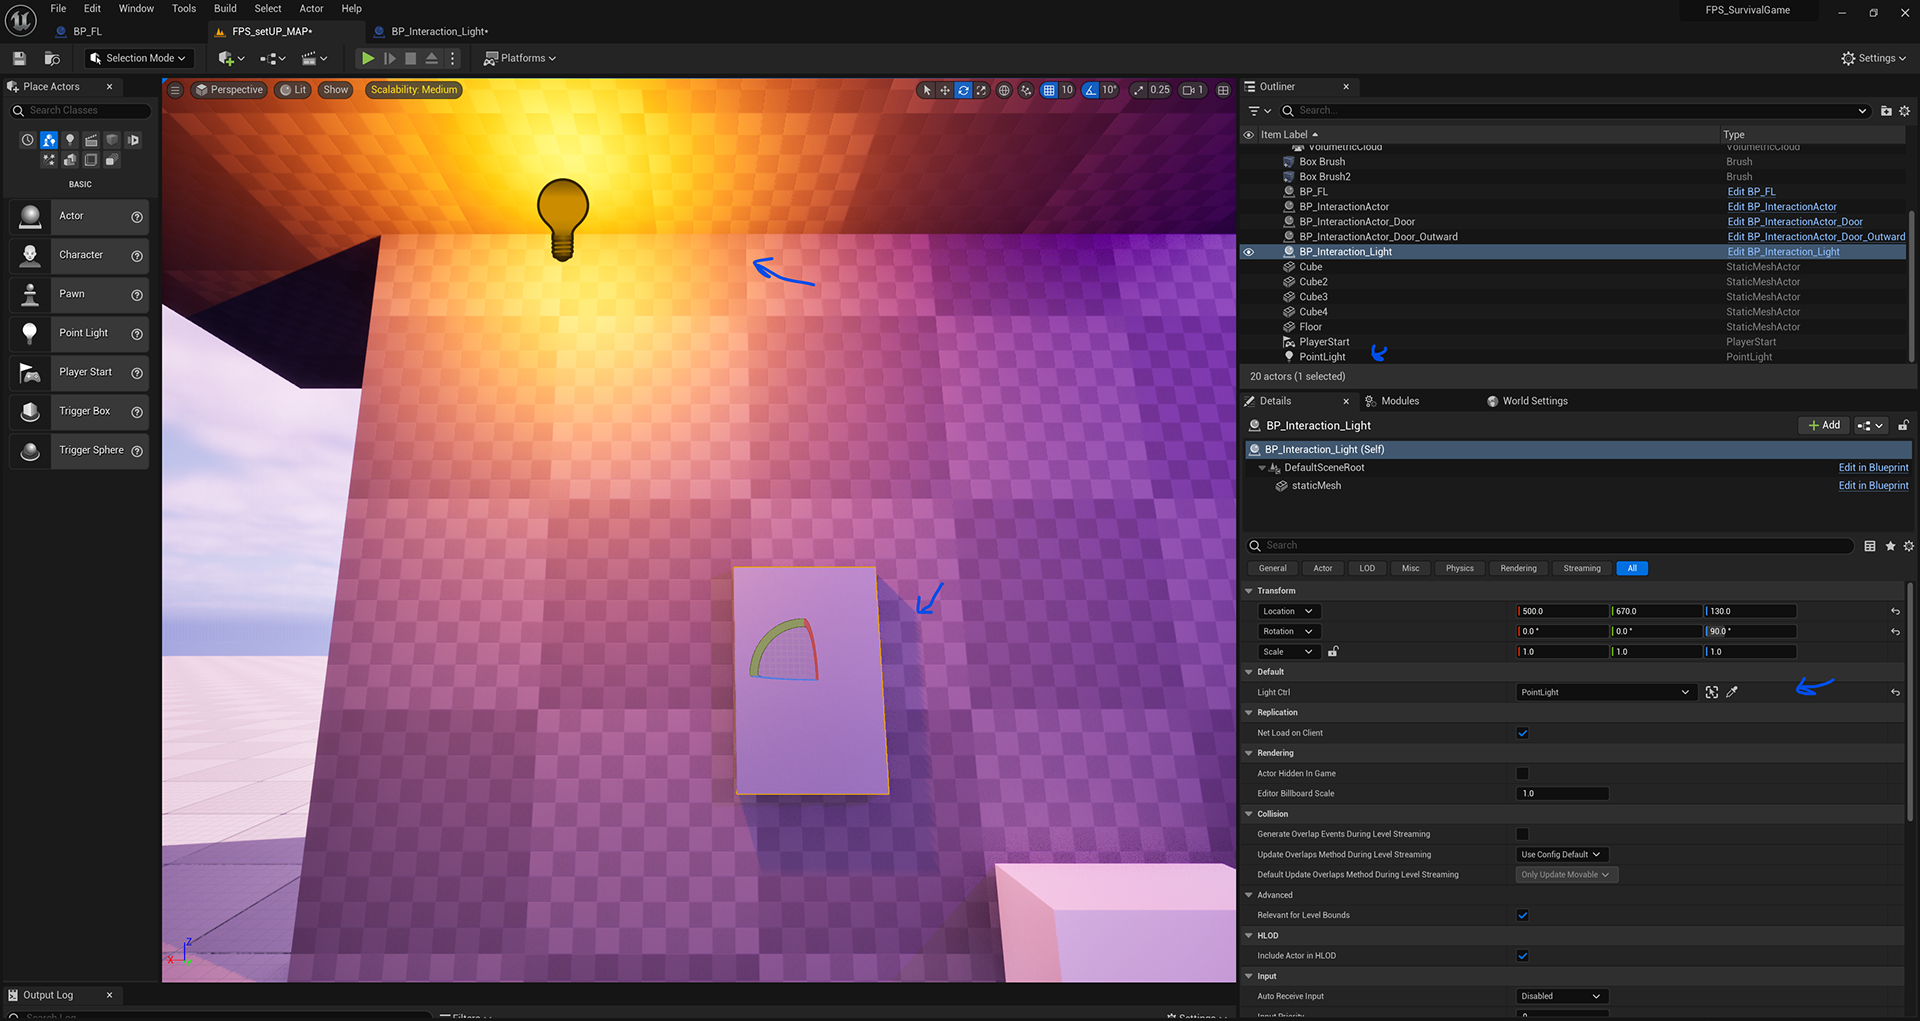
Interactive light switch -
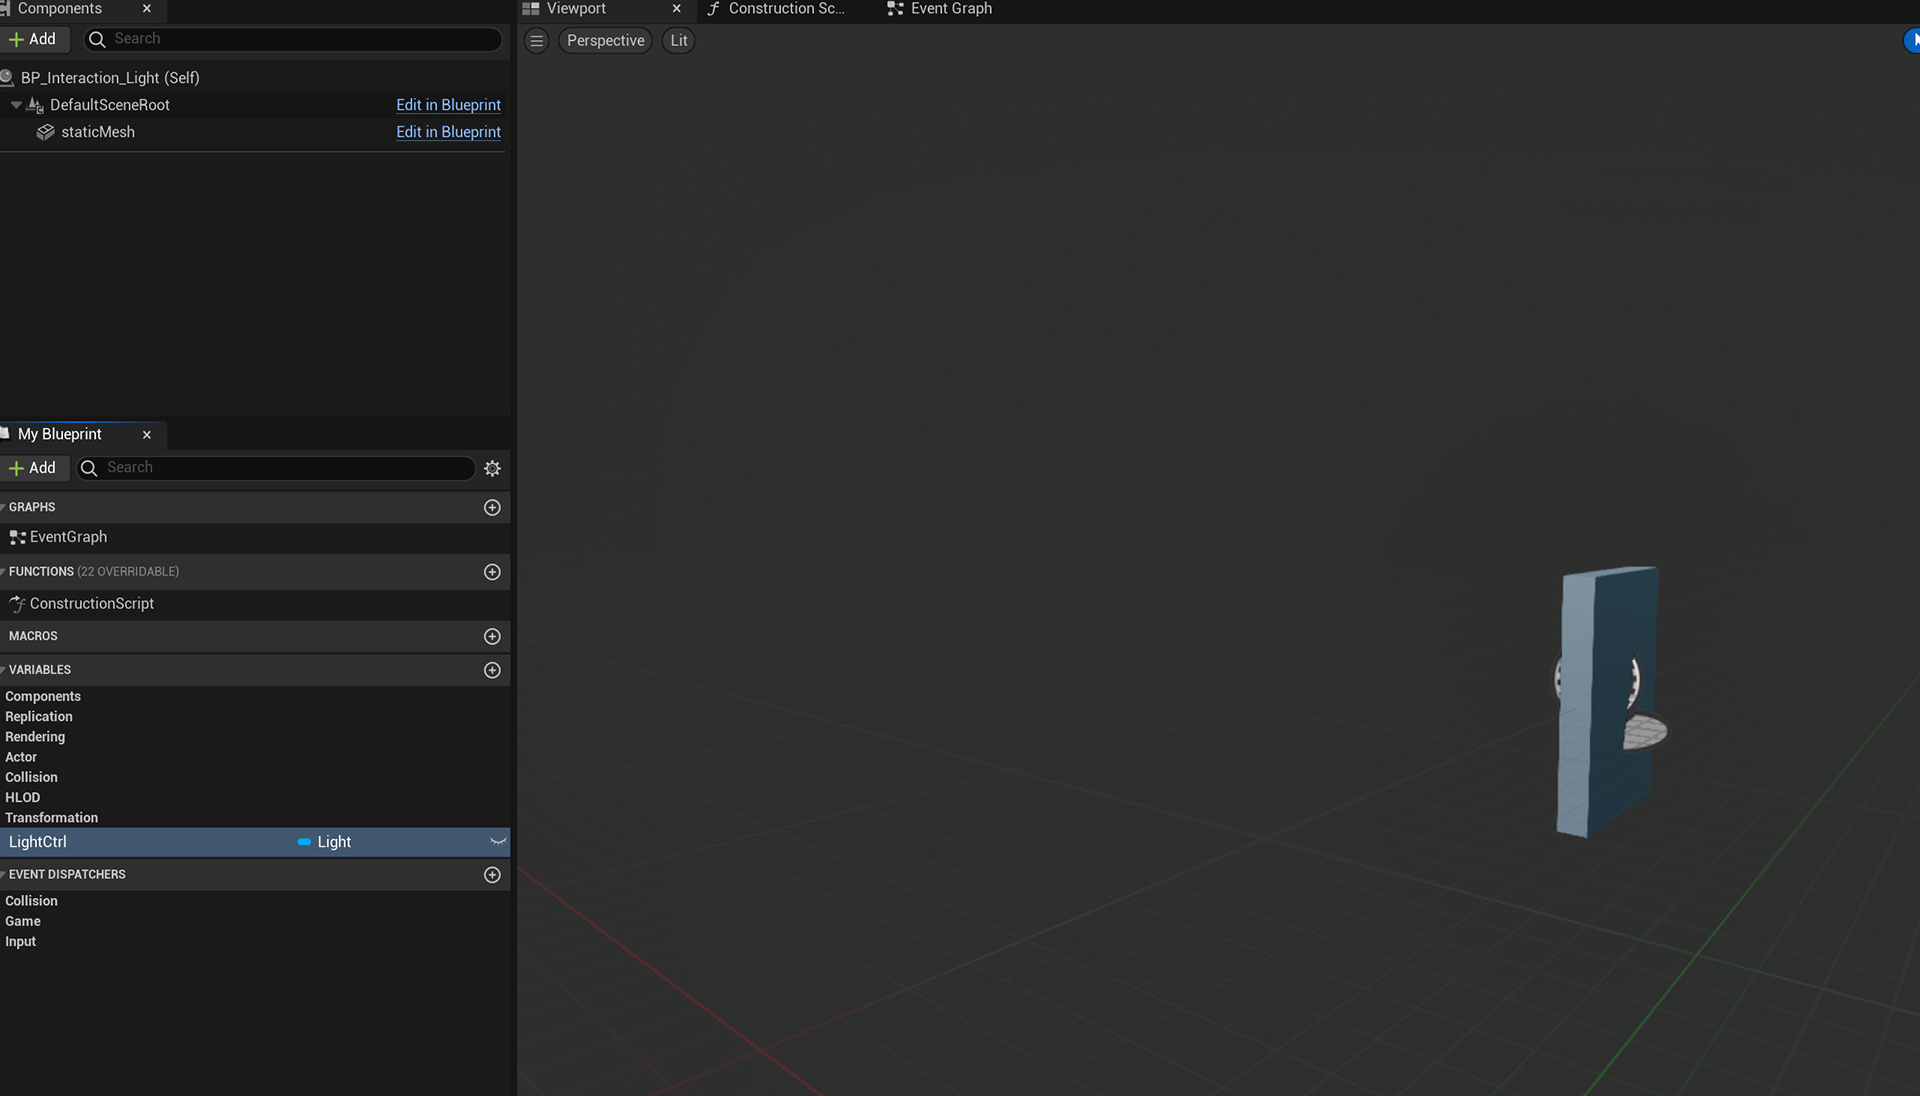
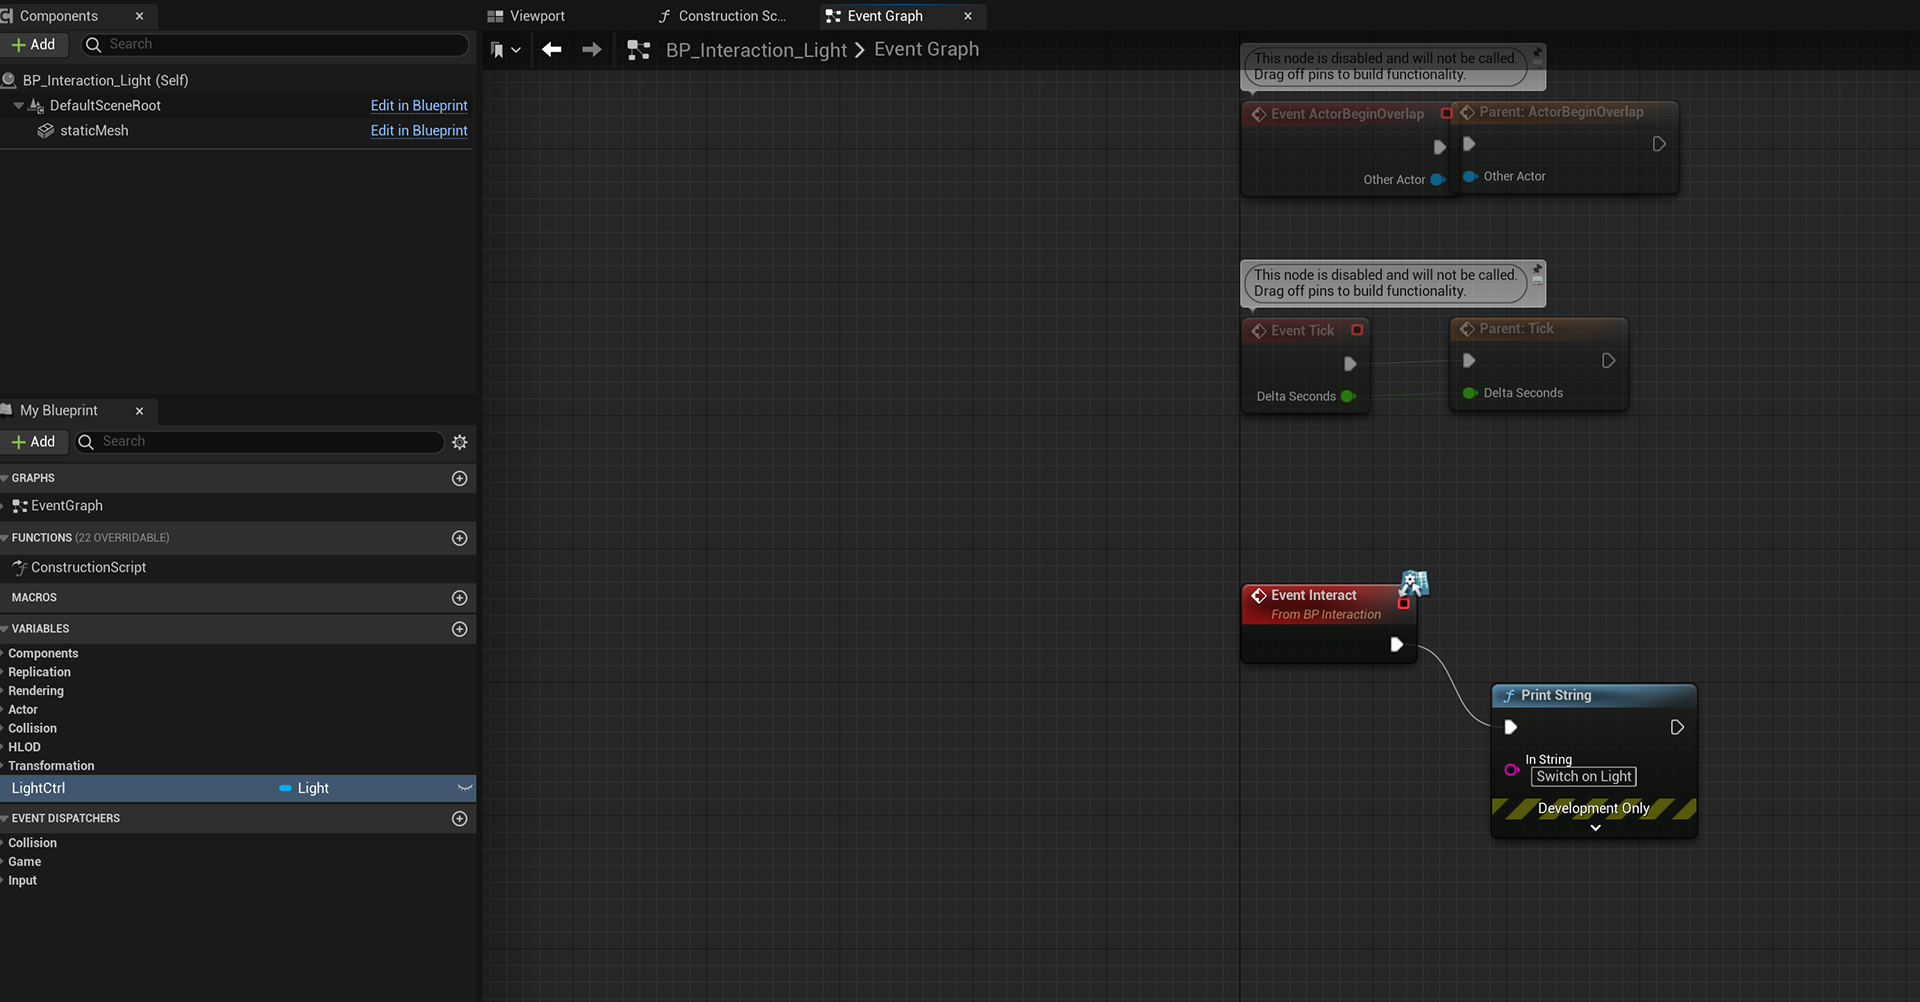
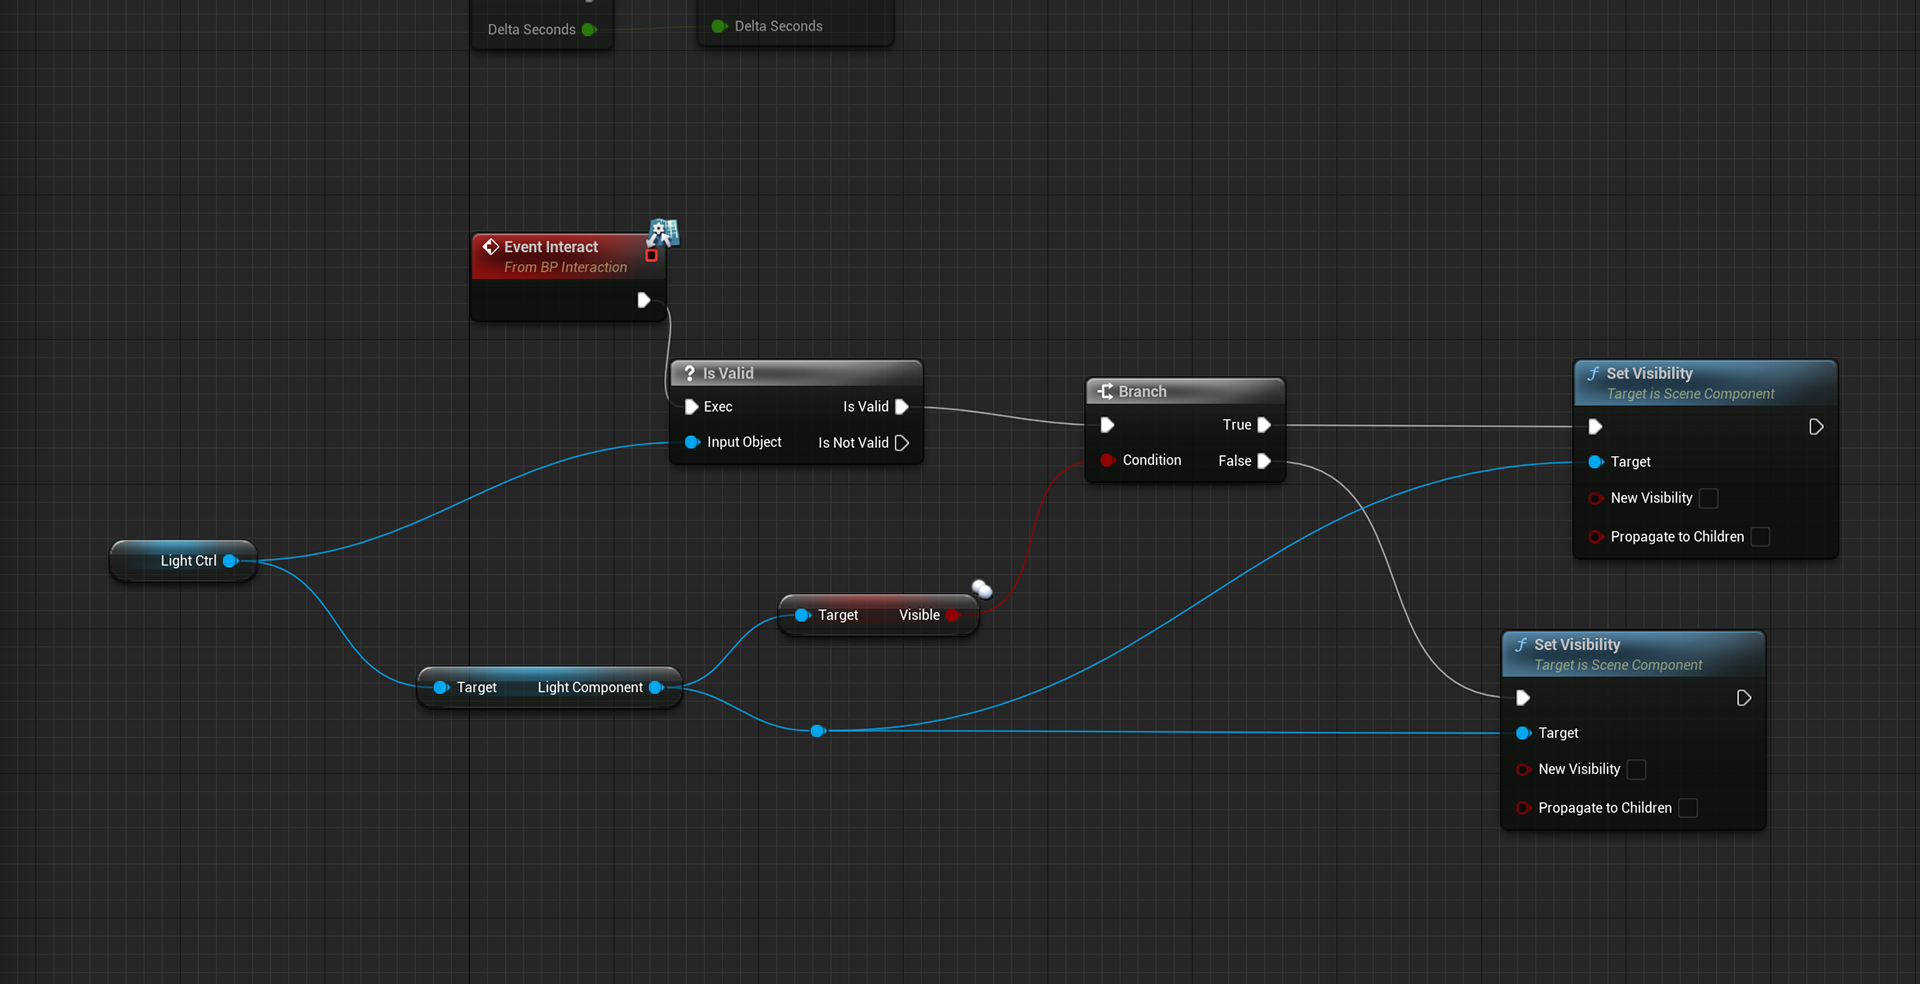
What I did was make temp light swicth , I will make my own soon. by the way had to make child class of the interactionactor. I had test by if it work by taking the interact event connect it to test if it works.
Then I had make light ctrl var, and make instance editable and then place light in world and attach it to light ctrl.
And then I wrote most of the code: which from interact , if is valid?(which its is) it will be true or false, if either one will be visbile and the other invisible. Visible is a condition true or false allowing it to dod (T or F) , which connected to light component( which is connected to light ctrl), linking it to the visibility function
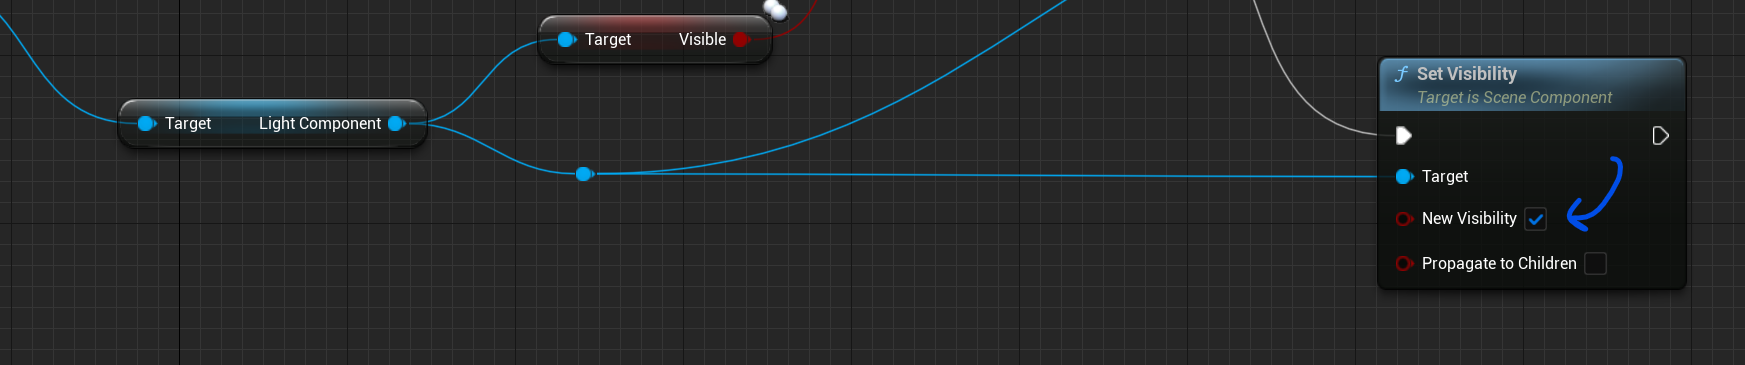
Then I had tick one of the new visibility, so I can click on and off to work
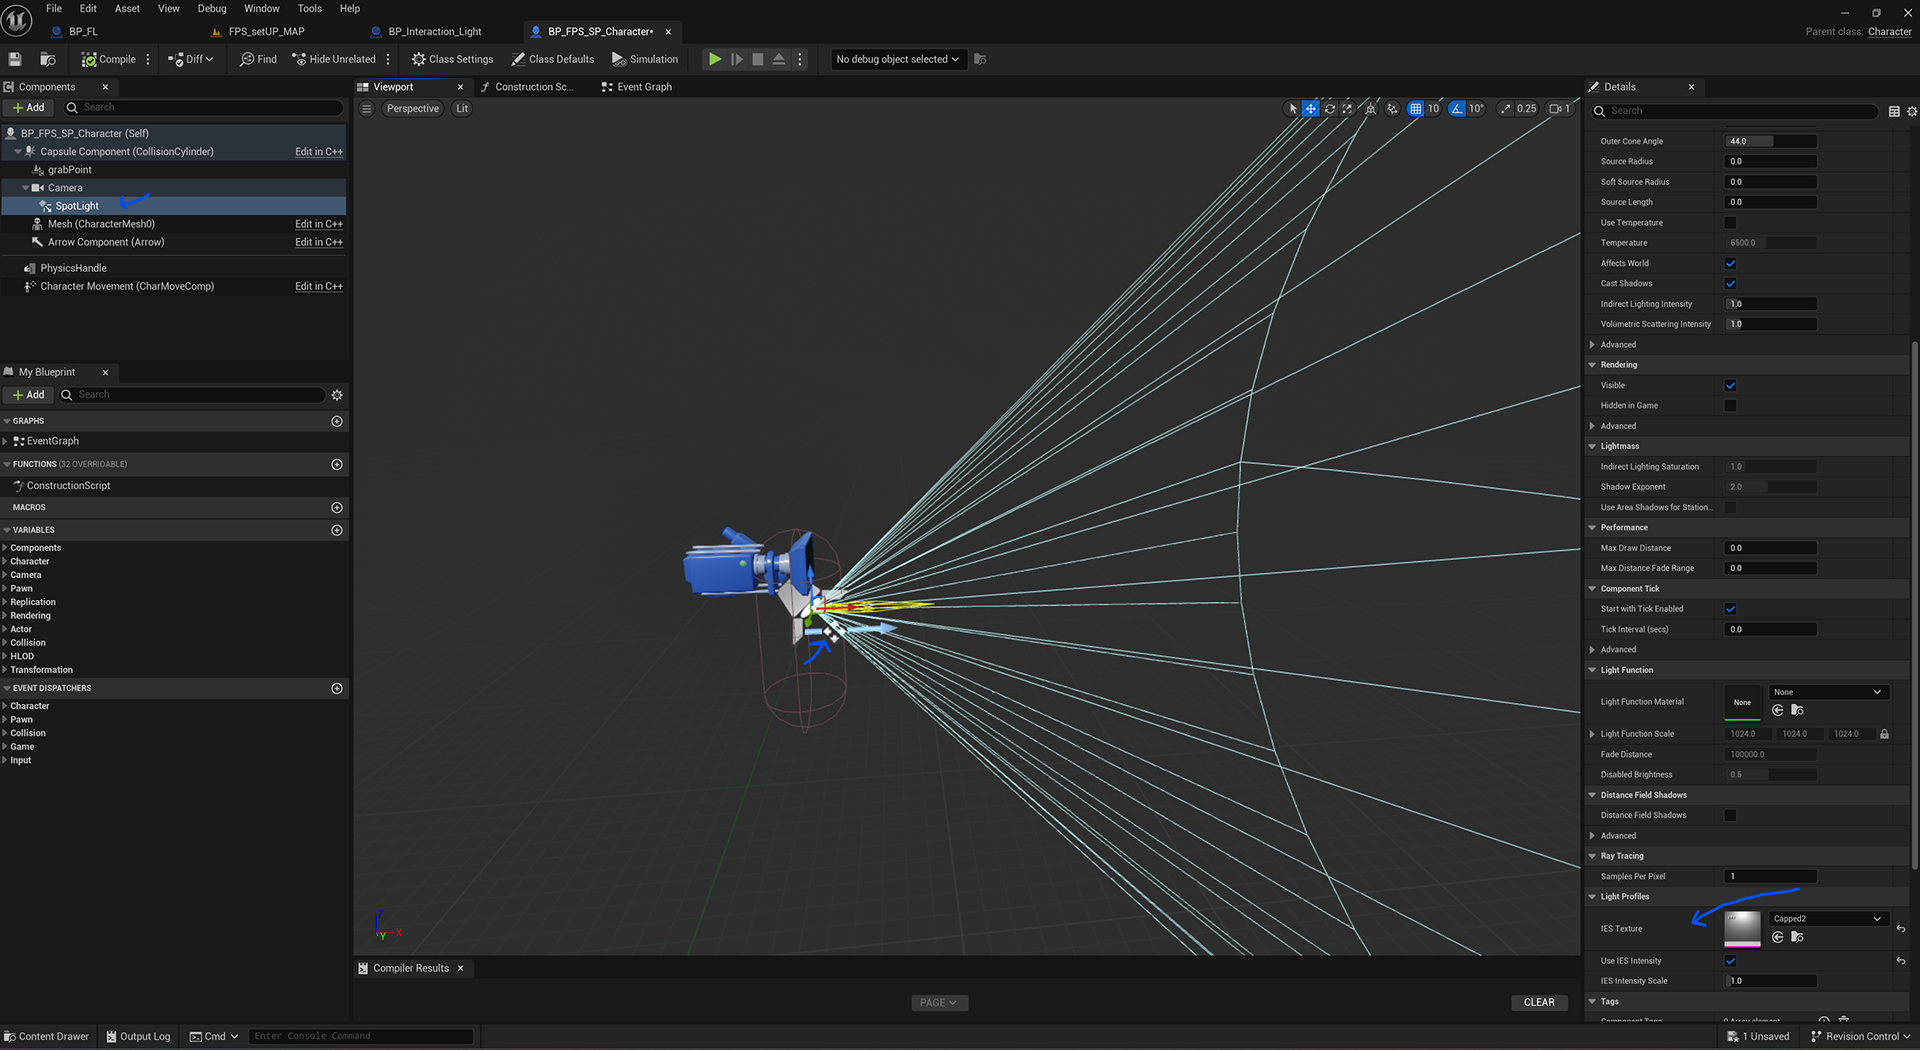

flash light
It was straight forward and and quick.
I had to obatain some files from market "Light Profile" for free by the way.
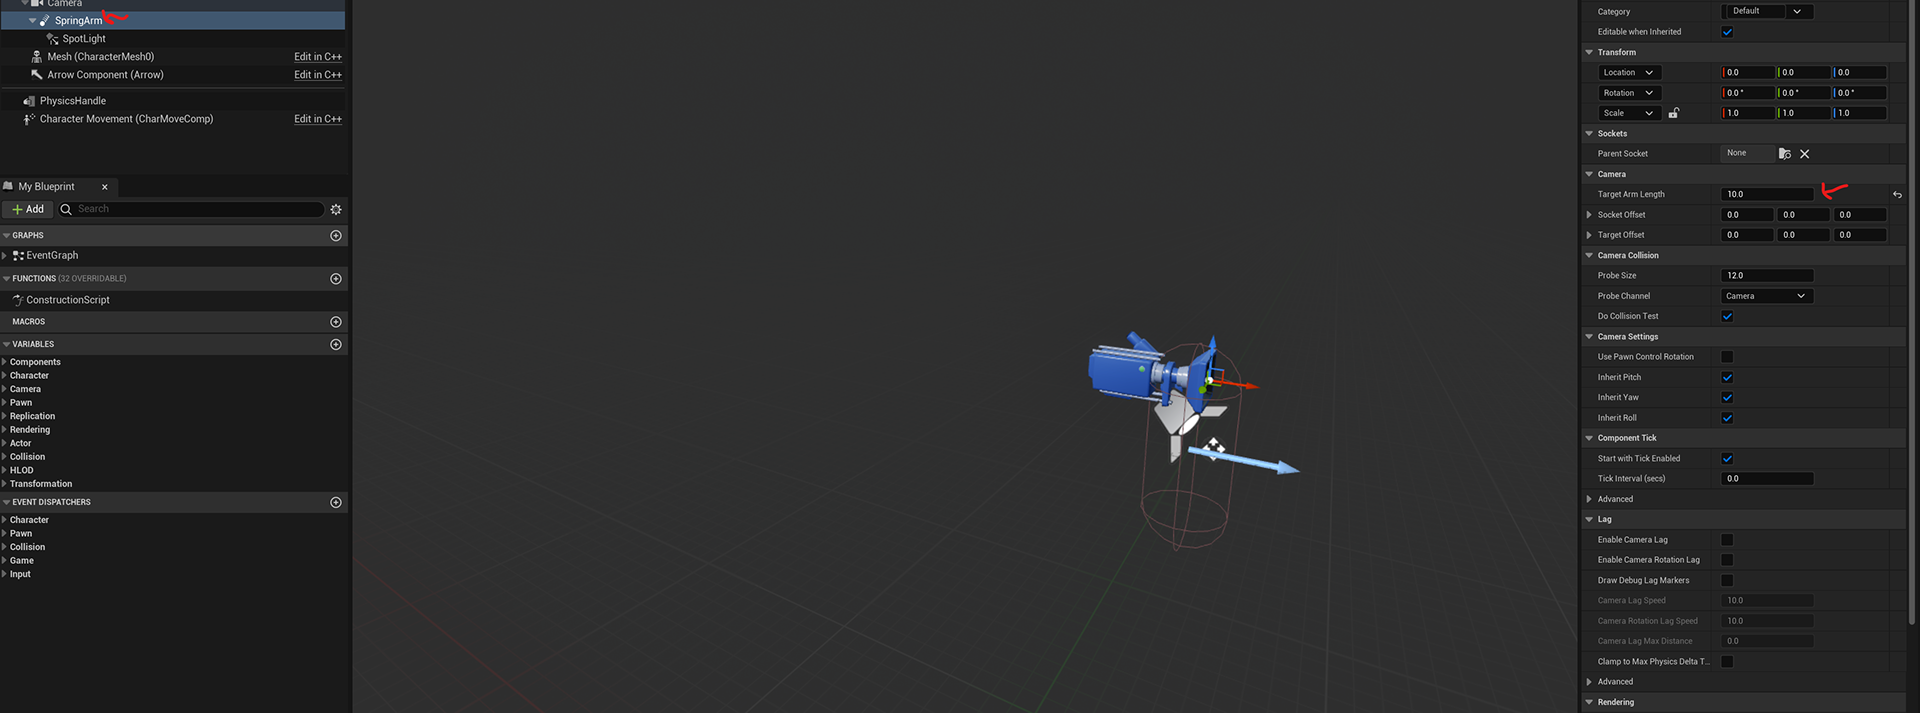
I made my own ttrigger button that uses the "H" key to open up flash light. Go to my charachter BP, place point light tweak abit, and then add the IE5 texture in iE5 texture light profile slot. Which changes the light design. Then include a spring arm and tweak it. Then set up blueprint which similiar to how the light switch bp code. The only different no "is valid?" and it is connected to IA event trigger.
The code self expantory, if true the light is visible if not it is invisble so not shown.
WEEK 12 - (April) 4/16/2024
Today I quickly made a Light switch model which I was suppose make last night but what I was doing took longer than I thought it will take. I built in 3ds max and place in my BP.
Then I worked on UI that when I walk up to anything it a text will show up and if I walk a text prompt will show up like Press certain key to do so and so.
I had one tiny issue, where i wanted to open and close widget one will show up if door open and close but I decided scrap that Idea because i tried couldnt do it plus the way decided to go was more simplier.
WEEK 12 - (April)4/17 to 18/2024
I was working on my inventory system. I chose go over video tutorial that I have used in the past to recreate for this project. I would of copy paste but that will proly lead to problems so I decided to start from the beginning to make my way to the end.
I had to figure how to set it up to fit my unreal build because I did mine little different like for example in this tutorial the line trace is in the inventory system but mine in controller bp instead. So I had to work around it.
Here is some videos of me testing out what I have done so far and BP code that come with it.
WEEK 13
This is the last week of the programming assignment project. I don't have time to continue the plan I have set out for the survival game, so I will stop production and give what I currently have. So I have been working on my evaluation and getting my documents ready to be sent.